Mastering Phoenix Framework

Mastering Phoenix Framework by Shankar Dhanasekaran is licensed under a Creative Commons Attribution 4.0 International License.
Dedication
This book is dedicated to my Mother & Father.
Mother - "Saroja Dhanasekaran" who loves me unconditionally and has been a great support in all seasons of my life.
Father - "Dhanasekaran Arunachalam" who lives in our hearts and is blessing our family from the Abode of Mt. Kailash.
Acknowledgments
First and foremost, I want to thank the Elixir Community for being a source of inspiration and support, without which this book series wouldn’t even exist.
My heartfelt gratitude to my brother Kadiresan who despite his hectic schedule gave me the necessary guidance, support and valuable feedback all through my journey.
My sincere thanks to my childhood friend and business partner Mohanraj who did the heavy lifting of managing our entire company’s operations while I was busy writing the book.
Some of the early readers of the book have been extremely helpful in providing me valuable feedbacks, constructive criticism and have spent a lot of time proofreading the text. Thank you John Hitz, Kyle Baker and Shan Huang for being incredibly helpful.
I am also thankful to Stuart Bain, Chase Wang, Ravern Koh, Heru Eko Susanto, Christopher Paterson, Christoffer Buchholz, Rodger Spring, Kishore Renangi, Uday Singh, Manu J, Azhaganandhan and Mohamed Mohsin for their valuable feedback.
I thank Manoj for being a source of inspiration and helping me focus during the journey of writing this book.
Lastly I wanted to thank my awesome family - my wife Devy, my son Nittin and my daughter Chaaru. Thank you for all your sacrifices, support, love and constant encouragement not only during the writing of this book but in all the endeavors that I undertake. I owe my gratitude to you all for eternity. You are the pillars of my success and life.
About the author
Shankar Dhanasekaran (@shankardevy) is an entrepreneur and a tech savvy programmer with more than a decade of experience in various web frameworks and technologies.
Shankar provides his global customers with a wide range of services including Web Development, E-Commerce Solutions, Server Management and Mobile Applications Development.
Shankar’s latest passion is designing and developing a decentralized swarm of microservices using Phoenix and Ruby on Rails for the community of Auroville where he lives.
On a personal level, he is inspired by Auroville Charter, A Dream and by the works of Derek Sivers, Charles Eisenstein and Osho to name a few. He is exploring his human potential through Gift Economy and Karma Yoga.
Shankar is best reached at shankardevy@gmail.com
Readers feedback
Found a mistake in the book or want to share you experience? I would love to hear from you. Contact me by direct email to shankardevy@gmail.com and I will get back to you as soon as I can.
Getting Started
Installation
In this section, we will install all the dependencies for the Phoenix framework including installation of Elixir and Erlang. We will cover installation instructions for macOS and Ubuntu/Debian here. However, Phoenix can run in several flavors of Linux as well as in Microsoft Windows. For installation instructions related to other platforms, check out the official installation page for Elixir and Phoenix.
Homebrew for macOS
We will be using the Homebrew package manager for installing all the Phoenix dependencies for macOS. So if you don’t have Homebrew installed, go to https://brew.sh and copy paste the install script on your terminal to install it. While Homebrew is not a prerequisite for Phoenix or Elixir, it helps us to install everything we need from the comfort of the command line.
Installing Elixir and Erlang
→ brew install elixirThe above command installs the latest stable version of Elixir along with Erlang. At the time of writing, this installs Elixir 1.4 which is what we need.
On Ubuntu and Debian
We need to install Erlang and Elixir individually.
Download the Erlang package and install it.
→ wget https://packages.erlang-solutions.com/erlang-solutions_1.0_all.deb
→ sudo dpkg -i erlang-solutions_1.0_all.deb
→ sudo apt-get update
→ sudo apt-get install esl-erlang
Now you can install Elixir using:
→ sudo apt-get install elixirInstalling Postgresql
Phoenix projects by default are configured to work with the Postgresql database, though, any database that is supported by the Ecto library will work. We can also use Phoenix without any database if we need to. In this book, we will use the Postgresql database as it enjoys good support in the Elixir community. In addition to being well supported it also has features not provided by other databases that we will require later.
→ brew install postgresqlOnce installed, Brew will print post installation notes as shown below:
...
To have launchd start postgresql now and restart at login:
  brew services start postgresql
Or, if you don't want/need a background service you can just run:
  pg_ctl -D /usr/local/var/postgres start
Be sure to run either of the commands shown above as per your need. Normally, I run brew services start postgresql so that I can forget about starting the Postgres server every time I restart my system.
Brew installs Postgresql and creates a default super admin. The name of this super admin is the same as the name of your currently logged-in system account name while the password is left empty. We could just go with that. However, for every Phoenix project that we create, we need to modify the configuration file to give the right credentials for the Postgres database.
Phoenix projects by default expect the Postgres admin username to be postgres with the password postgres. We can save a few key strokes for every new project by creating a Postgres user as expected by Phoenix. Login to Postgres shell by typing psql -d postgres on your terminal.
On the Postgres console, type the following commands to create a super user by name postgres with the password postgres.
postgres=# CREATE USER postgres;
postgres=# ALTER USER postgres PASSWORD 'postgres';
postgres=# ALTER USER postgres WITH SUPERUSER;
postgres=# \q
On Ubuntu and Debian
Install postgresql and postgresql-contrib through apt-get as shown below:
→ sudo apt-get install postgresql postgresql-contrib
Ubuntu installation of Postgres creates a default super admin in the name of postgres but doesn’t set the password. So you might want to set the password to postgres on your local machine to match the default settings for Phoenix projects. Login to Postgres shell by typing sudo -u postgres psql postgres on your terminal.
postgres=# ALTER USER postgres PASSWORD 'postgres';
postgres=# \q
Nodejs
Phoenix projects by default are setup to use Brunch — a nodejs tool for the management of asset files. In the development environment, all static files like images, fonts, CSS and Javascript files get processed by Brunch before Phoenix serves them. In the production environment we can use the precompiled files from our development machine without having to use Brunch on the production server.
Even in the development environment Brunch is not a hard dependency — meaning if we don’t want Brunch we can simply remove a simple configuration line in our project and still have Phoenix continue to work. Or we could replace Brunch with other tools like Webpack if we prefer. We will install Nodejs as we will use Brunch for managing the asset files in the development environment.
→ brew install node→ curl -sL https://deb.nodesource.com/setup_6.x | sudo -E bash -
→ sudo apt-get install -y nodejsinotify-tools (only for linux)
In the development environment, Phoenix provides live reloading feature that automatically refreshes our browser tabs whenever we change the source code in our project. On linux machines, this feature is dependent on inotify-tools while it’s not needed on macOS or windows.
Install inotify-tools using the command shown below:
→ sudo apt-get install inotify-toolsHex Package Manager
Hex is the package manager for Elixir libraries. It allows us to upload/download Elixir libraries from the https://hex.pm website.
→ mix local.hexRebar - Erlang Build Tool
rebar and rebar3 are Erlang build tools for compiling and testing Erlang applications. Since our Phoenix project will depend on some of the Erlang libraries, we need Rebar to be installed on our machine.
→ mix local.rebarmix is a command line binary that gets installed as part of the Elixir language installation. Since this is a sub-command of mix, a binary installed in our system as part of installing Elixir, the above command to install hex and rebar is same for all OS.
Phoenix Project Generator
And finally to install the Phoenix project generator, run the following command:
→ mix archive.install https://github.com/phoenixframework/archives/raw/master/phx_new.ezIt’s important to note that the above command installs the Phoenix project generator and not Phoenix itself. After installing the Phoenix generator, all that we get is a new sub command to mix, to create a new Phoenix project. The Phoenix framework itself gets installed within our project directory under the deps folder when we run the mix deps.get command which we will see shortly.
Validating the Installation
Run the following commands on the terminal to confirm you have installed the correct version of Elixir, Phoenix the required dependencies.
→ elixir -v
Erlang/OTP 19 [erts-8.2] [source] [64-bit] [smp:4:4] [async-threads:10] [hipe] [kernel-poll:false] [dtrace]

Elixir 1.4.0
Elixir version should be 1.4.0 or higher.
→ mix help | grep 'phx.new'

mix phx.new           # Creates a new Phoenix v1.3.0 application
Phoenix version should be 1.3.0 or higher.
→ psql --version

psql (PostgreSQL) 9.6.1
PostgreSQL version should be 9.4 or higher.
→ node -v

v7.2.1
Node version should be 5.0.0 or higher.
Code Editor
For a good developer experience, we will need a code editor that supports syntax highlighting and auto code completion for Elixir. There are several text editors that support the Elixir language. My personal choice is the Atom editor.
If you are a die-hard Emac or Vim fan, you might want to check out Spacemacs. For the rest of us, Atom works as a good editor for working with Elixir projects.
If you go with Spacemacs, do install the excellent Alchemist package for Elixir. It provides syntax highlighting, code completion and several other features that help your development workflow with Elixir projects. If you are on Atom, you can install language-elixir and atom-elixir packages to do similar stuff in Atom. The Atom packages can be installed from the terminal with a single command.
→ apm install language-elixir atom-elixirIf you are not a fan of either of these editors, pick up one that suits your taste, but make sure that it at least supports syntax highlighting for Elixir.
Create a New Phoenix project
In this section, we will quickly run through the steps required to create a new Phoenix project and add a new page to it. This exercise is to quickly glance at the various moving parts of Phoenix and not to master them. So don’t worry if you find it difficult to understand the code or if all this seems too fast paced. We will spend adequate time in the rest of the book to build understanding.
Let’s create a new Phoenix project using the mix generator command phx.new. It is the new sub command to mix binary that gets added when we installed the Phoenix generator in section 1.1.8.
Open up your terminal and run the following code.
→ mix phx.new learn_phoenixThis command creates a new folder learn_phoenix in your present working directory. In my case, my pwd is ~/pio and the new Phoenix project is initialized in ~/pio/learn_phoenix folder.
You will be prompted to either download the dependencies or skip them as below.
Fetch and install dependencies? [Yn]Choose "Y" to download the dependencies. The installer will then proceed to download all required Elixir libraries from https://hex.pm (the official package manager site for Elixir projects). It will also download nodejs packages from https://npm.org, specifically Brunch and its friends which are used for assets management in Phoenix.
* running mix deps.get
* running npm install && node node_modules/brunch/bin/brunch build

We are all set! Run your Phoenix application:

    $ cd learn_phoenix
    $ mix phx.server

You can also run your app inside IEx (Interactive Elixir) as:

    $ iex -S mix phx.server

Before moving on, configure your database in config/dev.exs and run:

    $ mix ecto.create
For now, it will suffice to know that the mix phx.new command has downloaded several Elixir libraries in your project’s deps folder and also downloaded several nodejs packages in assets/node_modules.
It’s important to note that all dependencies are installed in deps folder inside our project folder including phoenix i.e., the Phoenix framework is installed locally per project and not system-wide.
|
However, the Phoenix new project generator that we installed in the previous section is a system-wide installation that gives us the command mix phx.new.
The contents of the assets/node_modules directory is too big to show here in full and not very relevant to what we are learing.
Now run mix phx.server from inside the project directory.
→ mix phx.serverThis will take some time as Elixir compiles all the Elixir source code from our project and its dependencies into .beam files. Once compiled, you will see the following message on your terminal.
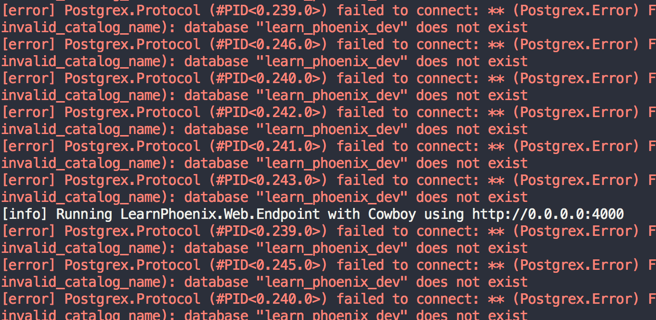
There are several error messages and then a line that reads
[info] Running LearnPhoenixWeb.Endpoint with Cowboy using http://0.0.0.0:4000
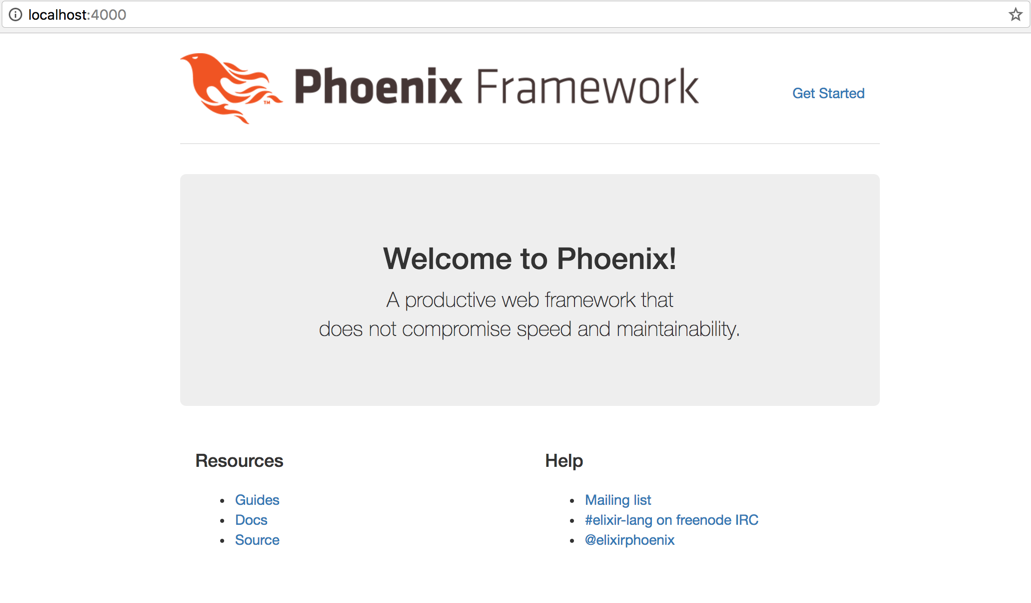
Let’s ignore those errors for now and open our browser to http://localhost:4000. We will be greeted with Phoenix welcome page:
Now back to the errors that we saw in the terminal. Our application is trying to connect to a Postgres database which doesn’t exist.
Let’s fix this error. Hit CTRL+c twice in the terminal running Phoenix server to stop it. Open config/dev.exs file in your editor and check if the Postgres login credential given are correct and Phoenix has the privilege to create a new Postgres database.
config :learn_phoenix, LearnPhoenix.Repo,
  adapter: Ecto.Adapters.Postgres,
  username: "postgres",
  password: "postgres",
  database: "learn_phoenix_dev",
  hostname: "localhost",
  pool_size: 10
If our local PostgreSQL username is postgres and password is supersecret, we need to change the database configuration in config/dev.exs file (shown above) to reflect the same.
# Change this only if your credentials are different
...
  username: "postgres",
  password: "supersecret",
...
However, if you followed the instructions to create Postgres superuser as previously explained in section 1.1.3, you don’t have to make any change in the config/dev.exs file.
After the database connection details have been configured correctly, we can now run mix ecto.create to create a database for our Phoenix app and then run mix phx.server. This time we won’t see those db connection errors as our Phoenix application is now able to connect to the database.
→ mix ecto.create
→ mix phx.server
Phoenix File Structure
Our learn_phoenix directory looks like this:
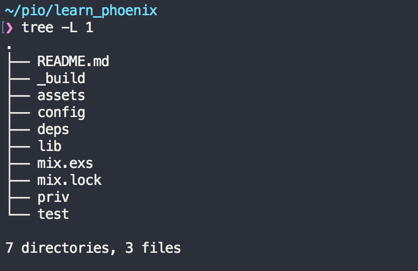
Assets and Priv
The top level directory assets contains css, js, images, fonts and any other static files within respective sub folders. While the assets directory contains the original source code for our assets, the priv directory contains the compiled version of the same asset files. The priv directory is also the place where translation files and database migration files get stored. We will dig into these files more in the coming chapters.
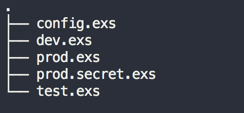
Config
The config directory contains files that store various configurations for our project like the database credentials, port number of the web server etc. Phoenix projects by default are configured to support three different environments — dev, test, prod.
Configuration files for each of these environments are present in the config directory as shown below:
Test
The test directory contains the various test code for our projects. We will create files in this directory when we start with Test Driven Development.
Lib
The lib folder contains our project’s main code.
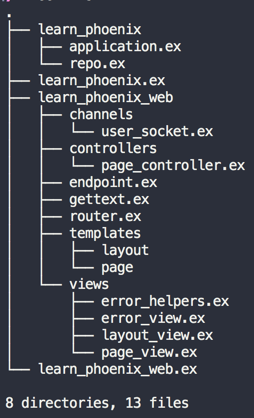
We will spend most of our time within the lib directory. All code that is specific to our project belongs here. This directory contains two subdirectories: first with the same name as our project and the second with a web suffix to our project name i.e., lib/learn_phoenix and lib/learn_phoenix_web
The learn_phoenix_web directory is the home of the web interface specific code for our project.
That is, the learn_phoenix_web directory contains code for starting web server, defining routes, controllers, HTML templates etc.
All non-web related code go into the lib/learn_phoenix directory. This includes the context and schema files for our project. We will look into these in detail in Chapter 3.
|
Module names are nested in Phoenix just like the folder structure. From now on, we will refer to long module names such as |
Control Flow in Phoenix
We haven’t done anything with our new Phoenix project yet. Let’s try to understand how the welcome page works and then mimic the same to create a new page at http://localhost:4000/about.
My preferred way to read an MVC web app is to start at its router file. This approach makes it easy to understand the control flow of various paths.
The router file for our Phoenix project is at learn_phoenix_web/router.ex.
defmodule LearnPhoenixWeb.Router do
  ...
  scope "/", LearnPhoenixWeb do
    pipe_through :browser

    # => Focus just on this line below and ignore everything else
    get "/", PageController, :index (1)
  end
  ...
end| 1 | Router definition for homepage / |
If you are familiar with any MVC framework, you might have at least guessed what this line of code means:
get "/", PageController, :indexIt basically says, for any request coming to / path (i.e., homepage), call the index function of the PageController. The controller functions that are mapped in the router for a specific path are also called controller actions.
Our PageController defined at learn_phoenix_web/controllers/page_controller.ex looks like this now:
defmodule LearnPhoenixWeb.PageController do
  use LearnPhoenixWeb, :controller

  def index(conn, _params) do
    render conn, "index.html"
  end
end
The index action receives the control from router and it renders the index.html file.
Again if you are coming from Rails or another MVC frameworks, you might guess that this file exists in the views folder. However, it turns out that our learn_phoenix_web/views folder does not have any html template files. Rather it contains a file called page_view.ex which defines PageView module.
Looking around in the other generated directories, it’s easy to find the index.html.eex. It lives inside the directory learn_phoenix_web/templates/page/. The contents of the file also confirms that it’s the same as the one that we see in the homepage.
|
Naming conventions
The render function within the
|
At this point it might be difficult to understand the purpose of PageView module as it is almost empty.
defmodule LearnPhoenixWeb.PageView do
  use LearnPhoenixWeb, :view
  # nothing here
end
While it’s tempting to conclude that PageView does nothing, that is not correct. To understand it, let’s change the render function call in our PageController module as below:
defmodule LearnPhoenixWeb.PageController do
  use LearnPhoenixWeb, :controller

  def index(conn, _params) do
    render conn, "index_new.html" # Change the template name
  end
end
Now if we visit the homepage, we are obviously greeted with an error. This error is however helpful to understand what is happening under the hood.
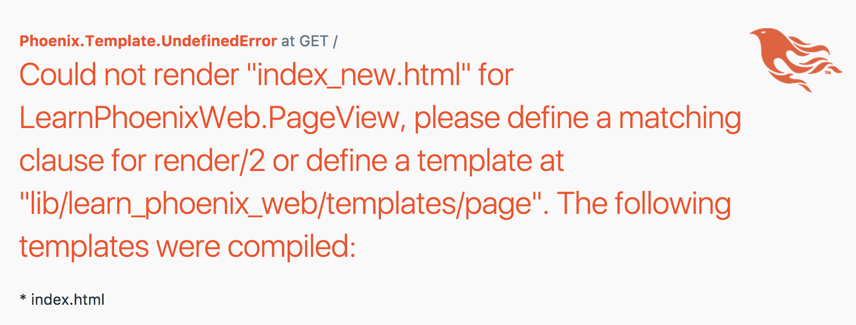
A layman’s translation of the error message is below:
|
It’s common to see function names referred to in the format The number after |
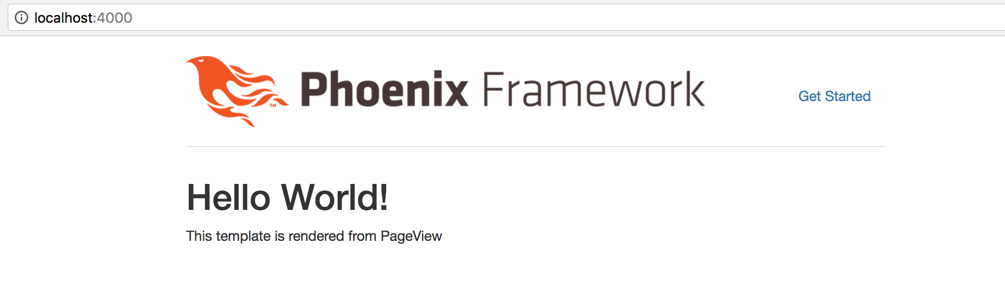
Now instead of creating a new template index_new.html.eex in the template folder, let’s create a new function render/2 in our PageView module as below:
defmodule LearnPhoenixWeb.PageView do
  use LearnPhoenixWeb, :view

  def render("index_new.html", _) do
    {:safe, """
    <h1>Hello World!</h1>
    <p>This template is rendered from PageView</p>
    """}
  end
end
Now going back to our homepage, we should see the new message displayed as given in our PageView module.
We will now remove this render function from the PageView module and add just the html to a new index_new.html.eex file inside learn_phoenix_web/templates/page. Back to the browser, the result is the same.
So what is happening here? It’s Phoenix magic powered by Elixir’s metaprogramming feature.
When we call render(conn, "index_new.html") from our PageController we are calling a function defined in the Phoenix.Controller module. It then calls render("index_new.html", _) defined inside our PageView module.
But we have just removed this function from the module. So it’s not there to be called and we expect an error.
Here is the nice little trick that Phoenix does.
During compilation process, it looks for any template files in the template folder ending in .eex suffix.
It then takes out the contents of each of these files and creates a render/2 function in the respective View modules similar to what we have created.
To summarize, the sequence of events happening when you visit http://localhost:4000/ are:
-
The router checks if the incoming request path is for
/and calls theindexaction in thePageControllermodule. -
The
indexaction on the controller calls thePhoenix.Controller.render(conn, "index.html")function. Since the modulePhoenix.Controlleris imported in all controllers, we are calling the functionrenderwithout the module name prefix. If you are new to Elixir and don’t know whatimportis, you will learn it in the next Chapter. -
Phoenix.Controller.render/2calls a similarly namedrender/2function inPageViewcontaining the compiled code from the template fileindex.html. The result of this function call is then displayed on the browser.
Now armed with this knowledge, let’s create a new page at /about. Based on knowledge gained so far, we know we need to do the following to complete our task:
-
Router
-
modify router to map the new path
/aboutto a function in aPageController. Let’s call this functionabout
-
-
Controller
-
create a new function
about/2in our controller. It should call therender/2function with the template nameabout.html
-
-
View
-
since
PageViewmodule already exists, we don’t have to create it again. -
define a new template
about.html.eexinsidelearn_phoenix_web/templates/pagefolder and add the HTML content.
-
Let’s modify the router as below to create a static page at http://localhost:4000/about.
scope "/", LearnPhoenixWeb do
  pipe_through :browser

  get "/", PageController, :index  # => Add this line below.
  get "/about", PageController, :about
end
Modify our PageController and add a new function as below:
defmodule LearnPhoenixWeb.PageController do
use LearnPhoenixWeb, :controller
(...)
def about(conn, _params) do
render conn, "about.html"
end
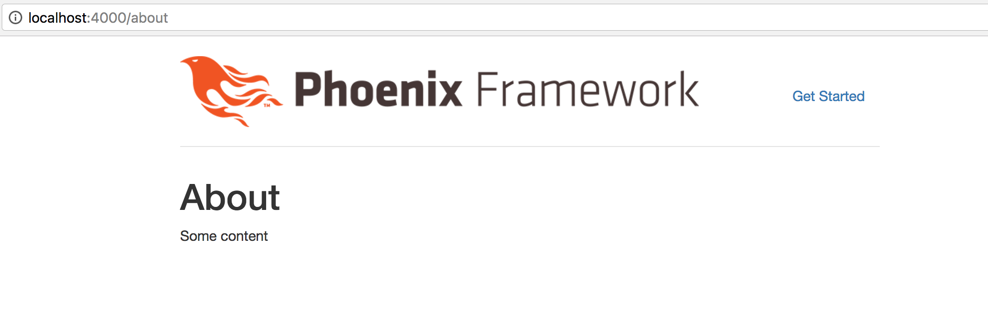
endInside our learn_phoenix_web/templates/page, create a new file about.html.eex and add some HTML data.
<!-- web/templates/page/about.html.eex -->
<h1>About</h1>
<p>Some content</p>
Now back to the terminal and run mix phx.server if it’s not already running. Let’s open http://localhost:4000/about in our browser to see the message we added in our template file.
We have now learned how the request for a web page flows through various parts of our Phoenix app and how to create a new static page in our application.
Summary
Let’s recap on the key concepts that we learnt in this chapter.
We learnt to install the various dependencies of the Phoenix Framework for macOS & for Ubuntu/Debian OS. We also installed the Phoenix project generator which we use by issuing the command mix phx.new projectname
As with any other Elixir project, we learnt that the Phoenix framework is installed as one of the dependencies of our project inside the deps folder. Hence all Phoenix projects are self-contained with a version of Phoenix installed inside each project.
We also configured the database connection, got to know a few mix tasks and understood the file structure of Phoenix.
Then we moved on to understanding how a page request is served by Phoenix. We did this by looking at the various interconnected critical components of our project including the Router, Controller, View and Templates.
Along with this, we also understood the inherent naming conventions and how Phoenix automatically identifies and links Controllers, Views and Templates.
Finally, we flexed our muscle by creating a new static page and getting it served successfully.
Just enough Elixir
This chapter is focused on learning the minimal amount of Elixir required to understand the code in a Phoenix project. We will quickly run through various basic Elixir concepts using the Phoenix project created in Chapter 1 to validate our learning. If you are already familiar with Elixir, you might want to skip this chapter or just scan through it quickly.
Down the rabbit hole
From my own experience and talking with fellow developers having mixed levels of experience in web development, here is what happens when someone comes to learn Phoenix.
HappyXDeveloper reads somewhere on the internet that Phoenix is super awesome! HappyXDeveloper now wants to learn Phoenix. (Replace X with Rails, Django, Laravel or any other awesome framework.)
Here is a typical journey of such a developer. You might need to zoom in to read all those text.

I have first-hand experience progressing through this maze, though I started learning Elixir before Phoenix. Learning through the maze can be at times daunting and unpleasant.
However, it need not be. The first step is to understand that while Elixir stands on top of the giant Erlang and has all those cool killer features like metaprogramming, you are probably not required to write metaprogramming in most cases.
OTP is yet another killer feature. You might have heard people calling it "battle tested", but again you are not going to launch a missile on the first day of your job. While these features are surely the differentiators and something that you should learn, do yourself a favor by not tackling them on the first day of your journey with Phoenix.
Metaprogramming
Elixir has powerful metaprogramming features. This allows you to create Domain Specific Languages (DSLs). Frameworks like Phoenix make extensive use of meta programming in Elixir. For example, Phoenix router has several DSLs for defining routes.
Learning meta programming is not an overnight task. Even if you understand the concepts and syntax behind metaprogramming, it takes a lot of practice and experience to use it appropriately. However, the good news is that as a developer using Phoenix, you only need to grok a very small subset of metaprogramming and you don’t have to do it on a day to day basis.
In fact as a developer using the Phoenix framework, you will reap the benefits of the built in meta programming, without having to know how it works. The only time you may want to do jump into hard core metaprogramming is when you want to create a framework like Phoenix itself.
OTP stuffs
Apart from the metaprogramming feature in Elixir, the bag full of tools and concepts from Erlang OTP available in Elixir is yet another challenge for newbies to understand.
The Process, Agent, Genserver, Supervisor are a whole new paradigm shift for any programmer diving into Elixir. These concepts don’t exist in any of the mainstream web programming language. As a result the programmer is not just learning a new syntax, but is undergoing an entire overhaul in the way they think.
Again, you are not likely to use OTP tools for every single problem you solve in Phoenix. The Phoenix framework depends heavily on OTP, but not all your applications using Phoenix are likely to use the OTP tools heavily. In fact, you can even build a moderately complex application without knowing the abc of OTP. When you are comfortable playing with Phoenix, you can go back to OTP and learn it inside out.
Learning Path
Here is what I recommend as the learning path.
-
Play with IEx
-
Learn the basic data types and operators
-
Write simple Elixir modules and functions
-
Understand the basic control flow structures
-
Understand the Mix tool
-
Learn how Pattern Matching works
-
Think in Pipe operator
-
Learn the
use,aliasandimportmacros -
Learn the basics of OTP Supervisors and Observer
The above topics should cover you in most cases when working as a Phoenix developer. When you are comfortable writing simple projects in Phoenix, you may then venture into learning in-depth metaprogramming, OTP in Elixir and even Erlang itself.
In the following sections of this chapter, you will learn Elixir using the learning path outlined above.
Setting the right expectations
The fact that you are holding this book already shows you are interested in learning Phoenix and Elixir and that I don’t have to convince you to learn either. However, when I started learning Phoenix, I became tired of a few things and began to question if the framework would really be productive for me and/or work as claimed:
A productive web framework that does not compromise speed and maintainability.
In fact, as I realized later, the issue I was facing was not with the framework. It was a question of mindset and a need to accept these three principles:
-
Elixir is functional. Don’t expect OOP features.
-
Explicit is better than implicit. Don’t hide the intent to save a few keystrokes.
-
There is a need to retune visual scanning of code. The code is not difficult to read. It’s just that you are not used to this pattern of code.
This short section is to set the right kind of expectations when approaching a Phoenix project. This is especially important if you are coming from an OOP background like Ruby and Ruby on Rails.
Elixir is functional
For those coming from OOP background, remember that Elixir is a functional programming language and you cannot expect things like
 user = User.create("user@example.com")
 user.send_confirmation_email
Instead, you will normally find something like below:
 user = User.create_user("user@example.com")
 User.send_confirmation_email(user)
When I first looked at this code, my immediate reaction was why should I type User twice? Why can’t I call the send_confirmation_email method on the user object?
As a functional programming language Elixir doesn’t have objects which are a mixture of data and behavior. In Elixir, you have to keep the data and the functions separate and there is no way data can come with a set of related functions.
So in the Elixir code above, User is a module, a namespace, which holds the user related functions. The function send_confirmation_email is created inside this module because it does something related to a user. However, it doesn’t have information about the specific user to whom it will send the email. This information has to be supplied at the time the function is called.
So when we say, Elixir is functional and that there are no objects, what we are effectively saying is that you can’t do "hello world".length in Elixir i.e., you can’t encapsulate data and the actions that can be executed on that data into a single object. In Elixir, data and functions live separately but go well together.
Explicit is better than implicit
If you are coming from Ruby on Rails, do expect to type more than you are used to in your Rails project. Things are verbose in Elixir and consequently in Phoenix. Explicitness is encouraged and valued.
Take for example the simple index action of the PageController that we saw in the previous chapter.
def index(conn, _params) do
  render conn, "index.html"
end
If the same code is written in Ruby on Rails, it would be
def index
end
Comparing both versions, the Phoenix version is explicit. The index action of Phoenix explicitly says that
-
the function gets
connas the first argument and that it needs this value for returning the output. -
the function doesn’t need the second argument and marks it so by prefixing the argument name with
_ -
the function renders a template by name
index.html
While it’s more typing than its Rails counterpart, the above information is more valuable because its meaning is clear at a glance.
Tune your visual
Because of language features such as pattern matching and pipe operators and because the framework values explicitness, you need to recalibrate your eyes to scan through the code easily. Here is a simple controller action for updating a cart in an ecommerce site. If you are not used to pattern matching and pipe operators, this code might look complex.
def update(conn, %{"order" => cart_params}) do
  cart = conn.assigns.cart
  case Sales.update_cart(cart, cart_params) do
    {:ok, cart} ->
      conn
      |> put_flash(:info, "Cart updated successfully")
      |> redirect(to: cart_path(conn, :show))

    {:error, %Ecto.Changeset{} = changeset} ->
      conn
      |> put_flash(:info, "Error updating cart")
      |> redirect(to: cart_path(conn, :show))
  end
end
However, it’s only a matter of practice and time before you will fall in love with writing and reading code like this.
Being able to easily and confidently scan through a piece of code is an important measure of expertise. So how do you get this visual familiarity? Read through various open source Elixir code and practice. There is no shortcut ;-)
Benefits
I hope I didn’t scare you away from learning Phoenix. My intention is to give you informed expectations in order to: help you learn Phoenix, appreciate things as they are, and to prevent you from struggling with an expectation-reality mismatch.
My wife is a Mammogram technician. She once shared with me something she learned from her experience with patients. Most people who undergo a mammogram procedure experience a significant amount of pain and many are not co-operative with the technician during the process. However, when my wife started explaining to patients what kind of pain they might experience during the procedure, reassuring them that it’s normal, and instructing them on the benefits they get in diagnosing medical illness, she started noticing something different. The patients are now more co-operative during the procedure and even experience less pain.
Learning a new language or framework works exactly the same way. The moment we face difficulty without being informed ahead of time we start to struggle, we get frustrated, and problems become more acute. But if we know what we face up front, then we "experience" the pain less, move forward earlier, and start seeing benefits sooner.
IEx
As part of the Elixir installation, we also get the iex binary installed on our system. IEx provides a language shell that is useful to run small pieces of Elixir code in an interactive way. This makes it a suitable platform to learn the language.
Since it’s already installed on our system, we simply need to type iex on our terminal to start it.
→ iex
Erlang/OTP 19 [erts-8.2] [source] [64-bit] [smp:4:4] [async-threads:10] [hipe] [kernel-poll:false] [dtrace]

Interactive Elixir (1.4.0) - press Ctrl+C to exit (type h() ENTER for help)
iex(1)>
When we run iex we will see output as above in our terminal with the information about the Elixir and Erlang versions that we have installed. We then end up with an IEx prompt iex(1)>. The numeral inside the parenthesis is the line number.
Here we are at the first line of our language shell and we can start typing in Elixir code right away.
Let’s start with something very simple. Type in the statement "1 + 1" and press the "Return / Enter" key. The IEx shell replies back after processing your input.
iex(1)> 1 + 1
2
iex(2)>
Use iex as your calculator and try various arithmetic operations
iex(1)> 1 + 1
2
iex(2)> 1 - 1
0
iex(3)> 2 * 5
10
iex(4)> 9 / 3
3.0
iex(5)>
In each of the above commands, iex processes our input and prints the output immediately. Inputs can also span multiple lines as shown below:
iex(5)> 1 +
...(5)> 2 +
...(5)> 3.5 +
...(5)> 4.4
10.9
In the example above, notice that the line number is (5) for the four lines of code. When iex finds an incomplete Elixir expression, it waits until the expression is complete before starting to process it. In the above case, the first line 1 + is an incomplete elixir expression. Iex needs a number on the right side of + to make it complete so it waits for the second line of input. But again the second line ends with an incomplete expression so it waits for third line and so on.
Data types and Operators
The following is a list of common data types that we will come across in Phoenix projects. Open an IEx shell and start trying them out.
iex> 1                          # integer
iex> 1.0                        # float
iex> true                       # boolean
iex> :any                       # atom
iex> "any"                      # string
iex> [1, 2, 3]                  # list
iex> {1, 2, 3}                  # tuple
iex> [key: "value"]             # Keyword List
iex> %{key: "value"}            # map
iex> %StructName{key: "value"}  # struct
Except for the struct example above, we can type all of them in our iex shell to play with them.
Atom
Atoms are constants whose name is their value. Atoms start with : (colon). If you are coming from Ruby, it’s the same as :symbol but with an important difference. Atoms are not garbage collected. That means if we create an Atom in our program, it lives forever.
|
Since once created an Atom lives forever, it’s not a good idea to dynamically create Atoms from user input. A malicious user could technically max out the total number of Atoms that can be created in a system thereby bringing the system to a halt. |
An Atom on it’s own is minimally useful. In practice, it’s often combined with another data type such as a Tuple.
Tuple
Tuple stores a collection of data. Items in tuple are comma separated and the entire data is enclosed within {}.
iex> {:ok, "Hello world"}
The Tuple is the de-facto data structure in functions that need to return more than one value. For example, Elixir’s built-in function File.read returns the Tuple {:ok, file_content} when the file read is successful; it returns the Tuple {:error, reason} when there is an error in reading the file. In this case the function File.read needs to return two values and it makes use of the Tuple to do so.
Atoms are mostly paired with Tuple data to annotate the type of data that is being stored in the tuple. By convention, the first element of most Tuples is an atom, though it’s not a necessity.
List
List also stores a collection of data. Items in the list are comma separated and the entire data is enclosed within [].
iex> [1, 2, 3, 4, 5]
Both Tuple and List data types are used to store a collection of data. The difference lies in how the Elixir language implements them internally.
Lists are stored in memory as linked lists, meaning that each element in a list holds its value and points to the following element until the end of the list is reached.
Tuples, on the other hand, are stored contiguously in memory. This means getting the tuple size or accessing an element by index is fast. However, updating or adding elements to a tuples is expensive because it requires copying the whole tuple in memory.
In practice, we use a List to store collections when we don’t know the total number of items in our collection ahead of time. For example, if we are parsing a CSV file, we will use a List to store the items from the CSV file. This is because the total number of items in the CSV file can vary.
iex> ["product1", "product2", ..., "productn"]
Tuples on the other hand are used to store collections of known size. Return values of functions are a perfect example. We know ahead of time how many items we will return from a function and we can use Tuple for this purpose.
Keyword List
Keyword List stores one or more (key, value) pairs.
iex> [book: "Harry Potter"]
iex> [name: "Nittin", sex: :male, interests: ["cooking", "programming"]]
Internally, Elixir uses a List of two element Tuples to build a Keyword List.
To verify, let’s type a List of two element Tuple, whose first element is an Atom.
iex(1)> [{:a, 1}, {:b, 2}]  # List of two element tuple
[a: 1, b: 2]                # We got a Keyword List
Since, a Keyword List is just list of tuples under disguise, the keys in the Keyword List can be repeated.
iex> [a: 1, a: 2, a: 3]
Map
Like Keyword Lists, a Map is a data type for storing one or more (key, value) pair. Unlike Keyword Lists, keys in a map cannot be repeated. If you are familiar with Python, an Elixir map is a Python dict. Or if you are familiar with Ruby, it’s a Ruby hash.
A map is created using the %{} syntax.
iex> %{ name: "Harry Potter", author: "J.K.Rowlings" }
Map keys can be atoms, strings, or mixed.
iex> %{ "string_key" => "value" }
iex> %{ "string_key" => "value", some_atom: "value" }
Struct
Structs are maps that have a predefine set of allowed keys. The Struct is the most commonly used data type in Phoenix for representing business entities. Since structs need a module definition, which we have yet to see, we will explore the struct data type after an introduction to Elixir modules in the subsequent section.
Operators
We have already seen the Math operators +, -, *, /. Let’s quickly run through the other operators.
Equality
==, !=, === and !==
# Check if value on both sides are same
iex> 5 == 5      # true
iex> 5 == 5.0    # true
iex> 5 == 4      # false

# Check if value on both sides are not same
iex> 5 != 4      # true
iex> 5 != 5      # false

# Check if both value and type are the same on both sides
iex> 5 === 5.0   # false

# Check if either value or type are not the same on both sides
iex> 4 !== 4.0     # true
Comparison
>, <, >=, ⇐
# Self explanatory

iex> 4 > 3   # true
iex> 3 > 4   # false
iex> 3 < 4   # true
iex> 4 < 3   # false
iex> 4 >= 4  # true
iex> 4 <= 4  # true
Logic
and, or, &&, ||
iex> true and false    # false
iex> false or true     # true
iex> false and false   # false
iex> false or false    # false
iex> true and true     # true
iex> 4 && false        # false
iex> 4 || nil          # 4
Elixir considers any value other than false or nil to be true.
There is a subtle difference between and and &&.
The and operator requires the left side operand to be either true or false while the && operator can accept any operand.
The same difference applies to or and ||.
If you try to use and or or on a non-boolean left-operand, you will get an error.
iex> 5 and true
** (BadBooleanError) expected a boolean on left-side of "and", got: 5
Negation
! and not
iex> !true  # false
iex> !!true # true
iex> not true  # false
Concatenate
<> is a concatenate operator that works with binary data. It joins two binary data into one.
iex> "Hello" <> " " <> "World"
"Hello World"
Other Operators
There are other important operators such as the = (match operator), the |> (pipe operator), and the _ (ignore operator). We will explore them in detail in the subsequent sections of this chapter.
Modules and functions
Though modules and functions can be written directly in iex, it’s convenient to write them in normal Elixir files and then execute them in the iex shell.
We will use the Phoenix project created in the first chapter to start writing modules and functions.
Module
A Module in Elixir is used to group a bunch of functions doing logically related tasks. A module is defined using the syntax defmodule followed by the module name and a do.. end block.
defmodule ModuleName do
end
From the Elixir docs:
What is called a module name is an uppercase ASCII letter followed by any number of lowercase or uppercase ASCII letters, numbers, or underscores.
Module names should begin with an initial capital letter and by convention use CamelCase. By the above rule, myModuleName, 111Module are invalid as they don’t begin with uppercase ASCII letters. My_Module_name is a valid module name but we will rarely see an Elixir library using this notation as the convention is to use CamelCase. So instead of snake_case My_Module_name, we will use CamelCase MyModuleName.
Let’s create a new module Catalog in our learn_phoenix app at lib/learn_phoenix/catalog.ex with the code below:
defmodule Catalog do
end
We have now successfully created a new module but it doesn’t do anything useful yet. So let’s look into writing some functions to do something useful.
Function
We define functions inside of a module using the syntax def or defp followed by the function_name, followed again by a do…end block. Functions defined using def are public functions whereas those defined with defp are private functions.
Public functions can be called from outside the module defining them whereas private functions can only be called within the module that defines them.
Let’s create a public function in our Catalog module to list some products.
defmodule Catalog do
  def list_products do
    ["Tomato", "Apple", "Potato"]
  end
end
The function list_products returns a List containing three product names. Like Ruby, functions don’t have an explicit return statements. The output of the last executed line of a function is its return value. In the above case, the last executed line is the List of 3 elements and the same is returned by the function.
Let’s try calling our function in the iex shell. This time we will run iex with -S mix argument from inside our project folder.
iex -S mix
The above command runs the iex shell as usual but additionally compiles all the modules in our learn_phoenix project and makes them available in our shell.
iex(1)> Catalog.list_products()
["Tomato", "Apple", "Potato"]
The parenthesis after the function name is optional.
iex(1)> Catalog.list_products
["Tomato", "Apple", "Potato"]
Let’s write another function in the Catalog module that returns a random product from the list.
defmodule Catalog do
  ...

  # Add this new function.
  def random_product(list) do
    Enum.random(list)
  end
end
Before I explain what is happening here, let’s go back to iex and call this new function.
iex(2)> Catalog.random_product(Catalog.list_products)
** (UndefinedFunctionError) function Catalog.random_product/1 is undefined or private
    Catalog.random_product(Catalog.list_products)
We are greeted with UndefinedFunctionError. This is because when we started the iex shell, we didn’t have this function in our module. iex is only aware of the modules and functions that were present when we started it. To reload a module definition, we need to explicitly tell iex to recompile the module file.
iex(3)> r(Catalog)
warning: redefining module Catalog (current version defined in memory)
  lib/learn_phoenix/catalog.ex:1

{:reloaded, Catalog, [Catalog]}
Now we can call our new function as the module is recompiled.
iex(4)> Catalog.random_product(Catalog.list_products)
"Apple"    # You may get a different random product
Let’s go back and study our new function.
def random_product(list) do
  Enum.random(list)
end
random_product takes a List as argument and then it calls the Enum.random function passing in the List. Enum.random is a built-in function that picks a random value from a List. Though our code seems to be working fine, it’s brittle because it makes the assumption that the input to random_product is always a List data type. What happens if we pass in a string?
iex(5)> Catalog.random_product("hello")
** (Protocol.UndefinedError) protocol Enumerable not implemented for "hello"
    (elixir) lib/enum.ex:1: Enumerable.impl_for!/1
    (elixir) lib/enum.ex:146: Enumerable.count/1
    (elixir) lib/enum.ex:1677: Enum.random/1
Obviously, the string "hello" is not a List and our function random just passed on the input to Enum.random without validating the input.
We can correct this now by introducing guard clauses to our function.
Back to the code editor, modify the function as below:
def random_product(list) when is_list(list) do
  Enum.random(list)
end
Guard clauses are written after the function arguments but before the do keyword.
In the above code, we are using a function is_list to check if the input is of type List.
If so, the function returns true otherwise it returns false.
If the guard clause returns false, then the function is ignored and not called.
Recompile the module again in iex and try again.
iex(8)> r Catalog
warning: redefining module Catalog (current version defined in memory)
  lib/mango/catalog.ex:1

{:reloaded, Catalog, [Catalog]}
iex(9)> Catalog.random("hello")
** (FunctionClauseError) no function clause matching in Catalog.random/1
    lib/mango/catalog.ex:6: Catalog.random("hello")
While the guard clause prevented the function from being called, it just resulted in a no function match error.
What we ideally want is to return a tuple with two elements {:error, "Not a list"} when we give a non-List value as the argument.
While we work at this, we also need to handle the case when random_product function is called without any argument. In this case it should return a tuple {:error, "Need a List of products as argument"}
Go back to editor add two new functions.
defmodule Catalog do
  ...

  def random_product(list) when is_list(list) do
    Enum.random(list)
  end

  # Add these two new functions.
  def random_product(_) do
    {:error, "Not a list"}
  end

  def random_product do
    {:error, "Need a List of products as the argument"}
  end
end
At first glance, this new addition looks like an error. How can we have multiple function definitions with the same name? Doesn’t one overwrite the other? In Elixir this is valid code and it doesn’t overwrite anything. We can write multiple functions with the same name as long as these functions either take different arguments or have different guard clauses.
Let’s now try all possible scenarios in iex shell.
iex(10)> Catalog.random_product("hello")
{:error, "Not a list"}
iex(11)> Catalog.random_product()
{:error, "Need a list of products as argument"}
iex(12)> Catalog.random_product(Catalog.list_products)
"Tomato"
Function Arity
So far we have referred to functions by just their name. But the proper way to refer to Elixir functions is function name followed by / followed by a numeral which refers to the number of arguments the function accepts.
The proper way to refer to our functions is
-
Catalog.list_products/0 -
Catalog.random_product/0 -
Catalog.random_product/1
Notice that there is no way to differentiate the two variations of Catalog.random_product/1 function i.e., the one with the guard clause and the one without it.
The reason is Elixir combines these two functions into a single function with a case statement during the compilation process.
We will see more about case statement in the next section along with other control structures in Elixir.
Before we wind up our intro to modules and functions, we will look into one of the exciting features of Elixir which is its built-in documentation.
In iex type in h Enum.random. Tada!
You get the full documentation for using the Enum.random/1 function right on your screen.
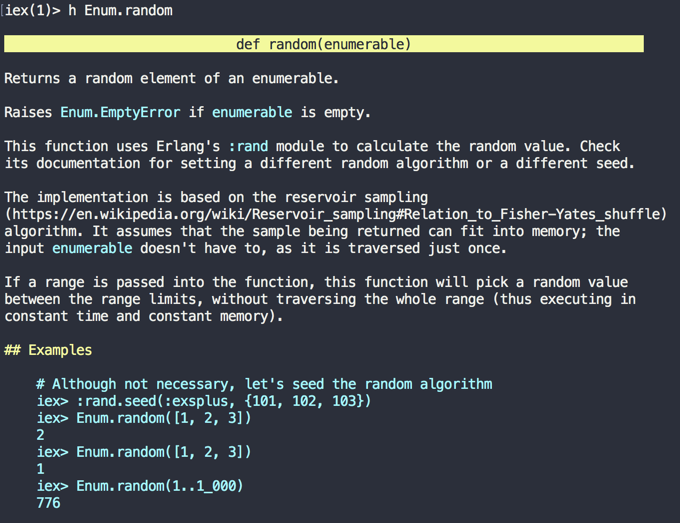
Isn’t it cool? Let’s try looking for documentation for a couple of others like is_list or Enum.
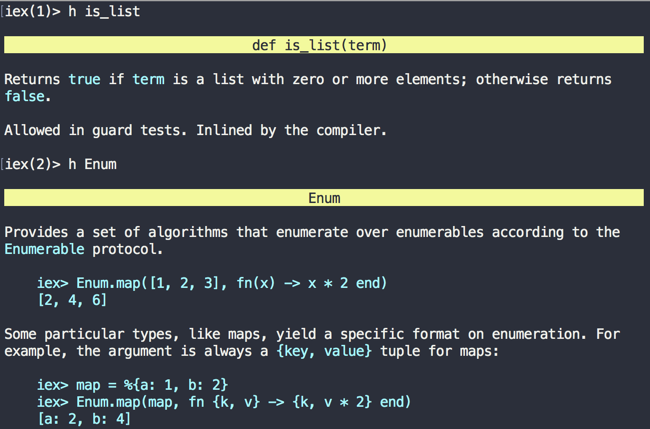
In each case, Elixir gives us complete documentation of the function or the module. Can we try the documentation for our module and functions?
iex> h Catalog
Catalog was not compiled with docs

iex> h Catalog.list_products
Catalog was not compiled with docs
How does the documentation for Elixir functions work? How can we add this functionality to the code that we write?
Documentation
Elixir provides first class support for documentation.
We can document our module using the @moduledoc attribute in our module file followed by a multiline string which is enclosed by """ in Elixir.
A function can also be documented using the @doc attribute followed by a multiline string just before the function definition.
Our modified module code with documentation for both the module and its functions look like this.
defmodule Catalog do
  @moduledoc """
  Provides a set of functions for querying the product inventory.
  """

  @doc """
  Returns a list of available products.
  """
  def list_products do
    ["Tomato", "Apple", "Potato"]
  end

  ...
end
In iex, we can now read the documentation for our module just like we can read the documentation for any built-in Elixir functions. Reload the module in IEx and
type in h Catalog or h Catalog.list_products and you will see the documentation on your screen. Isn’t that cool?
Struct
Our Catalog module is currently listing the products as a List of String data.
Catalog is limited from expressing complex product information such as the product name, price and so on by the use of the String data type. Instead of using String data, we could make use of the Map structure.
Instead of this
def list_products do
  ["Tomato", "Apple", "Potato"]
end
We could write
def list_products do
  [%{id: 1, name: "Tomato", price: 44},
   %{id: 2, name: "Apple", price: 22},
   %{id: 3, name: "Potato", price: 35}]
end
However, nothing prevents us from having a typo in our product map. So instead of %{name: "Potato"}, we could have a typo %{naem: "Potato"} and this error goes unnoticed until run time, when a call to the name key throws an exception.
To avoid this, we need a data type that gives a compile time guarantee. We need it to catch errors during compile time or to put it another way if the code compiles it works.
Struct comes to the rescue for this situation. Structs are defined inside a module and take the name of the module in which they are defined. Let’s create a new module at lib/learn_phoenix/product.ex with the following content.
defmodule Catalog.Product do
  defstruct [:id, :name, :price]
end
Now back in our catalog module, we can replace the maps with structs
def list_products do
  [%Catalog.Product{id: 1, name: "Tomato", price: 44},
   %Catalog.Product{id: 2, name: "Apple", price: 22},
   %Catalog.Product{id: 3, name: "Potato", price: 35}]
end
If we have a typo in the keys such as %Catalog.Product{naem: "Potato"}, we will get an error right at the time of compilation helping us catch bugs and prevent them from creeping into production code.
Pipe Operator
The pipe operator is one of my favorite features in the Elixir language. The more I use it, the more I feel it aligns with the natural way we think and break down problems.
The pipe operator in Elixir is |>. It’s used for writing nested function calls. In the last section, we already used a nested function call inside our function random_product/1.
Enum.random(list_products)Whenever a nested function call is written like this, we have to rewire our brain to read the code from inside out. That is, we read the innermost function call and then work our way out. Pipe operator solves this problem of backward reading by allowing us to write functions in the way they naturally flow. The above function call written using |> operator will be as follows:
list_products
|> Enum.random
It can also be written in a single line like:
list_products |> Enum.randomBasically, the pipe operator takes the value on the left side of the operator and passes it as the first argument of the function call on the right side.
On a simple problem like this, it’s not very easy to appreciate the benefits of the pipe operator. Let’s take a slightly more complex problem from Project Euler
Find the sum of all even numbers in a fibonacci series below 1000.
Looking at this problem, there are several steps involved to solve this.
-
Generate the fibonacci series below 1000.
-
Pick the even numbers in the series.
-
Find the sum of those numbers.
Each step in this solution is dependent on the result from the previous step. Each step is doing a simple small task and is arranged in the natural order in which our brain solves the problem. Compare it with the order given below:
-
Find the sum of numbers.
-
Pick the even numbers in the series.
-
Generate the fibonacci series below 1000.
Obviously this order is difficult to comprehend and is not how we think when we break down a problem into small steps. It makes sense only when you read it in the reverse order. However, this is how most programming languages require you to write the solution: find_sum(pick_even_numbers(generate_fibonacci(1000))). In Elixir, you can write the problem in the natural way using pipe operator like
generate_fibonacci(1000)
|> pick_even_numbers
|> find_sum
Reading the above function calls feels like reading the steps in a cooking recipe. If this example doesn’t convince you, consider the following example from Ecto that validates user input on various conditions before saving the data in the database.
customer
|> cast(attrs, [:email, :password])
|> validate_required([:email, :password])
|> unique_constraint(:email)
|> validate_format(:email, ~r/@/)
|> validate_length(:password, min: 6, max: 100)
|> put_hashed_password()
|> Repo.insert()
Since we have not yet covered Ecto, let me translate this code in layman’s term.
customer
|> allow_only_email_and_password_field_in_user_input
|> check_if_email_and_password_are_set
|> check_if_email_does_exist_already
|> check_if_email_matches_regex_pattern
|> check_password_length_with_range
|> replace_the_plain_password_with_a_hashed_password
|> insert_into_database
Imagine writing this long set of nested operations without pipe operator. Not only is it difficult to read, it’s difficult to conceive writing it in first place.
To summarize, the pipe operator helps us transform calls such as function2(function1()) to function1() |> function2().
Pattern matching
Pattern matching with = operator
In most languages, when we say a = 5 it means assign the value of 5 to the variable a. That is, the = is an assignment operator; it assigns the value on the right side to the variable on the left side of the operator.
However, = sign in Elixir is not an assignment operator but a match operator. In Elixir, when we say a = 5, what we are asking is to match the value on the right side of the operator to the variable on the left side. In other words, set the value of a to match the value 5. So, the value of a becomes 5 but this change is the result of matching a pattern. At this point, you might think it is same as assignment. That is because, we took a very simple example.
Let’s look at a few more examples.
Open IEx to play with pattern matching.
iex(1)> list = [1,2,3]
[1, 2, 3]
iex(2)> list
[1, 2, 3]
Nothing new so far.
iex(3)> [a, b, c] = [1, 2, 3] # On the left, we have a list of variables.
[1, 2, 3]
iex(4)> a                     # Magic
1
iex(5)> b                     # Magic
2
iex(6)> c                     # Magic
3
What happened here? We haven’t assigned any values to the variables a, b and c but Elixir matched the left side of the = operator containing a list of three variables to the right side of the operator containing a list of three values in a sequential order. Thereby the variables a, b & c get 1, 2 & 3 values assigned.
For the = operator to pattern match, items on both sides of the operator should be matchable. For example, if we ask Elixir to match [a, b] = [1, 2, 3], it cannot, because the number of items in the list on both sides are not equal.
We could either ask to match a = [1, 2, 3] in which case the entire list is assigned to a or we could give a list of [a, b, c] matching the items on the right.
Pattern matching can be done for all kinds of data. Let’s look at matching a map.
iex(1)> user = %{name: "Nittin", sex: :male, interests: ["cooking", "programming"]}
%{interests: ["cooking", "programming"], name: "Nittin", sex: :male}
iex(2)> %{name: name, sex: sex, interests: interests} = user
%{interests: ["cooking", "programming"], name: "Nittin", sex: :male}
iex(3)> name
"Nittin"
iex(4)> sex
:male
iex(5)> interests
["cooking", "programming"]
iex(6)>
In line iex(2)> above, on the left side we have a new map with keys matching the keys of our user map. The = operator looks for matching keys on either side and assigns the value to the variables on the left side map corresponding to the value on the right side map.
Ignore operator
_ (underscore) is the ignore operator in Elixir and goes hand-in-hand with pattern matching. Going back to the first example, what if we only wanted to know the second value of the list and not others?
iex(3)> [a, b, c] = [1, 2, 3]
We could rewrite the above to capture only the second value by using the _ operator.
iex(3)> [_, b, _] = [1, 2, 3]
Because we only need the second value, we replaced the others with _ which basically says "I need some value here but I don’t care what it is".
You can think of _ operator as a variable which forgets its value immediately after it’s assigned and goes back to its unassigned state.
Let’s check it out.
iex(1)> good_memory = "I remember what I am assigned"
"I remember what I am assigned"
iex(2)> good_memory
"I remember what I am assigned"
iex(3)> _ = "You are great!"                  # We assign some value to _
"You are great!"
iex(4)> _                                     # We ask for the value stored in _
** (CompileError) iex:4: unbound variable _   # _ had already entered its nirvana. It doesn't exist.
You can also use ignore operator as a prefix to a named variable to inject forgetfulness to it.
iex(3)> [_first, b, _last] = [1, 2, 3]
The above code works the same as using just _. The reason we might need this style of ignoring variables is to give some context to the programmer reading the code on what is being ignored. Consider the following tuple:
iex> person = {:director, "Steven Spielberg"}The tuple contains two elements. The first one denotes the role or position held by the person and the second one is the name of the person. If we want to get only the name through pattern matching, we can write it as follows:
iex> {_role, name} = personThe above code is more explicit than just using _ to ignore the first item. Just by looking at the code, we can say that we are ignoring the first value in the tuple which is storing possibly a value representing the role held by the person.
Control Structures
Control structures allow us to execute different logical branches of code based on a condition.
In Elixir we have two control structures case and cond.
case
As we saw earlier, Tuples are normally used in functions to annotate the return value. For example, Elixir’s built-in function File.read/1 returns a Tuple {:ok, file_content} on success and {:error, reason} on failure. If we are using the File.read/1 function in our program and we need to execute different branches of code based on the return value, case is a suitable candidate for this task.
case File.read!(path) do
  {:ok, file_content} ->
    do_something_with_content(file_content)
  {:error, error} ->
    IO.puts error
end
The case statement uses pattern matching to find the correct branch of code to execute. It checks the value of the expression right after case and tries to match the value with the different patterns within the do … end block. The code within the first pattern that matches gets executed.
case some_expression do
  pattern1 ->
    # code for pattern 1
  pattern2 ->
    # code for pattern 2
  pattern3 ->
    # code for pattern 3
  ...
end
We can have any number of pattern within the do..end block. We can also use _ operator as a pattern to match any value which is useful for a catchall case.
case some_expression do
  pattern1 ->
    # code for pattern 1
  _ ->
    # code for any other value
end
cond
case is useful for a single expression which can output multiple patterns. Sometimes we might want to check multiple conditions with different expressions for a single operation. For example, let’s take the classic blog post example.
-
A blog post can be edited if the user who tries to edit it is a site admin.
-
Or if the user is the author of the post being edited.
-
If both conditions fail, the user should not be allowed to edit the post.
Here we have one operation which checks if the post can be edited or not and we have multiple conditions to determine the answer.
can_edit = cond do
              is_admin(current_user) -> true
              is_author(current_user, post) -> true
              true -> false
            end
We stack all conditions inside the do.. end block and whichever condition returns true first gets executed. For this reason, we explicitly set the last condition with the block to true so that it gets called when all other conditions return false. In the above code, if the user is neither admin nor author, the last statement gets called which returns the value false. The return value of the cond statement is now stored in the can_edit variable.
if and unless
Elixir also comes with handy if and unless constructs to check a single condition. if works as in any other language. It basically checks for a condition and if the condition returns true, then it executes the code.
if condition_return_truthy_value? do
  # Execute code here
end
Internally Elixir converts the above code to a case statement such as this
case condition_return_truthy_value? do
  x when x in [false, nil] -> nil
  _ -> # Execute the code
end
Elixir considers both the boolean false and the atom nil to be falsy values. Everything else is a truthy value. So in the above transformation of the if statement to a case statement, Elixir first checks if the expression matches any of the falsy value. If so, then it does nothing. For everything else, it executes the code given in the original if block.
The unless construct works similar to if with the twist that its code block gets executed when the condition returns false.
unless condition_return_falsey_value? do
  # Execute code here
end
Mix
In Chapter 1, we used the mix commands to create a new Phoenix project, download dependencies, run the server, etc. It is a command line tool that gets installed as part of the Elixir installation. Using mix you can create a new Elixir project or run any of the pre-built mix tasks.
In the Ruby world, the closest thing to mix is rake but unlike rake, mix is officially a part of the Elixir language and plays an important role in managing an Elixir project.
To see a list of mix tasks that you can execute on your machine, run the command mix help in your terminal.
This will list all tasks that are known to mix.
→ mix help
mix                   # Runs the default task (current: "mix run")
mix app.start         # Starts all registered apps
mix app.tree          # Prints the application tree
mix archive           # Lists installed archives
mix archive.build     # Archives this project into a .ez file
mix archive.install   # Installs an archive locally
mix archive.uninstall # Uninstalls archives
mix clean             # Deletes generated application files
mix cmd               # Executes the given command
mix compile           # Compiles source files
mix deps              # Lists dependencies and their status
mix deps.clean        # Deletes the given dependencies' files
mix deps.compile      # Compiles dependencies
mix deps.get          # Gets all out of date dependencies
mix deps.tree         # Prints the dependency tree
mix deps.unlock       # Unlocks the given dependencies
mix deps.update       # Updates the given dependencies
(... trimmed)
A mix task is basically a module with a function to perform the given task. For each of the task listed above, there is a module that the Elixir installation on our system is aware of. We can also teach mix to do new tasks that are project specific by writing a simple module within our project.
The following definition from Mix documentation explains how simple it is to create a new mix task.
defmodule Mix.Tasks.Hello do
  use Mix.Task

  def run(_args) do
    Mix.shell.info "Hello World!"
  end
end
If we add the above code to our learn_phoenix project under lib/tasks/hello.ex, we can run the new task by mix hello.
→ mix hello
Hello World!
Our new task hello now prints the message "Hello World!" .
Library authors make extensive use of this feature. They extend mix giving us new commands like phx.new, phx.server, ecto.migrate etc. Basically the authors of Phoenix and Ecto have added mix tasks in their libraries which are available in any Elixir project that includes those libraries as dependencies.
If you are curious, you can look at the code for various mix tasks that are bundled with the Elixir language in this page. The mix tasks that are available in projects depending on Phoenix are available here and those for Ecto library are at here.
We will come across several mix tasks in the subsequent chapters. Remember that each time, we run mix something, mix is running a function which is defined in a file like those that we created above.
Finally before we end our quick tour on mix let’s look at one of the mix commands that we will frequently use throughout this book. On our terminal, run mix test
~/pio/learn_phoenix
→ mix test
Compiling 1 file (.ex)
..

Finished in 0.05 seconds
2 tests, 0 failures

Randomized with seed 432540
When we run mix test all the test files under the test folder in our project are executed and the result of the tests are printed on screen.
In our new learn_phoenix project, we have a few test files generated by default. You can look at those under test/learn_phoenix_web/*.
Later in this book, as we use Test Driven Development (TDD) to develop an ecommerce site, mix test will become an integral part of our workflow.
Common Patterns
use
Here is the code from the PageController of the project created in Chapter 1.
Look at line 2 of the module where it says use LearnPhoenixWeb, :controller.
defmodule LearnPhoenixWeb.PageController do
  use LearnPhoenixWeb, :controller

  def index(conn, _params) do
    render conn, "index_new.html"
  end

  def about(conn, _params) do
    render conn, "about.html"
  end
end
This is a common pattern that we will see in many places in our Phoenix projects. It’s used to add a piece of common code to one or more modules. Let’s look at how it works.
Open the referenced LearnPhoenixWeb module.
It reads as below:
defmodule LearnPhoenixWeb do
  def controller do
    quote do (1)
      use Phoenix.Controller, namespace: LearnPhoenixWeb
      import Plug.Conn
      import LearnPhoenixWeb.Router.Helpers
      import LearnPhoenixWeb.Gettext
    end
  end

  (...)
  defmacro __using__(which) when is_atom(which) do
    apply(__MODULE__, which, [])
  end
end| 1 | Common code that we want in every controller module. |
When module A uses module B, module A calls the __using__/1 macro defined in the module B at the time of compilation.
Here our PageController module has the line use LearnPhoenixWeb passing in an additional argument :controller
and so it calls the __using__ macro defined in the module.
In the above example, __using__ macro checks the incoming argument value for the parameter which and calls the function by the same name inside the module LearnPhoenixWeb. We are passing in :controller as the value for which and so the code in controller/0 function gets called.
The controller function has the following code
def controller do
  quote do
    use Phoenix.Controller, namespace: LearnPhoenixWeb
    import Plug.Conn
    import LearnPhoenixWeb.Router.Helpers
    import LearnPhoenixWeb.Gettext
  end
end
The code inside the quote do..end block is called in place of the line that calls this function making the PageController read as below during the time of compilation. The line use LearnPhoenixWeb, :controller vanishes and in its place, we have 4 lines of code.
It again has a use call, which the compiler will expand recursively until it finds no more use that can be expanded.
defmodule LearnPhoenixWeb.PageController do
  use Phoenix.Controller, namespace: LearnPhoenixWeb
  import Plug.Conn
  import LearnPhoenixWeb.Router.Helpers
  import LearnPhoenixWeb.Gettext

  def index(conn, _params) do
    render conn, "index_new.html"
  end

  def about(conn, _params) do
    render conn, "about.html"
  end
end
The injected code again has a use call, which the compiler will expand recursively until it finds no more use that can be expanded.
Without the use macro, we will be required to type several lines of code by ourselves in all controller modules. The use macro takes care of this rote task for us.
import
In the above example, we have several import statements.
import Plug.Conn
import LearnPhoenixWeb.Router.Helpers
import LearnPhoenixWeb.Gettext
import is again a macro which makes the functions defined in the imported module available in the current module scope. It does not inject the code as done by the use macro.
Lets understand this with an example.
The Plug.Conn module defines several public functions to manipulate the web request. These functions can be called from any controller module using the syntax Plug.Conn.function_name.
Since manipulating the request object is the main job of a controller module, we might need several function calls from the Plug.Conn module. Without the use of import, these function calls will be too verbose as shown below:
def some_action_in_controller(conn, _) do
  conn
  |> Plug.Conn.put_session(:customer_id, customer.id)
  |> Plug.Conn.configure_session(renew: true)
  |> Phoenix.Controller.put_flash(:info, "Welcome back!")
  |> Plug.Conn.redirect(to: page_path(conn, :index))
end
If we use import Plug.Conn in the controller module, then we could compact the above code as below:
def some_action_in_controller(conn, _) do
  conn
  |> put_session(:customer_id, customer.id)
  |> configure_session(renew: true)
  |> Phoenix.Controller.put_flash(:info, "Welcome back!")
  |> redirect(to: page_path(conn, :index))
end
alias
While the import macro helps us to reduce code clutter by making the function calls work without the module name prefix, it comes with a cost. When we have several import calls in a module, it brings in two challenges
-
We need to make sure we are not importing modules that define functions using the same name. Doing so will raise errors at the time of calling the function.
-
It’s difficult to identify the module that defines the function since all calls are made without the module name prefix.
For these two reasons, use of import should be limited to a minimum. While MyModuleName.SubModule.func1 is too explicit, using just func1 by importing the module is too implicit. How can we reach a point in the middle? That’s where alias comes in.
alias helps us write function call such as Deeply.Nested.Module1.func1 in the format Module1.func1 or Nested.Module.func1
# Add alias to a module.
# Automatically alias the module to its basename
alias Mango.Catalog

# Somewhere else in the module
products = Catalog.list_products
# Add alias to a module with a different name
alias Mango.Sales.Order, as: Cart
# same as %Mango.Sales.Order{}
cart = %Cart{}# Add alias to multiple modules in one line
alias Mango.CRM.{Customer, Ticket}OTP Basics
When we run our application using mix phx.server, it makes the app available on our localhost at http://localhost:4000. That deceptively simple command we used to start our application organized a large number of supervisors and workers to carry out various tasks that our application needs to do. To understand what we are talking about, let’s run our application within an IEx shell by using the command iex -S mix phx.server from our project folder.
→ iex -S mix phx.server
Erlang/OTP 19 [erts-8.2] [source] [64-bit] [smp:4:4] [async-threads:10] [hipe] [kernel-poll:false] [dtrace]

[info] Running LearnPhoenix.Endpoint with Cowboy using http://localhost:4000
Now type :observer.start in the IEx shell to open the Erlang Observer window.
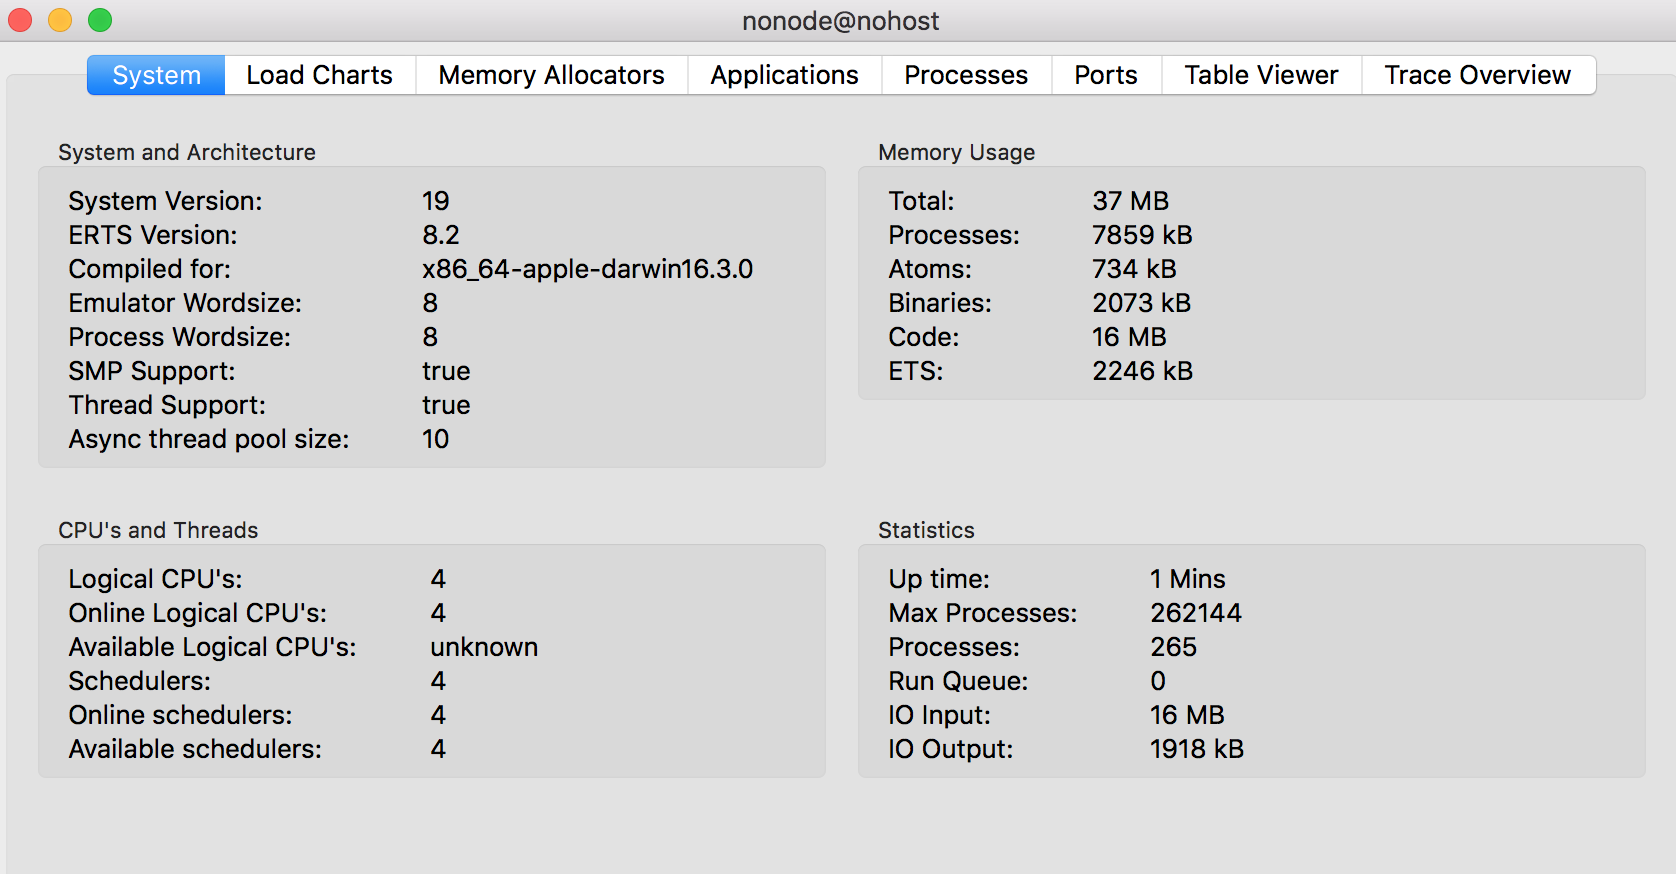
The observer window provides several useful pieces of information about our application during runtime. We will focus on the Applications tab alone in this section.
Moving to the Applications tab, you will see a list of names on the left side as below:

All these applications are running in the background in order for our site to be functioning.
Selecting each one of them shows a flowchart like diagram on the right. These are the respective supervisors and workers for the application. We will get to know what that means in a moment. Have a look at all of them and then finally click on our project name learn_phoenix. This should display a very large chart which doesn’t fit in a single screen view.
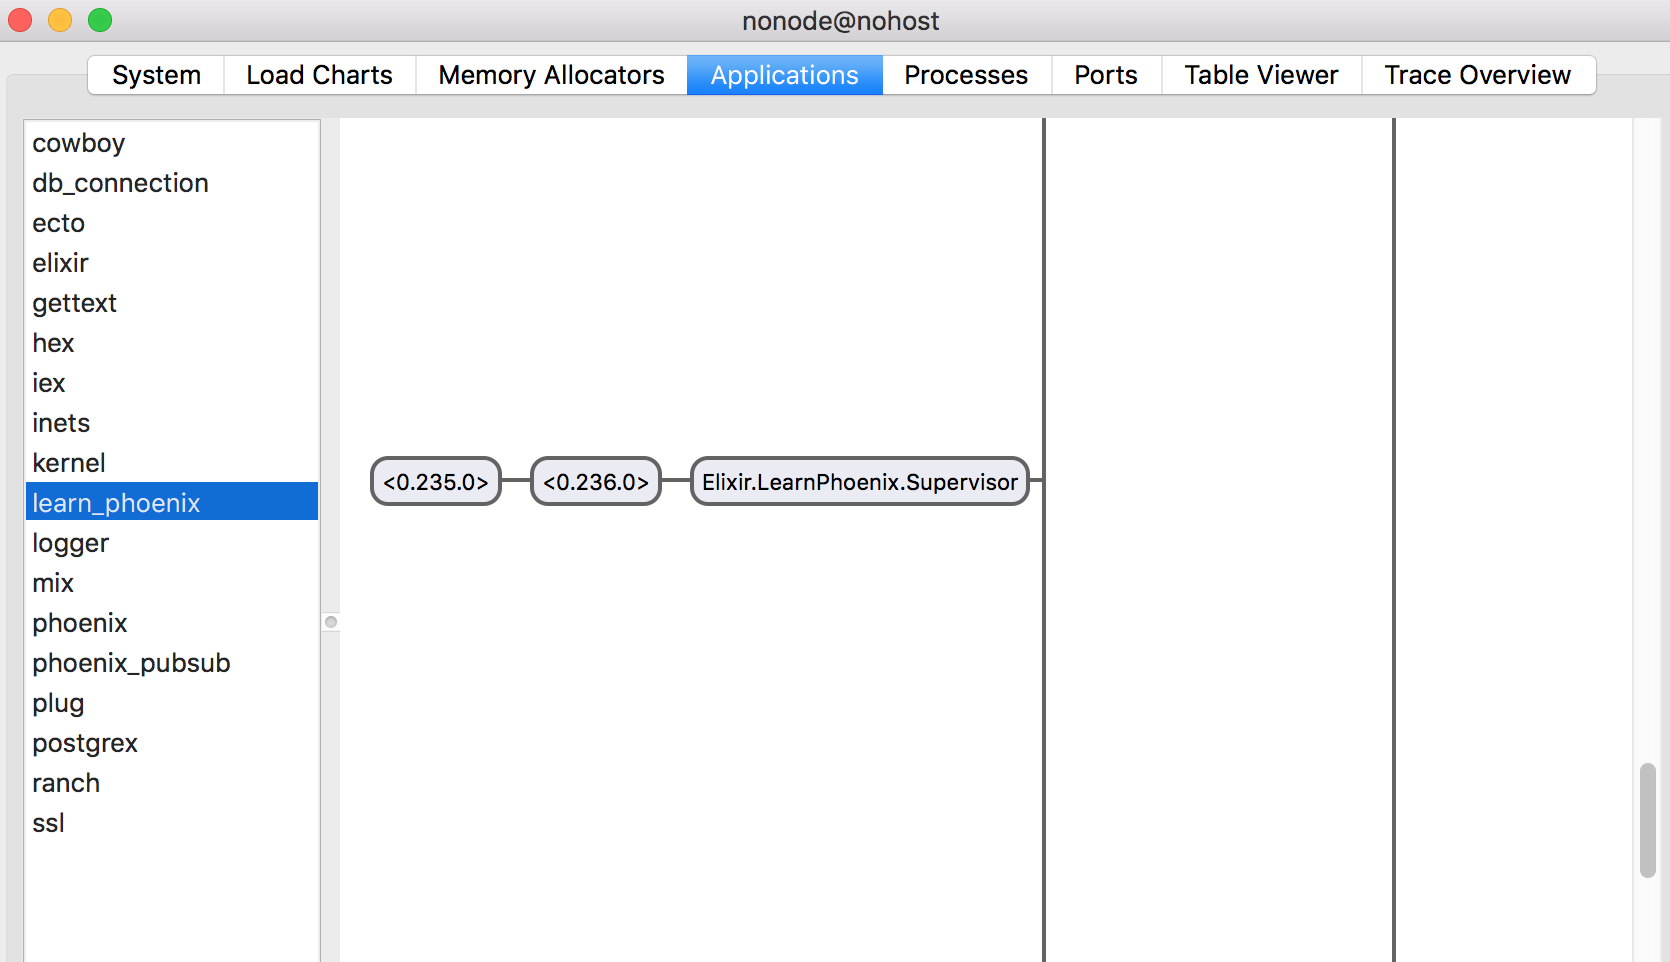
Let’s look at a simplified diagram of the same below:

Our LearnPhoenix app is using two top level supervisors namely Repo and Endpoint. The Repo Supervisor has many workers, where each is a database connections. The Endpoint supervisor again has several child supervisors. I have shown only the Endpoint.Server supervisor in detail in the above diagram to keep it digestible. The Endpoint.Server supervisor has many workers in it which are each Cowboy web server connections.
What are Supervisors and Workers?
A program like a web application can have several points of failure. Elixir which is built on the Erlang Virtual Machine uses the Erlang feature called OTP to build fault tolerant applications. We do this by commissioning workers to do different tasks and putting them under different supervisors whose only job is to check if the worker processes are alive or dead. If any of the worker process is dead due to any failure, the supervisor’s job is to create a new worker in its place.
Our Phoenix web application needs a database and needs to start its own embedded web server to serve the web requests. Both these activities can potentially fail due to various reasons. The database server may be busy or temporarily down and the web server may crash due to a run time error. Whatever error happens, we need to ensure that our application recovers from it gracefully on its own.
The chart that we saw in the Observer window is the hierarchy of supervisors and workers as required by our application. Our application also depends on several other applications that we have mentioned in our mix.exs file. These applications also have their own hierarchy of supervisors and workers to carry out their tasks. This is the reason you see different supervision tree under each of the applications listed in the left sidebar of the observer window.
If we visualize this all together, it might look like a cluster of several independent trees like below:
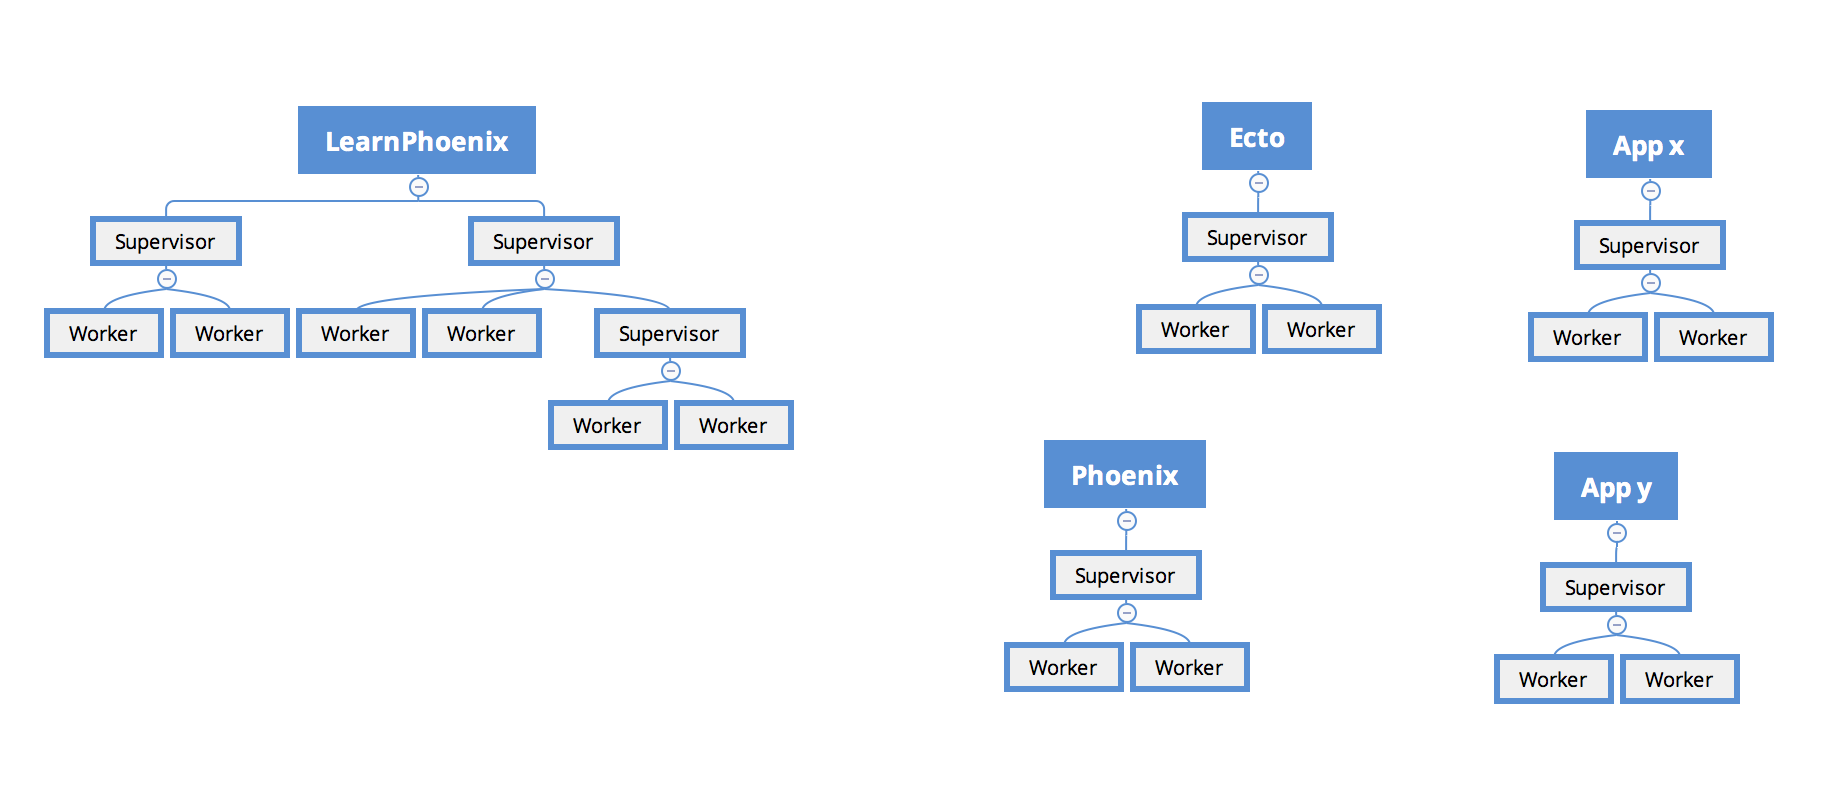
How does Elixir or the Erlang Virtual Machine get the information about these tree structure? The answer to that starts with the mix.exs file. Back in our mix.exs file in the learn_phoenix project, we have among others, the following function.
def application do
  [mod: {LearnElixir.Application, []},
   extra_applications: [:logger, :runtime_tools]]
end
The function application/0 is special. The information returned by this function is used by mix to generate a learn_phoenix.app. If you are brave enough, you can look at the contents of this file which is a large complex Tuple, reproduced below:
{application,learn_phoenix,
             [{description,"learn_phoenix"},
              {modules,['Elixir.LearnPhoenix','Elixir.LearnPhoenix.Endpoint',
                        'Elixir.LearnPhoenix.ErrorHelpers',
                        'Elixir.LearnPhoenix.ErrorView',
                        'Elixir.LearnPhoenix.Gettext',
                        'Elixir.LearnPhoenix.LayoutView',
                        'Elixir.LearnPhoenix.PageController',
                        'Elixir.LearnPhoenix.PageView',
                        'Elixir.LearnPhoenix.Repo',
                        'Elixir.LearnPhoenix.Router',
                        'Elixir.LearnPhoenix.Router.Helpers',
                        'Elixir.LearnPhoenix.UserSocket',
                        'Elixir.LearnPhoenixWeb']},
              {registered,[]},
              {vsn,"0.0.1"},
              {mod,{'Elixir.LearnPhoenix.Application',[]}},  # Focus on this line.
              {applications,[kernel,stdlib,elixir,phoenix,phoenix_pubsub,
                             phoenix_html,cowboy,logger,gettext,phoenix_ecto,
                             postgrex]}]}.
The file is present at this location _build/dev/lib/learn_phoenix/ebin/learn_phoenix.app relative to our project directory.
This large Tuple contains all the information needed to start the OTP supervision tree. To keep it simple, without going into the details of this Tuple structure, we will read the application/0 function again.
def application do
  [mod: {LearnElixir.Application, []},
   extra_applications: [:logger, :runtime_tools]]
end
It returns a Keyword List with the key mod: holding the value {LearnElixir.Application}. This piece of information says whenever our application is started, call the start/2 function defined in this module. It’s like the main function in the C language which gets called first whenever you start the program.
defmodule LearnPhoenix.Application do
  use Application

  def start(_type, _args) do
    import Supervisor.Spec

    children = [
      supervisor(LearnPhoenix.Repo, []),          # look here
      supervisor(LearnPhoenixWeb.Endpoint, []),  # look here
    ]

    opts = [strategy: :one_for_one, name: LearnPhoenix.Supervisor]
    Supervisor.start_link(children, opts)         # look here
  end
end
This function starts the supervision tree for our project learn_phoenix. Without going into the details of how Supervisor.start_link/2 works, we can infer that it starts two child supervisors LearnPhoenix.Repo and LearnPhoenixWeb.Endpoint. Each child supervisor then has to define the workers and supervisors in its module. In this fashion, the supervisor tree of our project learn_phoenix gets generated.
Every Elixir project contains the mix.exs file and if it starts an OTP supervisor, it mentions the main module that is responsible for starting the tree. This is true for all the dependencies that we have listed in our project’s mix.exs file.
defp deps do
  [{:phoenix, "~> 1.3.0-rc"},
   {:phoenix_pubsub, "~> 1.0"},
   {:phoenix_ecto, "~> 3.2"},
   {:postgrex, ">= 0.0.0"},
   {:phoenix_html, "~> 2.6"},
   {:phoenix_live_reload, "~> 1.0", only: :dev},
   {:gettext, "~> 0.11"},
   {:cowboy, "~> 1.0"}]
end
Elixir starts the supervision tree for each of the listed libraries above and this results in the cluster of trees that we saw above.
Adding external library as dependency
Our list_products/0 function in LearnPhoenix.Catalog module currently returns a List of hard-coded product structs.
In this section, let’s change this behavior by having the function return a List of products parsed from a CSV file containing information about 100 products.
We will use the nimble_csv library to parse the CSV file contents. You can read the docs for nimble_csv at http://hexdocs.pm/nimble_csv/NimbleCSV.html
Since our project is going to depend on this library for parsing the CSV file, we need to declare this dependency in our mix.exs file. Open the mix.exs file and modify deps function as below
  defp deps do
    [
      (...)
      {:nimble_csv, "~> 0.1.0"}
    ]
  end
Now run mix deps.get to actually download the nimble_csv library from hex.pm website.
→ mix deps.get
Running dependency resolution...
Dependency resolution completed:
  nimble_csv 0.1.1
* Getting nimble_csv (Hex package)
  Checking package (https://repo.hex.pm/tarballs/nimble_csv-0.1.1.tar)
  Fetched package
Let’s open up iex -S mix to play with our newly added library. As per the documentation, the following code parses a CSV string into an Elixir list.
iex> alias NimbleCSV.RFC4180, as: CSV
iex> CSV.parse_string "name,age\nchaaru,6\nnittin,13"
[["chaaru", "6"], ["nittin", "13"]]
NimbleCSV.RFC4180 is a module defined by the nimble_csv library. We alias it to CSV so that it’s short and reads better. We then use the parse_string/0 function to parse a string containing three lines of CSV content separated by two line breaks /n. As seen above, parse_string/0 ignores the first line as the CSV header and returns the rest of the content as a nested list. That is, it returns a List of lines where each line is again a List of all the comma separated values of that line.
Now that we know how to parse a CSV formatted string, our next task is to parse the product information from our CSV file which looks like below:
| ID | Name | Price |
|---|---|---|
1 |
Samsung Galaxy on 5 |
9000 |
2 |
Moto G5 Plus |
17000 |
3 |
Bingo U8 Smartwatch |
700 |
4 |
JBL T100 A Wired Headphones |
825 |
5 |
SanDisk Ultra 32GB Micro SDHC |
869 |
6 |
RK Yunteng Selfie Stick |
658 |
7 |
Logitech MK270r Wireless Keyboard |
1699 |
8 |
Canon EOS 1300D DSLR Camera |
21495 |
9 |
Sony HT-RT3 5.1 Soundbar |
16999 |
10 |
Mi-20000 mAH PowerBank |
2199 |
You can download this CSV on GitHub. Move the downloaded CSV file to priv/product_list.csv within our project.
One of the benefits of the Elixir pipe operator is that it helps us think clearly step by step for any given problem. The mental model of this task represented by Elixir pipes is as follows.
read the file contents
|> parse contents
|> convert nested_list to list of product structs
The beauty of this mind piping (similar to mind mapping) is that it breaks the problem into smaller units and clearly shows the order in which we need to solve each step. The above pseudo code represents our steps to solve the problem and it’s also the structure of our solution. Let’s see how. Modify our list_products/0 function with this pseudo code. We know how to parse a CSV string, so we will replace step 2 pseudo code with real code.
  def list_products do
    alias NimbleCSV.RFC4180, as: CSV

    read_the_file_content
    |> CSV.parse_string
    |> convert_to_list_of_product_struct
  end
Our imaginary read_the_file_content function reads the CSV file and returns the output to CSV.parse_string/1. The CSV.parse_string/1 parses the contents and transforms it into a List of lists. The output from CSV.parse_string/1 is then piped into convert_to_list_of_product_struct which transforms the "List of lists" to "List of product structs".
Elixir’s standard library comes with functions to work with files. These functions are available from the File module. We can make use of iex to learn about the File module and its functions.
|
In an |
The function that we particularly need for this task is File.read!/1 . Let’s try out this function in iex. Run File.read!("priv/product_list.csv")
The function reads our file contents and returns a string, which is exactly what we need for our CSV.parse_string/0 function. The last piece in our puzzle is to convert the parsed result to a list of product structs. We will use Enum.map/2 for this task. Let’s look up its documentation on iex
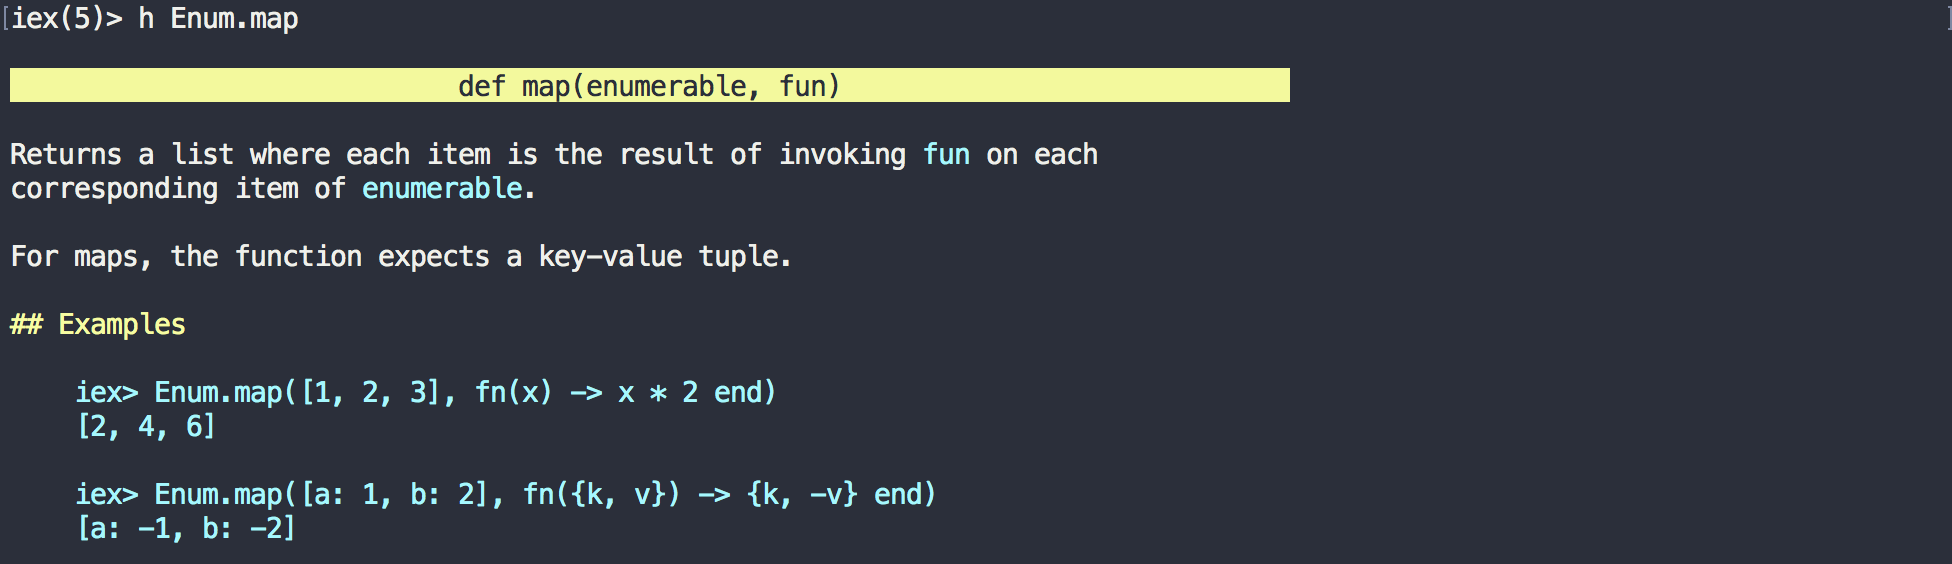
The function receives two arguments, the first one is a list and the second one is a function. Each item from the List gets passed to the function and the return values from this function forms a new List. Our completed function looks like below:
  def list_products do
    alias NimbleCSV.RFC4180, as: CSV
    "priv/product_list.csv"
    |> File.read!
    |> CSV.parse_string
    |> Enum.map(fn [id,name,price] ->
        %Catalog.Product{id: id, name: name, price: price}
    end)
  end
Enum.map/2 receives the list of products and in this case each product is again a list. We use pattern matching to deconstruct our list into named variables and use them to create our product struct. This results in a new list containing product structs.
Summary
That was quite a journey we made in this Chapter.
We jumped right into Elixir and got to learn how to use the Interactive IEx Shell. We played with it to understand how it works with various common data types and operators. The Struct is the commonly used datatype when it comes to representing business entities in Phoenix.
We learnt how to write modules and functions in Elixir, learned about function arity and how to use the built-in documentation available in IEx.
We saw how the Pipe Operator helps us solve problem in a natural, incremental way that matches our thought process. In addition we also understood the Match (=) & Ignore (_) operators.
We moved onto control structures, learned about the mix command, and then looked at various common patterns like use, import and alias
We looked at the basics of OTP processes, supervisors, workers and observer. Finally we got to know how to add external dependencies to our projects and tried an example.
Overall, we got to know the very important aspects, concepts, and processes of Elixir. We are now ready for our practical implementation of an ecommerce site in the subsequent chapters.
Exercises
We have covered the basics of Elixir with which you can understand almost all lines of code generated by the phx.new command in Chapter 1.
Use the code generated in the first chapter to complete the following exercises.
-
List out the public and private functions defined in
mix.exs. -
What is the data type of the return value of each of the functions in
mix.exs? -
In the
mix.exsfile, what is the data type of the elements inside the tuple indepsfunction. -
What is the arity of the
indexfunction inPageController? -
Rewrite the
renderfunction call insidePageController.indexusing the pipe operator. -
Identify all modules that use the
usemacro. -
Identify all modules that use
use LearnPhoenixWeband replace the line with the injected code. Runmix phx.serverto see that it still works as before. -
List out all instances of pattern matching on function head.
-
Which module in the
learn_phoenixapp is responsible for starting the supervisor tree? -
List out all instances of named and unnamed ignore operator.
Kickstarting Mango
With this chapter we have reached the crux of the book. From here on, we will work on developing an ecommerce portal using some of the best practices from Extreme Programming. Over time I have fallen in love with these techniques. If you aren’t following these practices at work, perhaps you should consider giving it a shot. However, to follow along in this book, you don’t need to know anything about Extreme Programming practices.
The entire development of the ecommerce store is driven by user stories. In this section we will briefly see the list of user stories that we will cover in the rest of the book. Implementation details of each of these user stories will be covered in the individual chapters that deal with it.
Each chapter has an Iteration Planning section where we will discuss the scope of the work and implementation ideas relevant to the user stories for that chapter.
Following the Extreme Programming principle, we will build small features that are immediately usable rather than generating a partially working CRUD (Create, Read, Update Delete) interfaces which most often implements bits and pieces of several user stories.
Project Discovery
As with developing any typical project, let’s start with a project discovery note.
Project background
The ecommerce store that we will build is for a fictional brick and mortar shop Mango in the city of Auroville. The shop sells fresh vegetables and fruits to its customers directly sourced from nearby farms. Due to popular demand to reduce the carbon footprint, Mango has decided to open an online store for its customers. However, the management still wants to continue operating the physical shop for customers who prefer to visit the shop in person. Also the online store only accepts orders from residents of Auroville and delivers to only locations inside Auroville.
User stories
As a customer, I want to
-
See seasonal products
-
Browse products by category
-
Register for an account
-
Login to my account
-
Logout out of my account
-
Add products to cart
-
View cart
-
Update cart
-
AJAX cart update
-
Login during checkout if not already logged in
-
Checkout products in cart
-
See my order history (Exercise)
-
Manage support tickets
-
Browse the website in either English, French or German
As an admin, I want to
-
Manage users with admin rights
-
See a different layout for the admin dashboard
-
Use magic link to login .i.e., passwordless login
-
See orders (Exercise)
-
See customers (Exercise)
-
Manage warehouse items
-
Manage suppliers
-
Use channel-powered MBot (Mango Robot) to
-
Get notified by chat when a customer orders on the web
-
Get order status by chat messages
-
Create POS orders through chat window.
-
A context for Phoenix Context
Developing a blog app or a simple Twitter clone to understand Phoenix is a good start but to fully appreciate the benefits of increased complexities introduced by Phoenix Context since version 1.3, we need to develop something that is much bigger than a few CRUD operations. Our completed app will contain the following contexts.
-
Catalog
-
CRM
-
Sales
-
Warehouse
-
Administration
-
External API
Setting up Mango
Run mix phx.new mango from your terminal to generate a new Phoenix project.
→ mix phx.new mango
...
* creating mango/assets/css/app.css
* creating mango/assets/css/phoenix.css
* creating mango/assets/js/app.js
* creating mango/assets/js/socket.js
* creating mango/assets/package.json
* creating mango/assets/static/robots.txt
* creating mango/assets/static/images/phoenix.png
* creating mango/assets/static/favicon.ico

Fetch and install dependencies? [Yn] Y
When prompted to install dependencies, select Y and continue as we did in Chapter 1 by following the on-screen instructions.
We are all set! Go into your application by running:

    $ cd mango

Then configure your database in config/dev.exs and run:

    $ mix ecto.create

Start your Phoenix app with:

    $ mix phx.server

You can also run your app inside IEx (Interactive Elixir) as:

    $ iex -S mix phx.server
Now we are ready to start working on our project powered by the latest Phoenix code.
Run mix phx.server on the terminal to start the server.
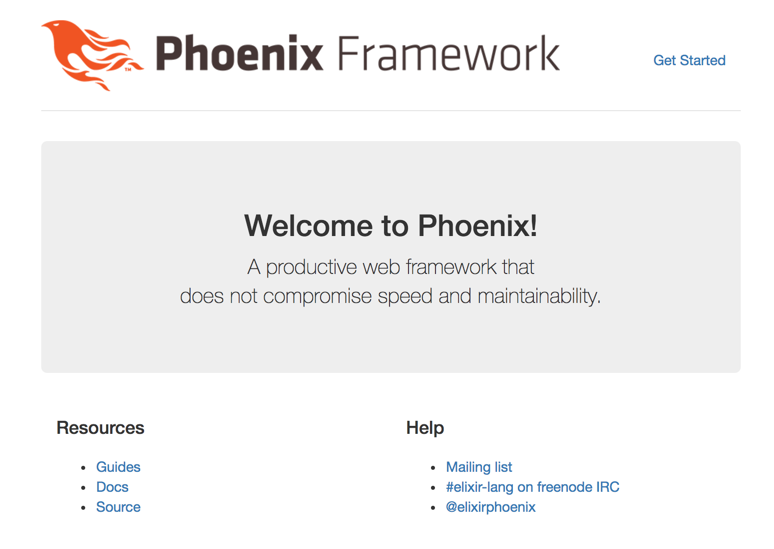
Nothing has changed since we saw the same page in Chapter 1. We shall now clean up the default HTML, and add a few CSS and Javascript files so that we don’t have to work on styling as we progress through the book.
Asset Files
Copy the assets/brunch-config.js, assets/css, assets/static and assets/vendor from the asset files bundled with this book replacing the files and folders in the assets directory of our project directory.
If all goes well, you will end up with a directory like this:
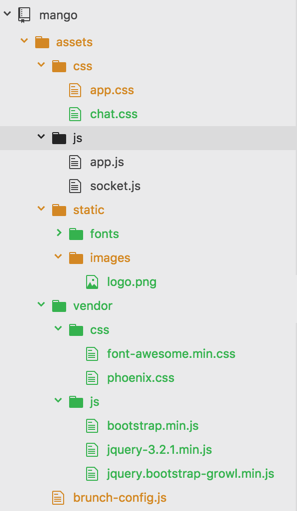
Template files
Open up mango_web/templates/layout/app.html.eex.
This file is the layout file for our project. That is, content from our page specific template will get rendered within this template.
This is a good place to put in common navigational elements that are seen across all pages of the site.
The contents of this page currently reads as below.
<body>
  <!-- Insert navigation code here --> (1)
  <div class="container">
    <!-- delete this header block --> (2)
    <header class="header">
      <nav role="navigation">
        <ul class="nav nav-pills pull-right">
          <li><a href="http://www.phoenixframework.org/docs">Get Started</a></li>
        </ul>
      </nav>
      <span class="logo"></span>
    </header>

    <p class="alert alert-info" role="alert"><%= get_flash(@conn, :info) %></p>
    <p class="alert alert-danger" role="alert"><%= get_flash(@conn, :error) %></p>

    <main role="main">
      <%= render @view_module, @view_template, assigns %>
    </main>

  </div> <!-- /container -->
  <script src="<%= static_path(@conn, "/js/app.js") %>"></script>
</body>| 1 | Insert the code <%= render "app_nav.html" %>. This renders a partial containing the common navigation menu. |
| 2 | Delete the entire <header> block. |
When you are done, the body tag should now read as below:
<body>
  <%= render "app_nav.html" %>
  <div class="container">
    <p class="alert alert-info" role="alert"><%= get_flash(@conn, :info) %></p>
    <p class="alert alert-danger" role="alert"><%= get_flash(@conn, :error) %></p>

    <main role="main">
      <%= render @view_module, @view_template, assigns %>
    </main>
  </div>
  <script src="<%= static_path(@conn, "/js/app.js") %>"></script>
</body>
Now let’s create the partial that we referenced above.
Create a new file mango_web/templates/layout/app_nav.html.eex with the following content in it.
The code is standard Bootstrap navbar component code with embedded Elixir to insert the logo image.
<nav class="navbar navbar-default navbar-fixed-top">
  <div class="container">
    <div class="navbar-header">
      <button type="button" class="navbar-toggle collapsed" data-toggle="collapse" data-target="#primary-nav">
        <span class="sr-only">Toggle navigation</span>
        <span class="icon-bar"></span>
        <span class="icon-bar"></span>
        <span class="icon-bar"></span>
      </button>
      <a class="navbar-brand" href="/">
        <img src="/images/logo.png"/> Mango
      </a>
    </div>
    <div class="collapse navbar-collapse" id="primary-nav">
      <ul class="nav navbar-nav">
        <li><a href="">Link</a></li>
      </ul>
    </div>
  </div>
</nav>
As we saw in the first chapter, mango_web/templates/page/index.html.eex is the template that gets rendered when we visit the home page. Let’s open it up and delete all the contents in it.
Test file
We will also delete the default controller test file present in tests/mango_web/controllers/page_controller_test.exs as it’s not relevant.
If you have followed along, this is the summary of the changes done so far:
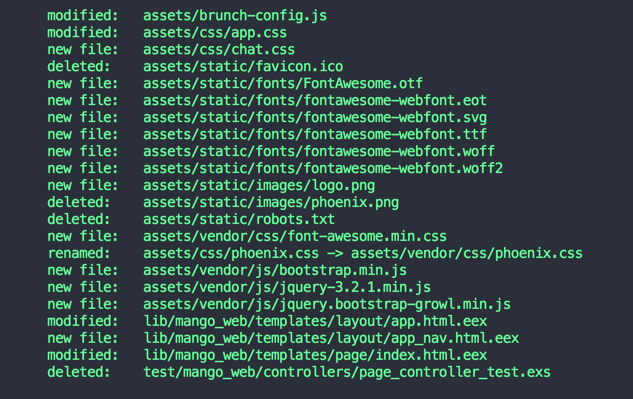
Back to the browser, our homepage should now display a nicely themed navbar and present a blank slate for us to play with.
Setting up Hound
Phoenix projects by default are configured to work with the ExUnit testing framework for
writing controller, context and view tests.
In this book, we will use Hound, in addition to the default setup.
Hound is an Elixir library for writing acceptance test. These tests are run using the browser and test the end-to-end workflow of each feature of our app.
If you are familiar with Rails, this is like Capybara for Phoenix.
You can use Hound to write test code which can be executed in Chrome, Firefox or Phantomjs browsers.
We will use Phantomjs in this book for running our Hound tests.
Open the mix.exs file and add the hound dependency to your mix.exs file:
defp deps do
  [
    {:phoenix, "~> 1.3.0"},
    {:phoenix_pubsub, "~> 1.0"},
    {:phoenix_ecto, "~> 3.2"},
    {:postgrex, ">= 0.0.0"},
    {:phoenix_html, "~> 2.10"},
    {:phoenix_live_reload, "~> 1.0", only: :dev},
    {:gettext, "~> 0.11"},
    {:cowboy, "~> 1.0"},
    {:hound, "~> 1.0"} (1)
  ]
end| 1 | Add the Hound dependency. |
Next run mix deps.get to download Hound and its dependencies.
Now open up the config/test.exs file and look for the configuration below:
# We don't run a server during test. If one is required,
# you can enable the server option below.
config :mango, MangoWeb.Endpoint,
  http: [port: 4001],
  server: false
As the comment says, if we want the server to run during the test, we need to set the server value to true.
Since we will use the Hound library with Phantomjs to test our app in a browser, we set this value to true.
We also need to configure Hound to let it know which browser we will use for testing.
The modified config/test.exs file is shown below.
config :mango, MangoWeb.Endpoint,
  http: [port: 4001],
  server: true  (1)

config :hound, driver: "phantomjs" (2)

(...) (3)| 1 | Change from false to true. |
| 2 | Add this line. |
| 3 | Retain all other code as is. |
Our next task is to install Phantomjs if you haven’t already installed it. On macOS, you can install Phantomjs using brew.
brew install phantomjsOn Ubuntu you can install Phantomjs using apt-get
sudo apt-get install phantomjsA little intro to basic Hound
Throughout this book we will be using the Hound library to interact with our HTML programmatically. Let’s spend some time understanding the basics so that when we use Hound in subsequent chapters we don’t have to diverge too much from what we are doing to understand Hound’s syntax.
Think of Hound as your little assistant who likes to do rote tasks. First, you teach Hound a given task. Then later you can ask it to repeat the task after you make modification to your code and it will repeat the task with pleasure. The type of tasks you can automate with Hound are
-
Go to a webpage
-
Fill in an HTML form element with given content
-
Submit a form
-
Check if the page has some given content
-
Find a link by its visible text
-
Click on a link
-
Resize the browser window
-
Take a screenshot
-
Read the page content
-
Find the current path
This is a non comprehensive list of tasks that Hound can do. To read the comprehensive list of tasks, have a look at Helpers section in the API Documentation.
The above list of tasks gives us an idea about Hound’s abilities. Hound can do the job of manual testers. Manual testers are typically given a list of tasks to accomplish, and do so by opening a browser and check them off one by one. Hound does this programatically.
Let quickly review some of the basic Hound commands that we will use quite often as we move through the book.
-
navigate_to -
find_element -
find_within_element -
visible_text -
click -
page_source
Most of the names are self explanatory. We will quickly go over each command below to ensure our understanding:
Visit Page
All Hound commands are given in the context of a webpage. So the first thing that we will want to do is to visit a page.
We can instruct Hound to visit a page by using the command navigate_to("/path_to_visit")
Finding Elements
To interact with the webpage, we need to first identify the element on the page with which we want to interact.
Consider the following HTML document displaying two pieces of product information:
<body>
  <div id="product1" class="product">Product 1
    <span class="price">50</span>
    <a class="buy-link" href="buy/1">Buy now</a>
  </div>
  <div id="product2" class="product">Product 2
    <span class="price">100</span>
    <a class="buy-link" href="buy/2">Buy now</a>
  </div>
</body>
We can use Hound to find the first product by using find_element(:css, "#product1").
We can also find all products in the page by using find_all_elements(:css, ".product").
|
From the Hound docs on
find_element/2Finds element on current page. It returns an element that can be used with other element functions.
Valid selector strategies are |
In the command find_element(:css, "#product1"), the first argument refers to the strategy by which we identify the elements.
In this case, we are using :css strategy to find the elements so in the second argument we reference a valid css selector.
#product1 is the CSS selector that we normally use to style the product element in CSS by its id property.
We use the same selector here to find the element.
Next, to find an element which is a child of another element we use the find_within_element/3 function. It works similarly to how the find_element/2 function works but takes a parent element as an additional first argument. For example, to find the buy link of the first product, we can use find_within_element/3 like this:
# First find the parent element
parent_element = find_element(:id, "product1")

# Use the parent element found above to narrow down to price within it.
buy_link_element = find_within_element(parent_element, :css, ".buy-link")
Interacting with the elements
After we have identified an element we can interact with it. For example, we can click the element or read the elements visible text.
Extending the above example,
-
to find the text in the link element, we can make use of
visible_text(buy_link_element)to locate the text "Buy now" within the parent element. -
to click on the buy link and there by navigate to the linked page, we make use of
click(buy_link_element). This makes Hound navigate tobuy/1path.
Interacting with the page
Sometime, we might need to interact with the page as a whole. Such as reading the page source to find out if some text is present or not.
In such cases, we make use of page_source() which returns the complete HTML of the visited page as a string.
Writing our first acceptance test
Let’s write our first acceptance test.
Open a new file test/mango_web/acceptance/homepage_test.exs and write the following code.
defmodule MangoWeb.HomepageTest do
  use ExUnit.Case
  use Hound.Helpers (1)

  hound_session()   (2)

  test "presence of featured products" do (3)
    navigate_to("/")

    assert page_source() =~ "Seasonal products"
  end

end| 1 | This enables the use of helper functions from Hound library in our test. |
| 2 | Starts a Hound worker who will do the tasks instructed. |
| 3 | test block encloses a logical unit of test coverage which may contain one or more tasks to be done. |
The above code loads the / path of our app in the test browser and checks if the page contains the text "Seasonal products”.
We are using helper functions provided by the Hound library to navigate to a given path and to check the presence of a text in the resulting page.
|
What is
=~?
does |
We need to start Phantomjs before running the test. On a separate terminal tab, run the following command to start Phantomjs.
→ phantomjs --wdNow on another terminal, run
mix test test/mango_web/acceptance/homepage_test.exsto execute the test we have written.
Hound makes a request to http://localhost:4001 in Phantomjs browser and checks for the text "Seasonal products".
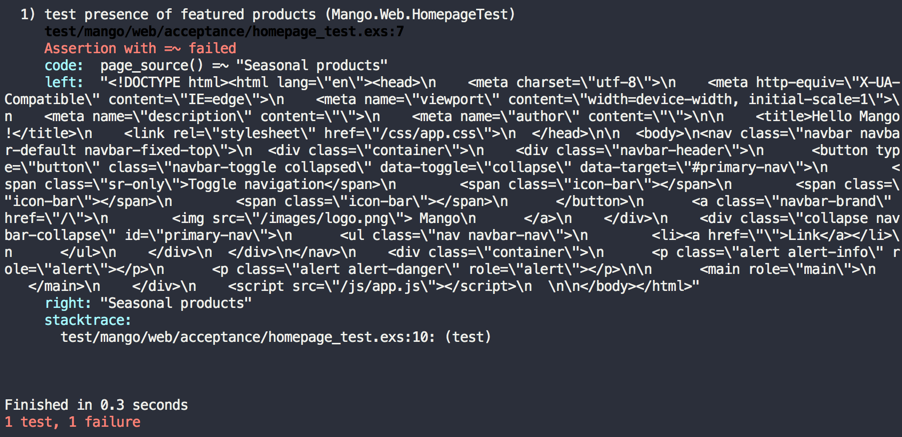
The test fails as the text "Seasonal products" is not present in our template. Again, this test simply checks for the presence of a chunk of text. To make this test pass we just need to add the text that our test expects to our homepage template.
Two problems you might encounter. First, if your test fails with a blank HTML body content as in the screenshot below, you most likely forgot to turn on the server for the test environment as explained above.
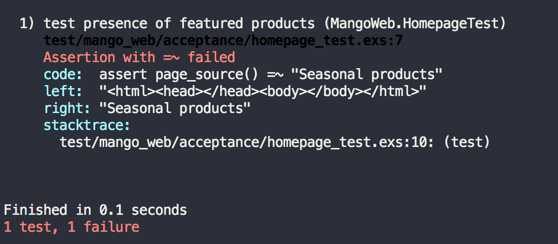
Second, if you get an error like below, then you might not have started Phantomjs in a new terminal as indicated earlier.
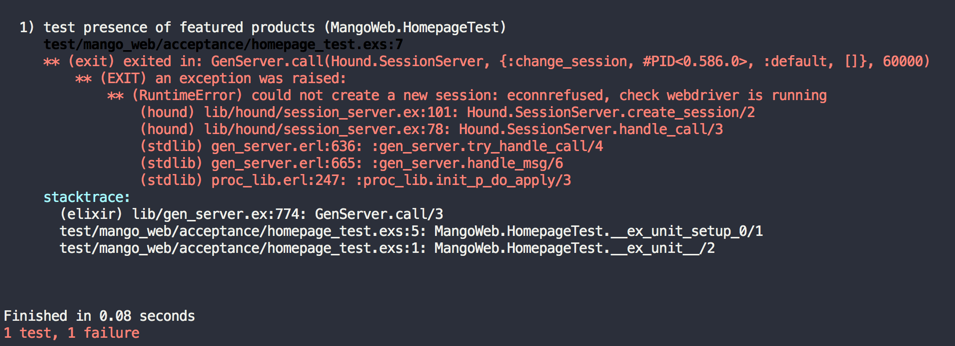
Add the following text to templates/page/index.html.eex
<h1>Seasonal products</h1>Now run the test again and it should pass.

From now on, whenever we run our acceptance tests, we need to ensure that Phantomjs is also running.
Summary
This is the starting chapter for an awesome journey to build a working ecommerce site.
Here we laid our ground work by understanding the scope of the work, we identified two personas for the project, and created various user stories for these personas.
We applied our newly acquired knowledge to installing Phoenix, creating a new Phoenix project, and added our project dependencies. We started to understand the importance of Test Driven Development and leant the basics of how Hound plays an integral part in TDD.
Finally, we had a bootstrap session on using Hound. We installed the Hound library, learnt various key commands for using Hound, and explored a short list of tasks that can be automated using it.
Product catalog
Iteration Planning
A simple design always takes less time to finish than a complex one. So always do the simplest thing that could possibly work next.
Simplicity is the key
In this chapter we will cover the following user stories.
As a customer, I want to
-
See seasonal products
-
Browse products by category
It’s important to note that we do not have a user story for managing products selected as one of our first user stories to develop. The reasons we did not select Manage Products are
-
Typically a user story like Manage Products is a term for a group of user stories involving actions such as
Create, List, View, Update and Delete products
-
Though all these actions can be implemented using a single CRUD resource generating command like
phx.gen.html(which we will see in Chapter 8 and 9), it’s often an incomplete implementation of the business rules. -
Each of the above actions needs different levels of access permissions which are not handled by the CRUD generators.
-
In the case of the Mango shop, I have the insider knowledge from the fictional shop owner that they don’t update products often.
So the value of the user story Manage Products is less than having the customer actually see them in the online store.
In addition to the reasons mentioned, our approach will also help us to organically build our knowledge of Phoenix by starting with simpler functions without Ecto and then build upon this knowledge to understand Ecto’s Migration, Schema and Repo over time.
Seasonal Products
We will start by writing an acceptance test case that captures the requirements above:
Open test/mango_web/acceptance/homepage_test.exs and modify it as below:
defmodule MangoWeb.Acceptance.HomepageTest do
  use ExUnit.Case
  use Hound.Helpers

  hound_session()

  test "presence of seasonal products" do
    ## GIVEN ##
    # There are two products Apple and Tomato priced at 100 and 50 respectively
    # With Apple being the only seasonal product

    ## WHEN ##
    # I navigate to homepage
    navigate_to("/")

    ## THEN ##
    # I expect the page title to be "Seasonal products"
    page_title = find_element(:css, ".page-title") |> visible_text()
    assert page_title == "Seasonal Products"

    # And I expect Apple to be in the product displayed
    product = find_element(:css, ".product")
    product_name = find_within_element(product, :css, ".product-name") |>  visible_text
    product_price = find_within_element(product, :css, ".product-price") |>  visible_text

    assert product_name == "Apple"
    # And I expect its price to be displayed on the screen
    assert product_price == "100"

    # And I expect that Tomato is not present on the screen.
    refute page_source() =~ "Tomato"
  end

end
The above test captures the specifications that we have listed for the user story in the format:
Given - lists the state of the system to be tested.
When - lists the actions performed in the test.
Then - lists the expectations regarding the new state that we need to test.
All three are listed as comments in the test above.
The test will now fail because we don’t have the system with the expected setup as mentioned in the GIVEN section, i.e., we don’t have the products yet.
What we need is
-
a function that lists all products
-
a function that filters and return only the seasonal products.
When we have both these functions, we have the necessary setup for continuing with the acceptance test.
In Test Driven Development, we spend time thinking about how our API should work before we implement it. This thinking exercise should focus on
-
keeping the function’s responsibility clear.
-
choosing clear and concise names for the functions that conveys their intent.
-
identifying the required inputs and expected outputs for our functions.
|
Interestingly this is the same exercise that we need to practice when using the Phoenix |
Let’s first work out the details of our first function — a function that lists all products.
-
It should only return a list of products and do nothing else.
-
We can settle on the name
list_productswhich is concise and expresses its intent. -
Lastly the function needs no input and returns a list data type containing the products.
Now that we have spent time thinking about our function, we could go ahead and create it. But under which module? Since all named functions in Elixir must belong to a module, our function needs a home.
We could place our list_products function thoughtlessly on any FooBar module placed inside any of the folders inside lib and it would work.
Unlike many MVC frameworks, in Elixir projects there is no special folder in which to place our code to make it discoverable.
Though any random path and module will work, we want our code to be well organized and self-explanatory. This will benefit any new person looking at our code or our future self when we return to the project code 6 months in the future.
We could settle on the module name Product, and with our project name prepended, it would be Mango.Product.
That’s one valid choice. However, that also means we will have as many public modules as business entities.
In the short term there is no harm going this way, but it brings in certain challenges.
For example, if we have a Category entity, all functions related to the category entity will fall under the Category module. In this scenario, where will we place a function that spans both entities? Say, list of products in a given category?
Does this function belong to the Category or the Product module? Placing the function in either of them is a choice that is not backed up by any rationale.
In situations like this, it’s best to think about our expectations of the world around us. For example, imagine a new gadget shop opens in your area. You walk up to the store manager to ask a few questions.
-
Do you accept cash payment?
-
Do you have deals on iPhone?
-
Do you offer home delivery?
It’s our expectation that the store manager can answer all these questions. On the other hand if he said
Oh dear madam! Pardon me for my limited knowledge. Your first question is regarding cash payments. Please ask that question to the guy sitting at the cash register. Your second question is on iPhones, please ask that to the lady standing near the Apple products section. Our delivery man is standing by his truck out back, you can ask him about home delivery.
If that was the reply, I bet you would never enter that store again. Why? Because it is our expectation that a store have a person who knows how the store functions, and that the manager is that person. As a store manager, it’s our expectation that he is reasonably able to answer all kinds of questions related to the store — which is the context for which he is responsible. If we were to ask him a question related to trade enquiry, he may not have the knowledge and may direct us to the Operations Manager who deals with them and that’s acceptable.
So what is the take away point that is related to our problem space? Just like how we expect a store manager, to be the single point of contact for all kinds of questions related to the store, we need a module that can hold functions related to our product as well as for other entities that are closely related. This unnamed module that will hold our product functions is the context in which our product entity lives. We expect other business entities to share this context space, but only if they are closely related.
Just like having to spend time thinking about our function design, it’s necessary to spend time thinking about good context names and what business entities each context should hold.
Most often the context names can be derived from the business processes in the physical world. In our case, we will settle on the name Catalog as our context.
Now that we have spent time thinking about various aspects of our functions and the context module, let’s define a simple test for our functions before we actually implement them. This test is going to be a unit test, testing the api of our functions. We will create a new context test file at test/mango/context_name/context_name_test.exs. Note, you need to also create the folder test/mango as it doesn’t exists yet.
Create a new file in test/mango/catalog/catalog_test.exs and add the following code.
defmodule Mango.CatalogTest do
  use ExUnit.Case (1)
  alias Mango.Catalog (2)

  test "list_products/0 returns all products" do
    [p1, p2] = Catalog.list_products
    assert p1 == "Tomato"
    assert p2 == "Apple"
  end
end| 1 | By using ExUnit.Case, we have macros such as test and assert available in our test file. |
| 2 | Add alias to Mango.Catalog to keep our code concise. |
The above test checks if calling the function Mango.Catalog.list_products/0 returns a list of two items which we verify by pattern matching.
We then verify if the two products are named "Tomato" and "Apple".
Lets run the test, which will obviously fail.
mix test test/mango/catalog/catalog_test.exs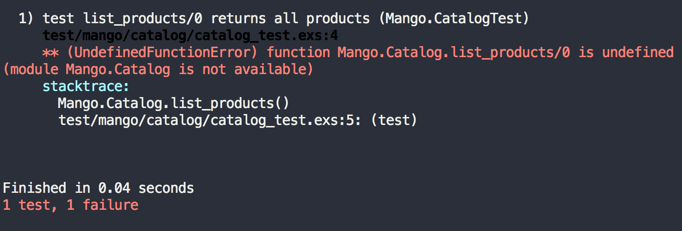
To get this test to pass, let’s create a new module and function as per the test specifications.
Create a new file at lib/mango/catalog/catalog.ex with the below content.
defmodule Mango.Catalog do

  def list_products do
    ["Tomato", "Apple"]
  end
end
Now running the test again, we see our test pass.
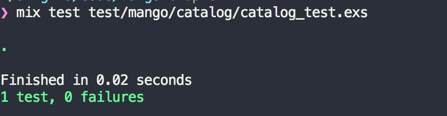
The information that we return about each product is very basic. We just returned the product name. However, as per our user story specification we need the product name and price.
To store complex data about each product, we could make use of a map or a struct data type. In this case since we want all products to have the same data structure, struct is the more appropriate choice.
Let’s modify our test code so that it now expects a list of two product structs.
defmodule Mango.CatalogTest do
  use ExUnit.Case
  alias Mango.Catalog
  alias Mango.Catalog.Product

  test "list_products/0 returns all products" do
    [p1, p2] = Catalog.list_products

    assert %Product{} = p1
    assert p1.name == "Tomato"
    assert %Product{} = p2
    assert p2.name == "Apple"
  end
end
Now our test will fail. We need to define a Product struct first and then change the implementation of list_products/0 to a list of structs.
Since the struct is related to our Catalog context, we will create it inside lib/mango/catalog/. Create a new file product.ex with the following contents to define a struct.
defmodule Mango.Catalog.Product do
  defstruct [:name, :price]
end
We can now modify list_products/0. to use this new struct below.
defmodule Mango.Catalog do
  alias Mango.Catalog.Product (1)

  def list_products do
    product1 = %Product{ name: "Tomato", price: 50 }
    product2 = %Product{ name: "Apple", price: 100 }
    [product1, product2]
  end
end| 1 | We added this new alias, so we can keep our struct name short in our code. |
Running our test again, we can see it passes successfully.
Open up iex -S mix and try executing our new function.
iex(1)> Mango.Catalog.list_products

[%Mango.Catalog.Product{name: "Tomato", price: 50},
 %Mango.Catalog.Product{name: "Apple", price: 100}]
Hurray! we just created a simple product catalog for our ecommerce store.
We can make the code inside the test function even more compact if we use some pattern matching.
Instead of these three lines
[p1, p2] = Catalog.list_products

assert %Product{} = p1
assert %Product{} = p2
we could do them in a single line as below
[p1 = %Product{}, p2 = %Product{}] = Catalog.list_productsThe above code pattern matches each of the two items to a %Product{} struct before assigning it to variables p1 and p2.
Our test file now reads like this
defmodule Mango.CatalogTest do
  use ExUnit.Case
  alias Mango.Catalog
  alias Mango.Catalog.Product

  test "list_products/0 returns all products" do
    [p1 = %Product{}, p2 = %Product{}] = Catalog.list_products

    assert p1.name == "Tomato"
    assert p2.name == "Apple"
  end
end
The next thing that we want to do is to create a function that filters the products and returns only the seasonal products.
To do that, we need an attribute in our %Product{} struct that stores if the product is seasonal or not.
Add a new key to the %Product{} struct to store the seasonal value.
defmodule Mango.Catalog.Product do
  defstruct [:name, :price, :is_seasonal] (1)
end| 1 | Added the new key :is_seasonal. |
Modify list_products/0 to list one seasonal and another non-seasonal product. This way when we implement our new function to filter, we can set our expectations in our test code.
defmodule Mango.Catalog do

  alias Mango.Catalog.Product

  def list_products do
    product1 = %Product{ name: "Tomato", price: 50, is_seasonal: false }
    product2 = %Product{ name: "Apple", price: 100, is_seasonal: true }
    [product1, product2]
  end
end
Now let’s create a function to list seasonal products.
Our previous function name was list_products/0 so it stands to reason that the new function can be named list_seasonal_products/0.
Let’s write a failing test for this new function.
defmodule Mango.CatalogTest do
  use ExUnit.Case

  (...)

  test "list_seasonal_products/0 return all seasonal products" do
    [product = %Product{}] = Catalog.list_seasonal_products

    assert product.name == "Apple"
  end
end
Running mix test test/mango/catalog/catalog_test.exs will fail at this point for the above test.
Let’s add the list_seasonal_products/0 function in our Catalog module as below:
defmodule Mango.Catalog do

  (...)

  def list_seasonal_products do
    list_products()
    |> Enum.filter(fn(product) -> product.is_seasonal == true end)
  end
end
The new function basically calls our list_products/0 function to get the list of all products and passes the return value to the Enum.filter function where we only select the items whose is_seasonal value is true.
|
If you are not super familiar with |
With the above change, our catalog test will now pass.
mix test test/mango/catalog/catalog_test.exs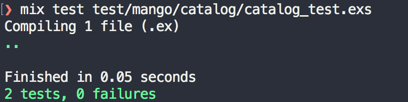
Our next task is to make the acceptance test pass.
mix test test/mango_web/acceptance/homepage_test.exs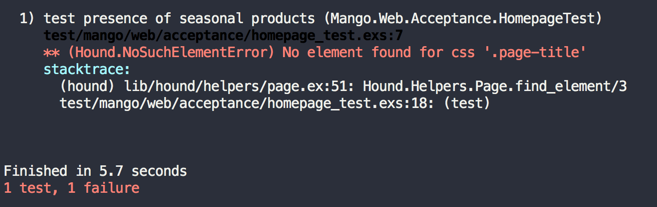
Our acceptance test fails because it doesn’t see the HTML markup as expected.
Since we already have PageController serving the homepage, we can modify it to make our acceptance test pass.
We open up PageController module and call the list_seasonal_products/0 function to get the product list. We then pass on this data to the template where we print the product names.
defmodule MangoWeb.PageController do
  use MangoWeb, :controller
  alias Mango.Catalog (1)

  def index(conn, _params) do
    seasonal_products = Catalog.list_seasonal_products (2)

    render conn, "index.html", seasonal_products: seasonal_products (3)
  end
end| 1 | Add a new alias. |
| 2 | Call list_seasonal_products/0 and then store the result in seasonal_products |
| 3 | Pass the seasonal_products variable to the index.html template under the same name. |
Let’s spend sometime understanding this piece of code.
render conn, "index.html", seasonal_products: seasonal_products (3)This code creates a variable named seasonal_products and makes it available in our template file. Let’s see the alternate ways of achieving the same thing.
When we want to send some data to the template, the only legitimate way is to add this information to the conn variable.
We can do so by using the function Plug.Conn.assign/3. The module Plug.Conn is already imported in all controller files so we can just use the function name assign without any module prefix.
The function takes the conn struct as the first argument, a key as the second, and a value as the third argument.
So in order to send the seasonal products list to our template in the name of my_seasonal_products, we need to modify the code as follows.
defmodule MangoWeb.PageController do
  (...)
  def index(conn, _params) do
    seasonal_products = Catalog.list_seasonal_products
    new_conn = assign(conn, :my_seasonal_products, seasonal_products) (1)
    render new_conn, "index.html" (2)
  end
end| 1 | Note the call to Plug.Conn.assign. |
| 2 | Note that we are now sending the new_conn with the value assigned in the previous step. |
|
What is a
conn?All controllers receive |
|
Want to know more about
conn?The second book of Phoenix Inside Out bundle — Garuda — treats this topic extensively. |
The above way of using assign/3 is fine until we face a situation of multiple variable assignments.
defmodule MangoWeb.SomeController do
  def some_action(conn, _params) do
    variable1 = get_variable1()
    variable2 = get_variable2()
    variable3 = get_variable3()

    new_conn1 = assign(conn, :my_var1, variable1)
    new_conn2 = assign(new_conn1, :my_var2, variable2)
    new_conn3 = assign(new_conn2, :my_var3, variable3)

    render new_conn3, "index.html"
  end
end
We could simplify the code by using the pipe operator and avoid the temporary variables by modifying our controller as below:
defmodule MangoWeb.SomeController do
  (...)
  def some_action(conn, _params) do
    variable1 = get_variable1()
    variable2 = get_variable2()
    variable3 = get_variable3()

    conn
    |> assign(:my_var1, variable1)
    |> assign(:my_var2, variable2)
    |> assign(:my_var3, variable3)
    |> render("index.html")
  end
end
Using the pipe operator has reduced the use of temporary variables but there are still a lot of calls to assign/3.
Phoenix provides a shortcut function to get the same output by passing a keyword list to the render/3 function.
conn
|> assign(:my_var1, variable1)
|> assign(:my_var2, variable2)
|> assign(:my_var3, variable3)
|> render("index.html")
The above code is the same as writing
render(conn, "index.html", my_var1: variable1, my_var2: variable2, my_var3: variable3)Back to our code in the PageController,
render conn, "index.html", seasonal_products: seasonal_productsthis is the same as writing
conn
|> assign(:seasonal_products, seasonal_products)
|> render("index.html")
The final step of the journey to complete our first user story is to modify the index.html template.
Open index.html.eex and add the following code.
<h1 class="page-title">Seasonal Products</h1> (1)
<div>
  <%= for product <- @seasonal_products do %> (2)
    <div class="product">
      <div class="product-name"><%= product.name %></div>
      <div>INR <span class="product-price"><%= product.price %></span></div>
    </div>
  <% end %>
</div>| 1 | Add class page-title |
| 2 | Use Elixir List comprehension to loop through the product list. |
The variables we pass from the controller are available in the templates via the @ prefix.
Therefore we have the @seasonal_products variable in our index.html template. We use list comprehension to loop over the products and we print the product details.
Run the full test suite to check if all tests pass.
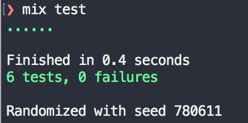
Open up http://localhost:4000 to see a seasonal product listed on the homepage.
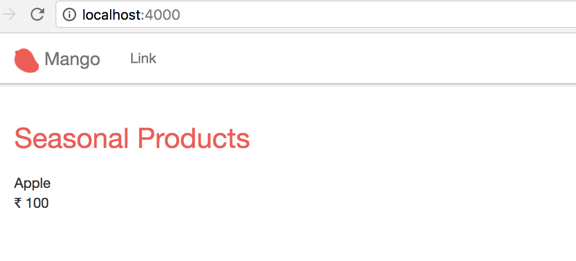
Hurray! we have successfully completed our first user story using TDD.
View Categorized Products
As with our previous user story, we will start with a failing acceptance test that captures the above specifications.
Create a new file test/mango_web/acceptance/category_page_test.exs. Here is the template.
defmodule MangoWeb.Acceptance.CategoryPageTest do
  use ExUnit.Case
  use Hound.Helpers

  hound_session()

  setup do
    ## GIVEN ##
    # There are two products Apple and Tomato priced 100 and 50
    # categorized under `fruits` and `vegetables` respectively
    :ok
  end

  test "show fruits" do
    # write tests for fruits
  end

  test "show vegetables" do
    # write tests for vegetables
  end

end
The difference between the previous acceptance test for user story #1 and this acceptance test is that we are doing two tests that share a given setup.
We have not used the setup function so far in our tests.
As we now have an example of two tests sharing a single context, I have moved the comments for the GIVEN context to the setup function.
We will dive deeper with the setup function as we start using Ecto for storing our products.
For now just know, the setup function should return an :ok atom if the setup is successful.
Here is the test for the fruits page.
  test "shows fruits" do
    ## WHEN ##
    # I navigate to the fruits page
    navigate_to("/categories/fruits")

    ## THEN ##
    # I expect the page title to be "Seasonal products"
    page_title = find_element(:css, ".page-title") |> visible_text()
    assert page_title == "Fruits"

    # And I expect Apple in the product displayed
    product = find_element(:css, ".product")
    product_name = find_within_element(product, :css, ".product-name") |> visible_text()
    product_price = find_within_element(product, :css, ".product-price") |> visible_text()

    assert product_name == "Apple"
    # And I expect its price to be displayed on screen
    assert product_price == "100"

    # And I expect that Tomato is not present on screen.
    refute page_source() =~ "Tomato"
  end
Here is the test for vegetables page.
  test "shows vegetables" do
    ## WHEN ##
    # I navigate to vegetables page
    navigate_to("/categories/vegetables")

    ## THEN ##
    # I expect the page title to be "Seasonal products"
    page_title = find_element(:css, ".page-title") |> visible_text()
    assert page_title == "Vegetables"

    # And I expect Tomato in the product displayed
    product = find_element(:css, ".product")
    product_name = find_within_element(product, :css, ".product-name") |> visible_text()
    product_price = find_within_element(product, :css, ".product-price") |> visible_text()

    assert product_name == "Tomato"
    # And I expect its price to be displayed on screen
    assert product_price == "50"

    # And I expect that Apple is not present on screen.
    refute page_source() =~ "Apple"
endThe comments in the code above explain the test details.
Since the product list is hardcoded, both the dev and test environment use the same product list.
This will change in the next section as we introduce the Ecto database wrapper and we can have different product list for development and testing.
Since we are not yet there, we will go and modify the product_list/0 function in Mango.Catalog to include the category information.
defmodule Mango.Catalog do

  alias Mango.Catalog.Product

  def list_products do
    product1 = %Product{ name: "Tomato", price: 50, is_seasonal: false, category: "vegetables" }
    product2 = %Product{ name: "Apple", price: 100, is_seasonal: true, category: "fruits" }
    [product1, product2]
  end

  (..)
end
We will also modify the %Product{} struct to allow the new key :category in it.
defmodule Mango.Catalog.Product do
  defstruct [:name, :price, :is_seasonal, :category]
end
Since both the paths /categories/fruits and /categories/vegetables share the same base path /categories/ and since both paths display similar information, we will create a single router configuration to handle both paths.
Open up lib/mango_web/router.ex and add the following configuration.
(...)
scope "/", MangoWeb do
  pipe_through :browser

  get "/", PageController, :index
  get "/categories/:name", CategoryController, :show (1)
end
(...)| 1 | Add this new line. |
In the above code, we forward all requests matching the path format categories/* to the show action of MangoWeb.CategoryController.
Since we already saw how to create a new controller and template in Chapter 1, we will run through this quickly.
Create a new controller at mango_web/controllers/category_controller.ex with the following content.
defmodule MangoWeb.CategoryController do
  use MangoWeb, :controller
  alias Mango.Catalog

  def show(conn, _params) do
    products = Catalog.list_products
    conn
    |> assign(:products, products)
    |> assign(:name, "Title")
    |> render("show.html")
  end

end
Create a new view at mango_web/views/category_view.ex with the following content.
defmodule MangoWeb.CategoryView do
  use MangoWeb, :view
end
Create a new template at mango_web/templates/category/show.html.eex with the following content.
<h1 class="page-title"><%= @name %></h1>
<div>
  <%= for product <- @products do %>
      <div class="product">
          <div class="product-name"><%= product.name %></div>
          <div>INR <span class="product-price"><%= product.price %></span></div>
      </div>
  <% end %>
</div>
At this point, we are close to completing out user story, except the following
-
We are showing all products instead of the category products.
-
The title of the page is not corresponding to the url.
To resolve the above listed issues one by one, we first need a function to filter our products by category.
This function being similar to the function list_seasonal_products/0 goes under the Catalog context module.
We will name this function get_category_products/1 accepting the category name as its argument.
Let’s write a unit test for this new function.
defmodule Mango.CatalogTest do

  (...)

  test "get_category_products/1 returns products of the given category" do
    [product = %Product{}] = Catalog.get_category_products("fruits")

    assert product.name == "Apple"
  end

end
To make the above test pass, we write a function that filters the products by category. This is similar to the function we wrote for filtering for seasonal products.
defmodule Mango.Catalog do
  (...)
  def get_category_products(name) do
    list_products()
    |> Enum.filter(fn(product) -> product.category == name end)
  end
end
Now we have the function ready to list the products of a given category. The last piece of this puzzle is to figure out how to get the category so that we can use our new function with the category information.
Let’s modify the CategoryController as below and then we will go through the changes made.
defmodule MangoWeb.CategoryController do
  use MangoWeb, :controller
  alias Mango.Catalog

  def show(conn, %{"name" => name}) do (1)
    products = Catalog.get_category_products(name) (2)
    conn
    |> assign(:products, products)
    |> assign(:name, name) (3)
    |> render("show.html")
  end

end| 1 | So far we have been ignoring the second argument. Now we are pattern matching on it and magically get the category name. |
| 2 | We now know the category name, so we are passing it to get_category_products/1 to get a list of products by category. |
| 3 | We also pass the category name to our template so we can display it as the title. |
How did we get the category name by pattern matching?
To answer this question, let’s look at our router configuration again.
get "/categories/:name", CategoryController, :show:name is called the placeholder in our path. When an actual page request comes in, Phoenix sends the value present in the placeholder in the params variable as the second argument to our actions.
This can be verified by visiting /categories/fruits path on our browser and
then checking the logs in the terminal that runs mix phx.server.

Note the line that says
Parameters: %{"name" => "fruits"}Phoenix passed the map %{"name" ⇒ "fruits"} as the params argument to our function. From here on, it’s a simple pattern matching trick.
Open iex and type in the following
iex(1)> %{"name" => name} = %{"name" => "fruits"}
%{"name" => "fruits"}
iex(2)> name
"fruits"
By using pattern matching in the above code, we set the value of name to fruits. We use the same pattern matching technique above in our show/2 function head and get the category name.
Run mix test check if all tests pass. We see it now fails for a trivial reason.
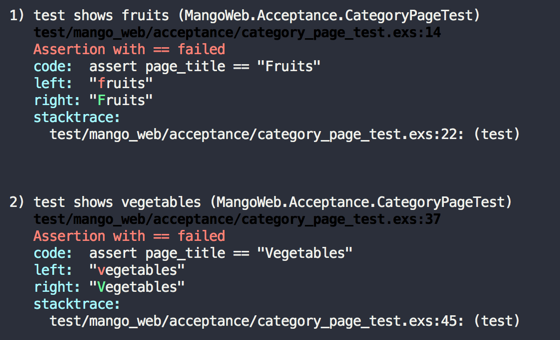
The page titles displayed in our category pages are in lower case, where as in the test, we have the title capitalized. Let’s take this opportunity to learn about writing helper function in our view module.
Open mango_web/views/category_view.ex and modify it as shown below:
defmodule MangoWeb.CategoryView do
  use MangoWeb, :view

  def title_case(name) do
    name
    |> String.downcase
    |> String.capitalize
  end
end
Next we will make use of the new function in our category template show.html file as below:
<h1 class="page-title"><%= title_case @name %></h1>Now run the entire test suite to confirm that everything passes.
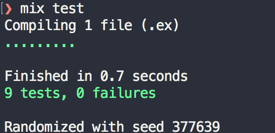
Adding links to navigation
Finally, let’s add two navigational links for these two categories. Open lib/mango_web/templates/layout/app_nav.html.eex and add two links
Remove this code
<ul class="nav navbar-nav">
  <li><a href="">Link</a></li>
</ul>
and instead add the following
<ul class="nav navbar-nav">
  <li><%= link "Fruits", to: category_path(@conn, :show, "fruits") %></li>
  <li><%= link "Vegetables", to: category_path(@conn, :show, "vegetables") %></li>
</ul>
Everytime we write a new route in our router file, Phoenix automatically generates helper functions to generate a url and/or a path for this new route.
The helper function category_path/3 is one such function generated by Phoenix when we added the route to the category page.
The function takes conn as the first argument, the controller action as the second argument, and values for any optional placeholders.
The function call category_path(@conn, :show, "vegetables") generates a string such as /categories/vegetables which is then passed as the argument to the link function.
The module Phoenix.HTML.Link defines the helper function link/2.
We make use of the link/2 helper function to generate links to the respective category pages.
Going back to the site, we get an error.
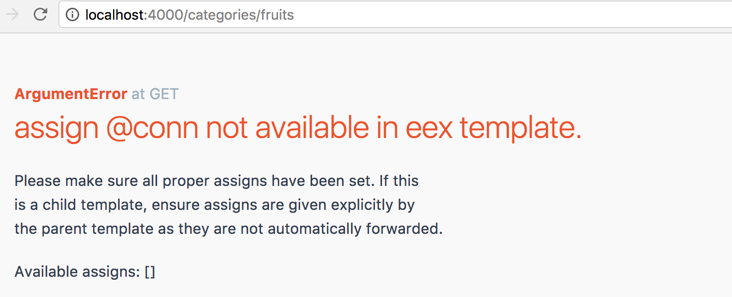
This is because the @conn variable is not available in the app_nav.html.eex. In Phoenix, partial templates don’t get the value from the parent template automatically. Variables required for partials needs to be explicitly passed on by the parent template.
Open app.html.eex in mango_web/templates/layout and modify the line below:
from
<%= render "app_nav.html" %>to
<%= render "app_nav.html", conn: @conn %>This passes the @conn variable present in the app.html.eex template to the app_nav template under the same name. We could also pass the variable under a different name to the partial by just modifying the key name.
Here it’s convenient to call it conn in both templates so we pass the value as conn.
Adding Ecto
Product information in an ecommerce store is a potential the type of data that goes into the database. So far we have used hardcoded product structs in our code. In this section let’s move away from the hardcoded product definitions and make the products load dynamically from the database. We will use the Elixir database wrapper Ecto to make this change. Our Phoenix project already lists Ecto as a dependency and is configured to use it. So we can start using it straightaway.
Our product struct currently contains the following fields:
-
name
-
price
-
is_seasonal
-
category
As we are migrating to the database, let’s also add more fields to it at the same time so that our product system looks more realistic.
In addition to the above fields, we will add the following fields to it:
-
sku
-
image
-
pack size
Creating database table
The first task is to create a database table that stores our product information.
Any change in the database is done through a migration file.
It’s just a simple Elixir script file named with a current timestamp prefix such as 20170530083715_create_product.exs so that Ecto can track which migration is new and which is pending execution. Ecto provides a handy Mix command to generate this file with just the basics needed to add our database changes.
Run the command mix ecto.gen.migration create_product to generate this migration file.
→mix ecto.gen.migration create_product
* creating priv/repo/migrations
* creating priv/repo/migrations/20170611060357_create_product.exs
The first time you run this command it creates the folder priv/repo/migrations to store migration files and also generates the timestamped migration files. On subsequent calls, it will generate only a migration file.
Open up the newly created migration file and it should read as below. Note, the timestamp on the migration file will be different when you run the command and it will not match the one above.
defmodule Mango.Repo.Migrations.CreateProduct do
  use Ecto.Migration

  def change do

  end
end
The migration file just contains an Elixir module with a function named change/0. Ecto will run this function to carry out the changes needed in the database. Currently this function doesn’t do anything. Our job is to populate this function with the changes that we want in our database. To describe the changes needed, Ecto provides a convenient Domain Specific Language(DSL) that is available to use in this module. The macro call use Ecto.Migration performs this magic.
Let’s add the instructions to create a product table with the details of the fields.
defmodule Mango.Repo.Migrations.CreateProduct do
  use Ecto.Migration

  def change do
    create table(:products) do (1)
      add :name, :string (2)
      add :price, :decimal
      add :sku, :string
      add :is_seasonal, :boolean, default: false, null: false
      add :image, :string
      add :pack_size, :string
      add :category, :string

      timestamps() (3)
    end

    create unique_index(:products, [:sku]) (4)
  end
end| 1 | Instruction to create a table named products |
| 2 | Add the required columns in the table with their data types |
| 3 | timestamps/0 is a handly function to add two common fields inserted_at and updated_at with the data type as datatime. |
| 4 | Make our sku column unique. |
When all the above changes are made to the migration file, run mix ecto.migrate to apply the changes to the database. We now have the product table in our database. We can verify it on Postgresql console.
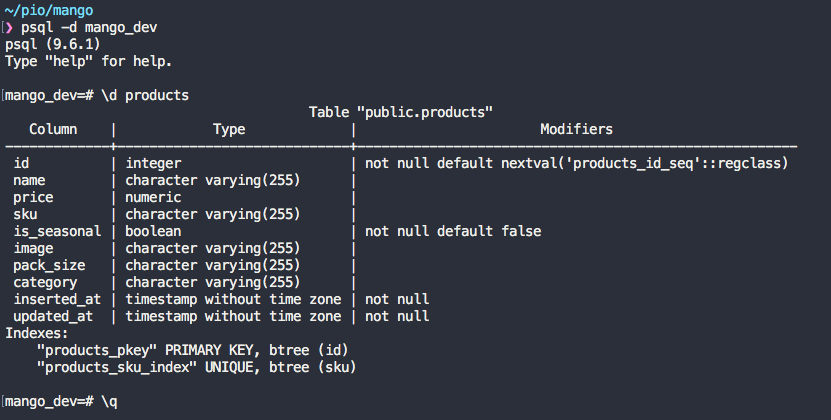
Apart from the fields that we specified in the migration file, Ecto has also generated a primary key field id automatically. This is the default behaviour and can be overridden if necessary. We can also see the timestamp field created by using timestamp/0 in the migration file.
Schema
Our next job is to create an Ecto schema for our products. It looks pretty much like our database table definition in the migration file and might look repetitive but it’s not. It serves a completely different purpose which will be clear as we develop Mango.
Open up lib/mango/catalog/product.ex file and remove the struct definition, and replace it with the schema definition as below:
defmodule Mango.Catalog.Product do
  use Ecto.Schema

  schema "products" do
    field :image, :string
    field :is_seasonal, :boolean, default: false
    field :name, :string
    field :price, :decimal
    field :sku, :string
    field :category, :string
    field :pack_size, :string

    timestamps()
  end
end
The schema definition as you can see contains more information about each field than what was provided by the struct definition. The schema is a Elixir macro that does two main tasks
-
Automatically create an Elixir struct
%Mango.Catalog.Product{}as we had earlier. -
Helps in mapping the data from database
productstable into the Elixir struct%Mango.Catalog.Product{}.
Now it’s time to start modifying list_products/0 in our Mango.Catalog module.
defmodule Mango.Catalog do

  alias Mango.Catalog.Product
  alias Mango.Repo (1)

  def list_products do (2)
    Product
    |> Repo.all
  end

  (...)
end| 1 | Add this new alias. |
| 2 | Modify this function. |
The Mango.Repo module is our point of contact with the database configured for our application. All actions that touch the database are done using a function available in this module. Here we are calling Repo.all/2 function passing in Product. Ecto automatically identifies the struct defined by the module and retrieves all the products stored in the database.
Back to the browser, http://localhost:4000 returns a blank page because we don’t have seasonal products in our database. In fact, we don’t have any product at all.
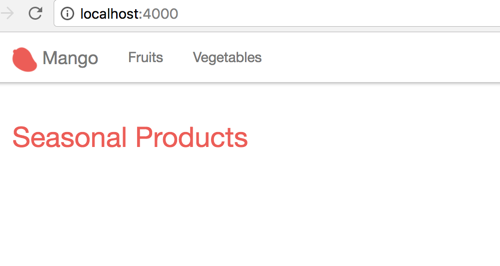
We will insert the same two products that we hard coded earlier into our database.
Open iex -S mix and run the following commands
iex> alias Mango.Catalog.Product
iex> alias Mango.Repo
iex> Repo.insert %Product{name: "Tomato", price: 50, is_seasonal: false, category: "vegetables"}
iex> Repo.insert %Product{name: "Apple", price: 100, is_seasonal: true, category: "fruits"}
Back to the browser, it now displays the seasonal products on the homepage.
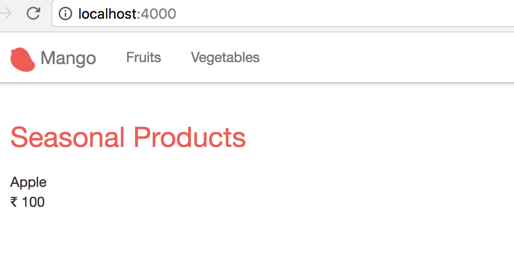
However, our tests are now broken. Running mix test now fails for all our tests. Our test also raises a few new error messages that we haven’t seen so far:
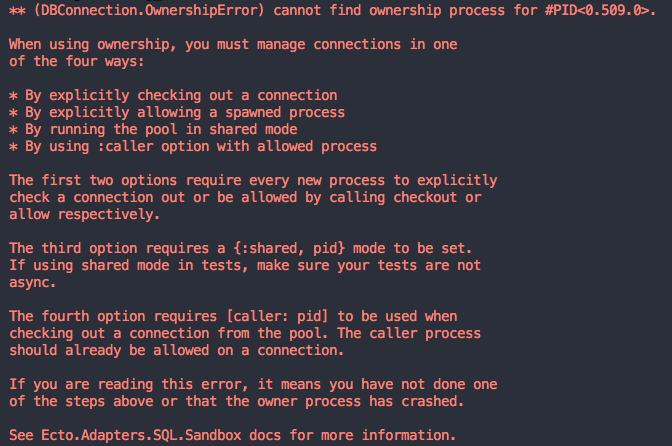
This is because until now, we were using a hard coded product list in our test and not using the database. Let’s fix them.
Open up test/mango/catalog/catalog_test.exs file and modify as below:
defmodule Mango.CatalogTest do
  use Mango.DataCase (1)

  alias Mango.{Catalog, Repo} (2)
  alias Mango.Catalog.Product

  setup do (3)
    Repo.insert %Product{ name: "Tomato", price: 55, sku: "A123", is_seasonal: false, category: "vegetables" }
    Repo.insert %Product{ name: "Apple", price: 75, sku: "B232", is_seasonal: true, category: "fruits" }
    :ok
  end

  (...)

end| 1 | Instead of using ExUnit.Case, we use Mango.DataCase which helps us establish db connections during tests.
This module is already present in our project, thanks to mix phx.new generator. |
| 2 | Add new alias to Mango.Repo |
| 3 | Add setup call to insert test data. |
The setup call deserves more explanation. Our Phoenix project is configured with three different Mix environments — dev, test, prod.
Each of these environments is capable of having many options including having its own database.
When we run mix test, our test will not find the products that we added in the iex shell because these got added in the dev environment. So in order to have some products available for us to test, we need to insert them for each test manually in the test environment before running the tests. This helps us to separate our test data from the actual live data.
Additionally these test data are removed automatically after each test run so that our test are always run against a clean database.
Now running mix test, we can see all our tests in Mango.CatalogTest pass while our acceptance tests fail. Our acceptance tests also need a similar fix.
Modify both our acceptance tests as below:
defmodule MangoWeb.Acceptance.CategoryPageTest do
  use Mango.DataCase (1)
  use Hound.Helpers

  hound_session()

  setup do (2)
    ## GIVEN ##
    # There are two products Apple and Tomato priced 100 and 50
    # categorized under `fruits` and `vegetables` respectively
    alias Mango.Repo
    alias Mango.Catalog.Product
    Repo.insert %Product{name: "Tomato", price: 50, is_seasonal: false, category: "vegetables"}
    Repo.insert %Product{name: "Apple", price: 100, is_seasonal: true, category: "fruits"}
    :ok
  end
(...)defmodule MangoWeb.Acceptance.HomepageTest do
use Mango.DataCase (1)
use Hound.Helpers
hound_session()
setup do (2)
## GIVEN ##
# There are two products Apple and Tomato priced 100 and 50 respectively
# Where Apple being the only seasonal product
alias Mango.Repo
alias Mango.Catalog.Product
Repo.insert %Product{name: "Tomato", price: 50, is_seasonal: false}
Repo.insert %Product{name: "Apple", price: 100, is_seasonal: true}
:ok
end
(...)| 1 | Instead of using ExUnit.Case, we use Mango.DataCase which helps us establish db connections during tests. |
| 2 | Insert setup call as we did in CatalogTest. |
The reason we need to repeat the test data in each test file is as stated above. Each test runs in a database transaction. So the setup data available to tests defined in one module is not available for the tests defined in another module.
At this point, we might also think of DRYing up our setup call by moving all the code to a common function. Let’s resist that urge to keep our tests independent. Making our test files dependent on a common fixture creates more harm than benefit as any change in the common fixture doesn’t obviously convey the tests that get affected by it.
Let’s run the entire test suite to check if we introduced any new bugs with the changes we made.
mix test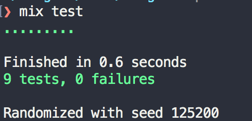
With our tests backing us up, we can be confident that we didn’t introduce any regressions and move to the next feature.
Seed Data
Phoenix comes with a simple priv/repo/seeds.exs file with comments on how to use it.
Basically, any valid Elixir code can be put in the seeds.exs file and run using mix run priv/seeds.exs. If we modify the file with the following contents, it will insert two products when it’s run.
alias Mango.Repo
alias Mango.Catalog.Product
Repo.insert %Product{name: "Tomato", price: 50, is_seasonal: false, category: "vegetables"}
Repo.insert %Product{name: "Apple", price: 100, is_seasonal: true, category: "fruits"}
Instead of doing this, we will use a CSV where each line represents a product. We will loop over the data, parsing and inserting each product.
Similar to what we did earlier in Chapter 2, we will again use the Nimble CSV library for parsing the file.
Open mix.exs file and add nimble_csv as dependency.
defp deps do
  [
    (...)
    {:hound, "~> 1.0"},
    {:nimble_csv, "~> 0.1.0"} (1)
  ]
end| 1 | Add nimble_csv as dependency. |
Run mix deps.get to download the new dependencies.
Copy the CSV file product_list.csv bundled with the book code to priv/seed_data/product_list.csv and add the following code to seeds.exs.
The code again is similar to what we did in Chapter 2, except that it calls our Repo.insert function for each item.
alias NimbleCSV.RFC4180, as: CSV
alias Mango.Catalog.Product
alias Mango.Repo

"priv/seed_data/product_list.csv"
|> File.read!
|> CSV.parse_string
|> Enum.each(fn [_, name, price, sku, is_seasonal, image, pack_size, category] ->
     is_seasonal = String.to_existing_atom(is_seasonal) (1)
     price = Decimal.new(price) (2)
     %Product{name: name, price: price, sku: sku, is_seasonal: is_seasonal, image: image, pack_size: pack_size, category: category}
     |> Repo.insert
end)| 1 | Convert string value such as "true" or "false" to boolean data type. Since true and false boolean values are Elixir atoms, we convert it to atoms. |
| 2 | Convert string value such as "12.5" to Decimal data type. |
|
User input strings should not be converted to Atom dynamically to avoid atom table blow up as explained in Chapter 2.
However, in this case, we are using If for some reason, our CSV file contains other strings instead of |
Now run
mix run priv/repo/seeds.exsto populate our database. Back in our browser, we should now be seeing a lot more products.
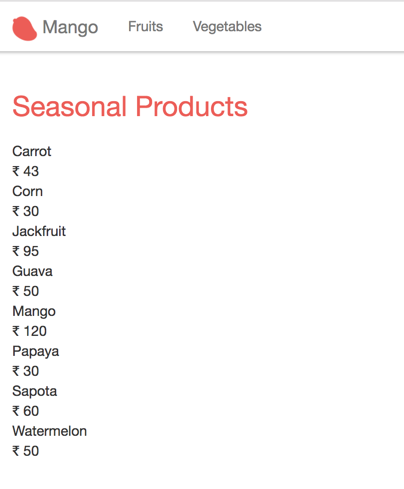
We added a couple of products through IEx shell in the last section. So let’s reset the database so that we only have the products created through the seeds file.
Stop any active iex shell or mix phx.server using the database and run mix ecto.reset.
This will
-
drop the database
-
recreate database
-
run the migrations and
-
finally run the seed file.
Refactor and Tidy up
In the homepage template, we have the following code
(...)
<div class="product">
  <div class="product-name"><%= product.name %></div>
  <div>INR <span class="product-price"><%= product.price %></span></div>
</div>
(...)
We also have the same code duplicated in category show template.
Let’s DRY this up by refactoring the above code into a separate template that we can call from both the home and category page templates.
Create a new folder lib/mango_web/templates/product to hold this new template.
Since the template we are going to create is for a product, which doesn’t logically belong to either category or page module, we are using a new folder.
Inside this new folder, create a new file product_card.html.eex with the following code extracted from the homepage template.
<div class="product">
  <div class="product-name"><%= @product.name %></div> (1)
  <div>INR <span class="product-price"><%= @product.price %></span></div>
</div>| 1 | Note the addition of @ prefix to the product variable. In partials, variables are passed down from the parent template and are no longer local variables inside a list comprehension. |
Since all template files have to be backed up by a view module, let’s create a new ProductView module to support this template.
Create a new file mango_web/views/product_view.ex with the following code.
defmodule MangoWeb.ProductView do
  use MangoWeb, :view
end
Now back in the homepage template, let’s modify the code to use the new template. We will also add some bootstrap classes to make it look pretty.
<h1 class="page-title">Seasonal Products</h1>
<div class="row"> (1)
  <%= for product <- @seasonal_products do %>
    <div class="col-md-4"> (2)
      <%= render MangoWeb.ProductView, "product_card.html", product: product %>(3)
    </div>
  <% end %>
</div>| 1 | Add a new Bootstrap class. |
| 2 | Enclose the content in a new Bootstrap column. |
| 3 | Use the new template that we extracted. |
Since the new template lives in a view that is different from the view responsible for the current template, we explicitly pass the view name in our call to the render function.
We do the same in the category page template.
<h1 class="page-title"><%= title_case @name %></h1>
<div class="row"> (1)
  <%= for product <- @products do %>
    <div class="col-md-4"> (2)
      <%= render MangoWeb.ProductView, "product_card.html", product: product %> (3)
    </div>
  <% end %>
</div>| 1 | Add a new Bootstrap class. |
| 2 | Enclose the content in a new Bootstrap column. |
| 3 | Use the new template that we extracted. |
Run mix test to confirm all our tests pass and nothing breaks in response to this refactoring.
Our database contains more information about each product than we display now. Let’s modify our product template to show all the fields. Again we will use some Bootstrap classes to make the display look nice.
<div class="product thumbnail">
  <div class="caption">
    <span class="text-muted pull-right"><%= @product.pack_size %></span>
    <h2>
      <div class="product-name"><%= @product.name %></div>
      <span class="pull-right">
        <small class="product-price">INR <%= @product.price %></small>
      </span>
    </h2>
    <hr/>
  </div>
  <img src="<%= @product.image %>" />
</div>
Back in the homepage, we see more information for each product stacked horizontally. However, we don’t see the images rendered.
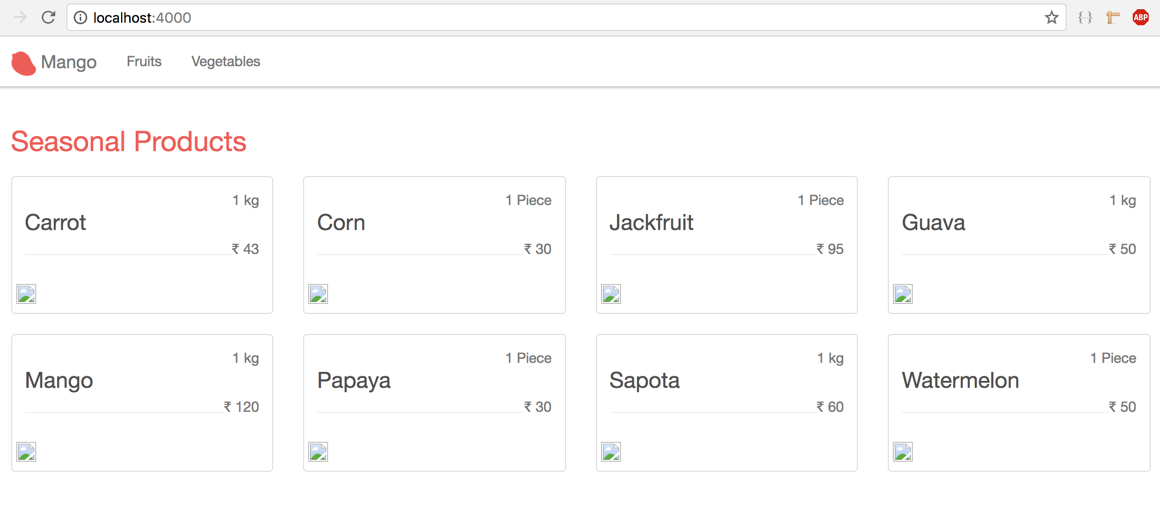
Copy the product_images folder from the files bundled with book to priv/static directory.
Refresh the browser again, we still don’t see them.
This is because our project is not configured to serve static files from this new directory that we created.
That’s easy to fix. Open up the file lib/mango_web/endpoint.ex add product_images to the list of directories allowed by Plug.Static which is responsible for serving static files.
plug Plug.Static,
  at: "/", from: :mango, gzip: false,
  only: ~w(css fonts images product_images js favicon.ico robots.txt)
Now refresh the browser and you will see all the product images load up.
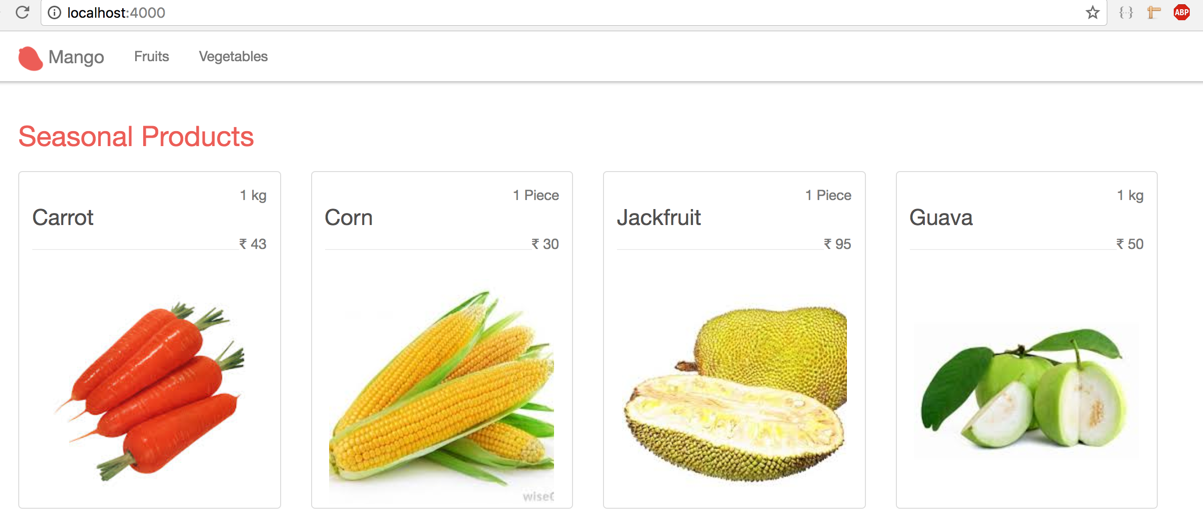
Summary
We learned how to organize our code in modules by Context.
We explored the importance of conn, saw how it gets passed across the entire project, and learnt how to pass variables to our templates.
We created a few acceptance tests for the various modules we have so far. We also saw the use of the DataCase to set up the database for our tests.
Finally, we started with a hardcoded list of products and transitioned to using Ecto with a database. Through this process we were able to see the difference between a database table and a schema. We further stretched our knowledge of working with data by setting up seed data, importing data from a CSV file with Nimble, and by using the reset command to drop and recreate the database.
Register, Login, Logout
Iteration Planning
In this chapter we will cover the following user stories:
As a customer, I want to
-
register for an account
-
login to the website
-
logout of the website
Initially, the Cart chapter was planned to appear as Chapter 5 since it seemed natural to work on the cart feature as an extension of the product catalog that we did in the last chapter.
However, in terms of complexity and learning curve, the Cart chapter involves more complex concepts. The Register, Login, Logout chapter is introduced here instead of the Cart chapter so that we can work our way into concepts such as Ecto’s Changeset and Plug with simpler examples. This will allow us to incrementally understand the more complex ideas in the following chapters.
Registration is a typical action required on most websites. Normally, the user account details such as email and password are stored separately from the user profile details such as name, phone number and address. However, we are going to combine both these data sets together in a single table because
-
It’s easier to understand the basics with simpler data structure and this is our primary focus in this chapter.
-
In a real application we are most likely to use an external library for user registration so we don’t have to learn a full implementation of something that we will surely replace in our real projects.
In this chapter, we will learn:
-
How to create HTML forms using Phoenix HTML helper functions.
-
How to validate schema structs using Ecto Changesets.
-
The basics of
Plug.Connstruct.
Registration
We are postponing our acceptance test in this chapter. We will go through a long tour of various concepts before we actually arrive at creating the registration form. By that time we risk forgetting what we did in the test. So instead we will start by learning the preliminaries required for user registration. Once we have the requisite foundation set, we will return to our acceptance test and then develop the functionality for this chapter.
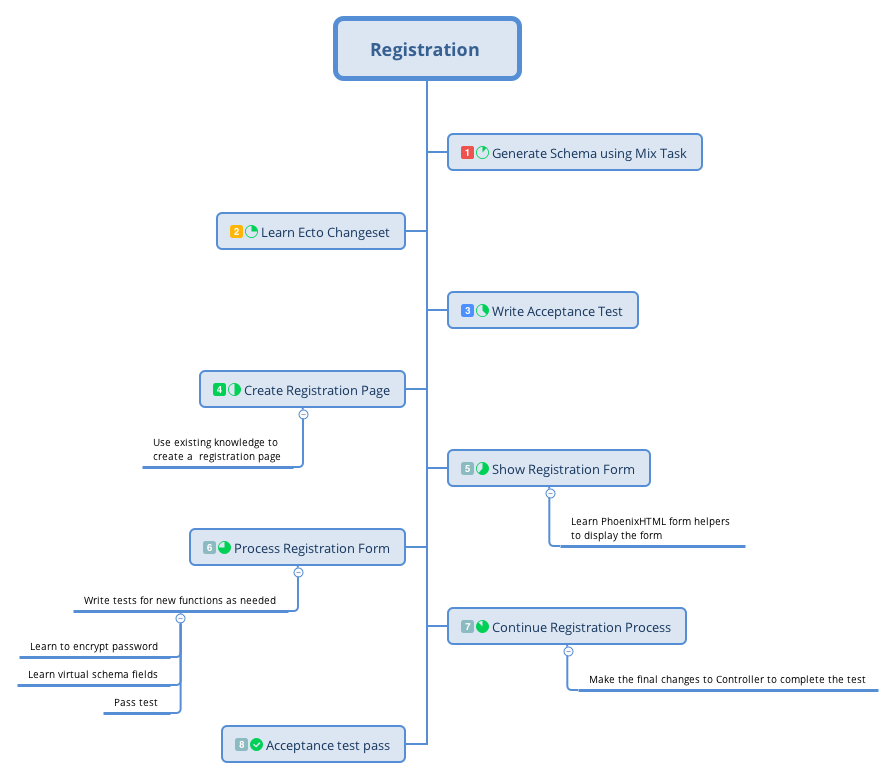
Generating Schema Using Mix Task
Let’s get started with our storage needs. We need to decide where to store the registration data and how we should represent this data in our application.
As we saw earlier, we can store the data in a customers table and we can represent this data in our application using a %Customer{} struct.
The next thing we need to consider is the context module that will hold our API functions which will be used to interact with this struct. The context for this customer struct can be CRM (Customer Relationship Management).
We chose this name for the context as we have already seen a full list of user stories for Mango which contains features such as the ability for the customer to create support tickets.
Because we have these functionalities planned, the name CRM suits us well. CRM is a good context because it fits our current needs and can be extended to hold other customer related API functions such as our support tickets.
|
Context names are contextual
Just because we used CRM as our context for storing the customers data, it doesn’t mean every application where customer data is present should fall under a CRM |
In the last chapter when we migrated our Product data to Ecto, we manually created both the migration file and the schema file in two different steps.
We can do better by using the mix task mix phx.gen.schema to do it in a single command.
In the terminal, run the command mix phx.gen.schema followed by ContextName.SchemaName, table_name_in_plural, and a list of fields which are required in the table along with their their data type as shown in the command below.
→ mix phx.gen.schema CRM.Customer customers name:string email:string:unique phone residence_area password_hash
* creating lib/mango/crm/customer.ex
* creating priv/repo/migrations/20170613061922_create_customers.exs

Remember to update your repository by running migrations:

    $ mix ecto.migrate
The above command includes a lot of information and creates both the schema file and the migration file. Let’s understand what is going on.
-
CRM.Customerdenotes that the context module is namedCRMand the schema module is namedCustomer. -
customersdenotes the plural form of the schema module which is used as the table name. -
Fields required in the schema are given after the table name in the format
field_name:type. -
name:stringdenotes anamefield of type string is required in the schema. -
email:string:uniquedenotes that anemailfield of type string is required in the schema and it needs to be unique i.e., implementUNIQUE INDEXin PostgreSQL table. -
other fields such as
phonedoesn’t mention the data type. When given without a type the field defaults to type string.In fact, we could also remove
:stringfrom thenamecolumn in our command. It’s just added there to show the different types of usage.
Open the newly created migration file and confirm everything is configured as required.
defmodule Mango.Repo.Migrations.CreateCustomers do
  use Ecto.Migration

  def change do
    create table(:customers) do
      add :name, :string
      add :email, :string
      add :phone, :string
      add :residence_area, :string
      add :password_hash, :string

      timestamps()
    end

    create unique_index(:customers, [:email])
  end
end
All looks fine, except for the email field as our specification says
Email is the primary identifier of a customer during login.
If we were to create a table as it is now, our system would consider data such as "JOHN@example.com" and "john@example.com" to be two different emails and would allow two different registrations with the same username.
Obviously we don’t want this to happen.
So we need to modify the column definition of the email field from :string to :citext which is a column type supported by the PostgreSQL database for storing case insensitive strings.
Additionally we need to enable the citext PostgreSQL extension as it’s not available without enabling it explicitly.
Modify the email field definition in the migration file as given below.
defmodule Mango.Repo.Migrations.CreateCustomers do
  use Ecto.Migration

  def change do
    execute "CREATE EXTENSION IF NOT EXISTS citext" (1)
    create table(:customers) do
      add :name, :string
      add :email, :citext (2)
      add :phone, :string
      add :residence_area, :string
      add :password_hash, :string

      timestamps()
    end

    create unique_index(:customers, [:email])
  end
end| 1 | Enable extension citext. |
| 2 | Change column type. |
Let’s run mix ecto.migrate to execute the migration file.
Understanding Ecto.Changeset
Open customer.ex file created by our mix command to see the schema definition created.
defmodule Mango.CRM.Customer do
  use Ecto.Schema
  import Ecto.Changeset
  alias Mango.CRM.Customer


  schema "customers" do
    field :email, :string
    field :name, :string
    field :password_hash, :string
    field :phone, :string
    field :residence_area, :string

    timestamps()
  end

  @doc false
  def changeset(%Customer{} = customer, attrs) do
    customer
    |> cast(attrs, [:name, :email, :phone, :residence_area, :password_hash])
    |> validate_required([:name, :email, :phone, :residence_area, :password_hash])
    |> unique_constraint(:email)
  end
end
It looks similar to what we have seen in the Product schema module except this one imports Ecto.Changeset and has a changeset/2 function defined in it.
To understand this changeset, let’s open iex -S mix and start playing with it.
iex(1)> alias Mango.CRM.Customer
Mango.CRM.Customer

iex(2)> alias Mango.Repo
Mango.Repo

iex(3)> %Customer{name: "Shankar"} |> Repo.insert
[debug] QUERY OK db=42.9ms
INSERT INTO "customers" ("name","inserted_at","updated_at") VALUES ($1,$2,$3) RETURNING "id" ["Shankar", {{2017, 6, 13}, {7, 13, 35, 349497}}, {{2017, 6, 13}, {7, 13, 35, 356712}}]
{:ok,
 %Mango.CRM.Customer{__meta__: #Ecto.Schema.Metadata<:loaded, "customers">,
  email: nil, id: 1, inserted_at: ~N[2017-06-13 07:13:35.349497],
  name: "Shankar", password_hash: nil, phone: nil, residence_area: nil,
updated_at: ~N[2017-06-13 07:13:35.356712]}}|
Through out this book, we will be using With this above code written in an |
We were able to create a new customer with just the name value using Repo.insert. We need to restrict the struct from being inserted into the database if it’s missing required values?
The solution is to use Ecto.Changeset.
If you are familiar with Rails, Changeset is similar to ActiveRecord validations.
However, there is a lot of flexibility allowed with the Ecto.Changeset that is not provided by ActiveRecord.
For instance, it’s very easy to provide different types of validations for a single schema without resorting to complex if else conditional trees.
Coming back to our Customer struct, let’s say we don’t want it to be stored without name and email field.
To do that, we need to use Ecto.Changeset when inserting the data.
Before we do that, let’s understand what Ecto.Changeset is.
iex> %Ecto.Changeset{}
Ecto.Changeset<action: nil, changes: %{}, errors: [], data: nil, valid?: false>

iex> Map.from_struct(%Ecto.Changeset{})
%{action: nil, changes: %{}, constraints: [], data: nil, empty_values: [""],
  errors: [], filters: %{}, params: nil, prepare: [], repo: nil, required: [],
  types: nil, valid?: false, validations: []}
As you can see from above, %Ecto.Changeset{} is a normal Elixir struct just like our %Product{} struct that we have created in the previous chapter.
The %Ecto.Changeset{} struct has several keys which can be seen in our second call to Map.from_struct.
Without going into details regarding what these keys are meant to store, understand that we need to use this struct to insert data into our database when we want to perform any kind of validation on our data.
So, for inserting validated data; instead of using %Product{} |> Repo.insert or %Customer{} |> Repo.insert,
we will have to use %Ecto.Changeset{} |> Repo.insert.
Because we use a common struct to insert all kinds of data in our database, there needs to be a mechanism to store our product data or customer data into this %Ecto.Changeset{} struct.
Ecto provides several functions to create and manipulate %Ecto.Changeset structs. These functions are defined in the module Ecto.Changeset.
To insert our customer data into %Ecto.Changeset{} struct, we need to use the function cast defined in Ecto.Changeset.
Back to iex -S mix, let’s start using this cast function to create %Ecto.Changeset and insert customer data in it.
iex> Ecto.Changeset.cast(%Customer{}, %{name: "shankar"}, [:name])
#Ecto.Changeset<action: nil, changes: %{name: "shankar"}, errors: [],
 data: #Mango.CRM.Customer<>, valid?: true>
The cast function takes 3 arguments and they work as described below.
-
The first argument is the struct for which we are creating the changeset.
-
The second argument contains the values we want to set in our struct.
-
The last argument contains the list of fields in our struct that are allowed to change.
You can think of the cast function as a funnel that takes an input map, filters only the allowed values and stores the struct and filtered values in the %Ecto.Changeset struct.
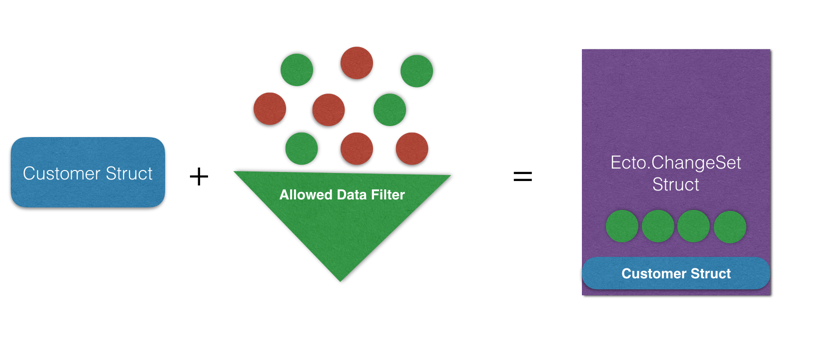
The above diagram explains the function of cast. On the left side of the =, we have %Customer{} struct, a set of values represented by green and red dots, and a filter that is in green.
On the right side of the = we have the output of the cast function which is an %Ecto.Changeset struct.
The struct returned embeds the entire %Customer{} struct as passed to the cast function and it contains only the green values as allowed by the filter.
Back to iex -S mix, we can try out different filters
iex> Ecto.Changeset.cast(%Customer{}, %{name: "John", email: "john@example.com"}, [:name])
Ecto.Changeset<action: nil, changes: %{name: "John"}, errors: [],
 data: Mango.CRM.Customer<>, valid?: true>

iex> Ecto.Changeset.cast(%Customer{}, %{name: "John", email: "john@example.com"}, [:name, :email])
Ecto.Changeset<action: nil,
 changes: %{email: "john@example.com", name: "John"}, errors: [],
 data: Mango.CRM.Customer<>, valid?: true>
In the first example, we passed a %Customer{} struct, a map containing name and email, and a list containing only :name which acts as the filter.
The result is an %Ecto.Changeset{} struct. However, if we look at the changes key, we see only the name value appears.
Ecto.Changeset<action: nil, changes: %{name: "John"}, errors: [],
 data: Mango.CRM.Customer<>, valid?: true>
This is because our filter given as the 3rd argument allows only the :name field to be changed.
In the second example, we did the same, but this time, we allowed both :name and :email by placing both values in our list of allowed filters.
This gives us an %Ecto.Changeset{} struct whose :changes key includes both the :name and :email values.
The :changes key in %Ecto.Changeset{} struct contains the values that are allowed in the filter,
whose value is different from the value present in the struct passed as first argument to cast.
Consider the following example
iex> Ecto.Changeset.cast(%Customer{name: "John"},
...> %{name: "John", email: "john@example.com"},
...> [:name, :email])

Ecto.Changeset<action: nil, changes: %{email: "john@example.com"}, errors: [],
 data: Mango.CRM.Customer<>, valid?: true>
Even though we allow both :name and :email in our filter, the resulting changeset only contains :email value in the :changes key. This is because, the customer struct that is passed in already has the same name.
So there is nothing changed from the original value.
It’s important to note that %Ecto.Changeset is just a pure data structure.
It knows nothing about the database. The function cast also knows nothing about the database.
It consumes a struct and returns a struct.
That means unless we call Repo.insert or some other function in the Repo module with the changeset struct, the database is not touched. That is to say, Ecto does not make changes to the database.
Let’s try inserting some data using a changeset.
iex> changeset = Ecto.Changeset.cast(%Customer{},
...> %{name: "John", email: "john@example.com"},
...> [:name, :email])

iex> Repo.insert(changeset)
[debug] QUERY OK db=35.9ms queue=0.1ms
INSERT INTO "customers" ("email","name","inserted_at","updated_at") VALUES ($1,$2,$3,$4) RETURNING "id" ["john@example.com", "John", {{2017, 6, 13}, {10, 44, 15, 885167}}, {{2017, 6, 13}, {10, 44, 15, 895225}}]
{:ok,
 %Mango.CRM.Customer{__meta__: Ecto.Schema.Metadata<:loaded, "customers">,
  email: "john@example.com", id: 2, inserted_at: ~N[2017-06-13 10:44:15.885167],
  name: "John", password_hash: nil, phone: nil, residence_area: nil,
  updated_at: ~N[2017-06-13 10:44:15.895225]}}
Now, let’s add more validation to our changeset. We want to insert our data only if the :email value is present.
(1)
iex> changeset = Ecto.Changeset.cast(%Customer{},
...> %{name: "John"},
...> [:name, :email])

(2)
iex> changeset2 = Ecto.Changeset.validate_required(changeset, :email)

(3)
iex> changeset2.valid?
false

(4)
iex> Repo.insert(changeset2)
{:error,
 #Ecto.Changeset<action: :insert, changes: %{},
  errors: [email: {"can't be blank", [validation: :required]}],
data: #Mango.CRM.Customer<>, valid?: false>}| 1 | We create a new changeset as above, but we only set the name value. |
| 2 | We use the returned changeset from step 1 and pass it to a new function where we check if :email is present. |
| 3 | We could check if the changeset struct is valid without inserting it into the database. Just call the valid? key on the changeset struct. |
| 4 | We try inserting the changeset returned from step 2 into the database which returns an error now. |
We can chain these three steps using the pipe operator, which allows us to accomplish this without using temporary variables.
%Customer{}
|> Ecto.Changeset.cast(%{name: "John"}, [:name, :email])
|> Ecto.Changeset.validate_required(:email)
|> Repo.insert
If we import the Ecto.Changeset module, the above code can be even more compacted
%Customer{}
|> cast(%{name: "John"}, [:name, :email])
|> validate_required(:email)
|> Repo.insert
There are several validation functions present in the Ecto.Changeset like the validate_required function that we just saw.
All of them take a changeset as input, validate the data present in the changeset and return a changeset marking it as valid or invalid.
We will see more of these validation function as we work through the registration process.
Let’s go back to our work…Where were we? Oh yeah! Customer schema.
With our recently gained knowledge of the Ecto.Changeset module, let’s try to understand the Customer schema module generated earlier.
defmodule Mango.CRM.Customer do
  use Ecto.Schema
  import Ecto.Changeset
  alias Mango.CRM.Customer


  schema "customers" do
    field :email, :string
    field :name, :string
    field :password_hash, :string
    field :phone, :string
    field :residence_area, :string

    timestamps()
  end

  @doc false
  def changeset(%Customer{} = customer, attrs) do (1)
    customer
    |> cast(attrs, [:name, :email, :phone, :residence_area, :password_hash]) (2)
    |> validate_required([:name, :email, :phone, :residence_area, :password_hash]) (3)
    |> unique_constraint(:email) (4)
  end
end| 1 | A function that takes a customer struct and a Map containing a new set of values for the customer struct. Basically the function wraps all that we did in the last exercise. |
| 2 | Create a changeset allowing only the listed fields. Currently it lists all fields. |
| 3 | Make all listed fields mandatory. |
| 4 | Ensure the value for email field is unique. |
Let’s use it in the IEx shell.
iex> %Customer{} |> Customer.changeset(%{})

Ecto.Changeset<action: nil, changes: %{},
 errors: [name: {"can't be blank", [validation: :required]},
  email: {"can't be blank", [validation: :required]},
  phone: {"can't be blank", [validation: :required]},
  residence_area: {"can't be blank", [validation: :required]},
  password_hash: {"can't be blank", [validation: :required]}],
 data: Mango.CRM.Customer<>, valid?: false>
As expected, we get a changeset struct with all the errors listed in the errors key.
And when we pass all the required values, we get a changeset whose valid? value is true.
Ecto.Changeset<action: nil,
 changes: %{email: "john@example.com", name: "John", password_hash: "pass",
   phone: "11111", residence_area: "Area1"}, errors: [],
 data: Mango.CRM.Customer<>, valid?: true>

iex> changeset.valid?
true
Acceptance Test for Registration form
As promised we have spent a good deal of time understanding the Ecto.Changeset schema and function. Now let’s get into the task of creating the registration form.
We will start with an acceptance test.
Create a new file at test/mango_web/acceptance/registration_test.exs
defmodule MangoWeb.Acceptance.RegistrationTest do
  use Mango.DataCase
  use Hound.Helpers

  hound_session()

  # Add test functions here
end
Add the following test function that checks for a successful registration.
test "registers an account with valid data" do
  navigate_to("/register")

  form = find_element(:id, "registration-form")
  find_within_element(form, :name, "registration[name]")
  |> fill_field("John")

  find_within_element(form, :name, "registration[email]")
  |> fill_field("john@example.com")

  find_within_element(form, :name, "registration[phone]")
  |> fill_field("1111")

  find_within_element(form, :name, "registration[residence_area]")
  |> fill_field("Area 1")

  find_within_element(form, :name, "registration[password]")
  |> fill_field("password")

  find_within_element(form, :tag, "button")
  |> click

  assert current_path == "/"
  message = find_element(:class, "alert")
            |> visible_text()

  assert message == "Registration successful"
end
The test navigates to the /register path and fills in all the fields with valid data. We are using the :name strategy to find the elements and the fill_field function to enter the value.
Finally we submit the form and expect the "Registration successful" message on the homepage.
Now add this test for checking invalid registration.
test "shows error messages on invalid data" do
  navigate_to("/register")

  form = find_element(:id, "registration-form")
  find_within_element(form, :tag, "button") |> click

  assert current_path() == "/register"
  message = find_element(:id, "form-error") |> visible_text()
  assert message == "Oops, something went wrong! Please check the errors below."
endWe start again by navigating to "/register" and we submit the form without filling in any values. Then we expect to return back to the same path and find an error message. Of course, we could do better by testing if the error message for each of the field is as expected. However, that would be overkill for what we are trying to learn now. You can of course try to do that as an exercise.
Creating Registration Page
To start with, let’s create two new routes for handling registration.
scope "/", MangoWeb do
  (...)

  get "/register", RegistrationController, :new (1)
  post "/register", RegistrationController, :create (2)
end| 1 | Add this route for showing the registration form. |
| 2 | Add this route for processing the form submission. |
We will now add a new controller file registration_controller.ex inside lib/mango_web/controllers with the following content:
defmodule MangoWeb.RegistrationController do
  use MangoWeb, :controller

  def new(conn, _) do
    render(conn, "new.html")
  end

end
Create a new view file at lib/mango_web/views/registration_view.ex with the following content.
defmodule MangoWeb.RegistrationView do
  use MangoWeb, :view
end
Finally add a new template file at lib/mango_web/templates/registration/new.html.eex with the following content.
<h1>Register account</h1>Now visit http://localhost:4000/register` to see the message in our template.
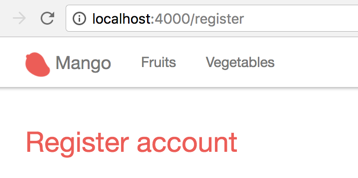
Our registration form is going to create a new customer when submittted with valid data.
When a form directly maps to a schema struct, we need an Ecto.Changeset.
In our case, we need an Ecto.Changeset for our customer struct to create this registration form.
We don’t have our context module CRM created yet. We need two functions in this context for our current requirements. We will call them
-
build_customer -
create_customer
The following are the requirements for the build_customer function:
-
We should be able to call the
build_customerfunction without any arguments and it should return a changeset struct. We will use this changeset for displaying the registration form. -
We should also be able to call the
build_customerfunction with an optional map containing the customer field values. In this case, it should create a new changeset with those values applied. We will use this return value to try inserting the struct into the database.
Let’s start writing the unit test for these two functions with the above design in mind. Create a new file test/mango/crm/crm_test.exs file with the below content:
defmodule Mango.CRMTest do
  use Mango.DataCase
  alias Mango.CRM
  alias Mango.CRM.Customer

  test "build_customer/0 returns a customer changeset" do
    assert %Ecto.Changeset{data: %Customer{}} = CRM.build_customer
  end

  test "build_customer/1 returns a customer changeset with values applied" do
    attrs = %{"name" => "John"}
    changeset = CRM.build_customer(attrs)
    assert changeset.params == attrs
  end
end
The first test is straight forward. Ecto.Changeset has several keys which we haven’t seen in detail. The :data key in the changeset stores the struct for which it is created. Here we are testing if the changeset returned is for the %Customer{} struct by pattern matching on the :data key.
The second test checks if the attrs passed in to build_customer are indeed applied to the changeset. We test this by checking if the :params of the changeset is the same as the map we passed into the build_customer function.
To pass both the tests, let’s create lib/mango/crm/crm.ex with the following code.
defmodule Mango.CRM do
  alias Mango.CRM.Customer

  def build_customer(attrs \\ %{}) do
    %Customer{}
    |> Customer.changeset(attrs)
  end
end
The \\ in the function definition sets the default value of attrs to an empty map %{}. This default value is used when we don’t pass in any value to build_customer. The rest of the code is what we have already seen. We are building a changeset for the %Customer{} struct passing in the attrs value.
Run mix test test/mango/crm/crm_test.exs to confirm everything passes.
Let’s modify the registration_controller.ex file to use this new function and then pass the changeset returned in to the template.
defmodule MangoWeb.RegistrationController do
  use MangoWeb, :controller
  alias Mango.CRM (1)

  def new(conn, _) do
    changeset = CRM.build_customer() (2)
    render(conn, "new.html", changeset: changeset) (3)
  end
end| 1 | Add alias to context module. |
| 2 | Create a changeset. |
| 3 | Pass changeset to template. |
Understanding Form Helpers
We will now modify this template to display a registration form. It basically needs an html form like below
<form method="post" action="/register">
  <input type="text" name="name" value="" />
  <input type="text" name="email" value="" />
  <input type="text" name="phone" value="" />
  <input type="text" name="residence_area" value="" />

  <input type="submit" name="Register" />
</form>
However, instead of using the plain HTML form like above, we will make use of form_for html helper to generate the HTML form.
Using form_for automatically adds hidden fields to the generated form with CSRF tokens that Phoenix uses to validate the incoming data.
By default Phoenix enables CSRF protection so any form submission without valid CSRF tokens are rejected by Phoenix thus securing the application from CSRF attacks.
Modify the template to present a partial registration form.
<h1>Register account</h1>
<%= form_for @changeset, registration_path(@conn, :create), [as: :registration, id: "registration-form"], fn f -> %>
  <div class="form-group">
    <%= label f, :name, class: "control-label" %>
    <%= text_input f, :name, class: "form-control" %>
    <%= error_tag f, :name %>
  </div>

  <%= submit "Register", class: "btn btn-primary" %>
<% end %>
Now visit the page to see the form rendered.
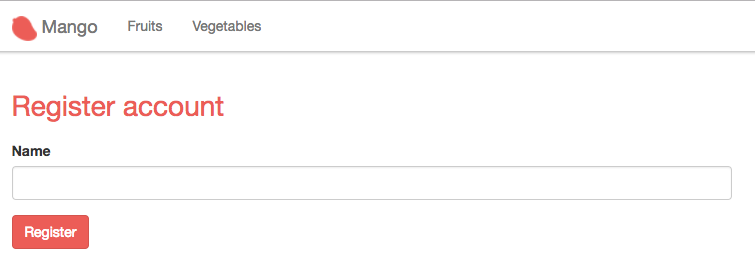
The form needs more elements but before we add them, let’s focus on understanding the code so far.
The above code using form_for block generates the following HTML
<form accept-charset="UTF-8" action="/register" id="registration-form" method="post">
  <input name="_csrf_token" type="hidden" value="PzcECh5dAAFwYX1zPwJsFi85GRUrNgAAKd7r+nZoETL5RlTNZLjAnw==">  (1)
  <input name="_utf8" type="hidden" value="✓">
  <div class="form-group">
    <label class="control-label" for="registration_name">Name</label>
    <input class="form-control" id="registration_name" name="registration[name]" type="text">
  </div>
  <button class="btn btn-primary" type="submit">Register</button>
</form>| 1 | CSRF token generated automatically. |
<%= form_for @changeset, registration_path(@conn, :create), [as: :registration, id: "registration-form"], fn f -> %>The form_for function takes
-
@changesetstruct as the first argument. -
the path to submit the form data as the second argument.
-
a keyword list of options as the third argument. Specifically, the
asoption defines the name prefix for the elements in the form.If you look at the
nameattribute of the generated HTML, you can see that our form field name gets nested underregistration[]. This is due to theasoption we used in theform_forfunction. The form also gets an HTML id attribute value as passed in the options. -
finally it takes an anonymous function as the fourth argument which renders the form fields.
Within the anonymous function, we render
-
a text field for getting the customer name. We will add more fields shortly.
-
a button to submit the form.
Let’s look at the helper to generate a single field.
<%= text_input f, :name, class: "form-control" %><input class="form-control" id="registration_name" name="registration[name]" type="text">All input helper functions take a form struct represented by f as the first argument and the input name as the second argument.
Any attributes that need to be set on the HTML element are given as the third argument in a keyword list.
With this understanding, let’s add all the remaining fields. Our template will now look like this:
<h1>Register account</h1>
<%= form_for @changeset, registration_path(@conn, :create), [as: :registration, id: "registration-form"], fn f -> %>
  <div class="form-group">
    <%= label f, :name, class: "control-label" %>
    <%= text_input f, :name, class: "form-control" %>
    <%= error_tag f, :name %>
  </div>

  <div class="form-group">
    <%= label f, :email, class: "control-label" %>
    <%= text_input f, :email, class: "form-control" %>
    <%= error_tag f, :email %>
  </div>

  <div class="form-group">
    <%= label f, :phone, class: "control-label" %>
    <%= text_input f, :phone, class: "form-control" %>
    <%= error_tag f, :phone %>
  </div>

  <div class="form-group">
    <%= label f, :residence_area, "Area of Residence", class: "control-label" %>
    <%= text_input f, :residence_area, class: "form-control" %>
    <%= error_tag f, :residence_area %>
  </div>

  <div class="form-group"> (1)
    <%= label f, :password, class: "control-label" %>
    <%= password_input f, :password, placeholder: "Password", class: "form-control" %>
    <%= error_tag f, :password %>
  </div>

  <%= submit "Register", class: "btn btn-primary" %>
<% end %>| 1 | The customer struct contains a password_hash field, but here we create a form field for password.
Phoenix form helpers allow us to create arbitrary form fields even if they are not present in the changeset.
The reason we use password instead of the existing field password_hash is because we don’t want to store the plain text password from the user directly in the database.
Instead, we are getting the plain text password in the field password. We will later do some processing to generate the hash and finally store the hash in the database. |
Back in the browser, our registration form is now complete.
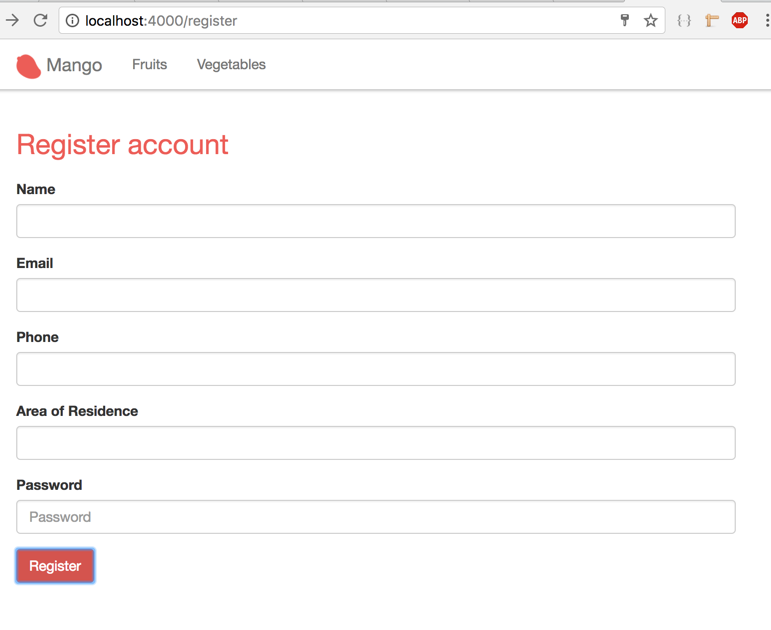
Try submitting it, we will get this error.
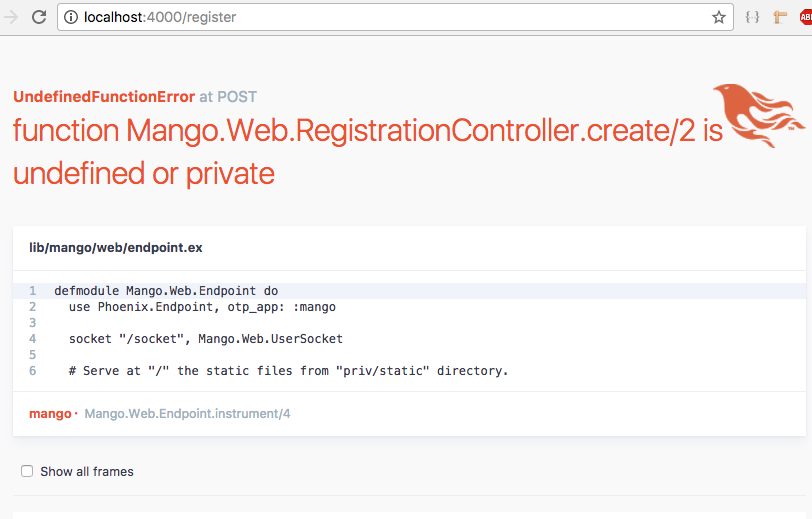
That’s because we haven’t added the create action in our registration_controller.ex to handle the form submission.
Processing Registration Form
Open the controller and add the create action as below:
def create(conn, params) do
# we will add code here soon.
endHow to retrieve the submitted form details from the params?
When a form is submitted, the controller actions receive the form contents as part of params in the second argument.
Unless we know the structure of the form data present in params, it’s not possible to pattern match and isolate the submitted data from the form.
All form submissions in Phoenix are received in the map format as %{ "form_name" ⇒ form_submission_data }, where
-
form_nameis the value passed to theaskey in theform_forhelper function. In our case, this value isregistration. -
form_submission_datais again a map whose keys are the names given to each field. Their corresponding values are the users submitted form data.
So to get the submitted data from our registration form we just need to pattern match on the key "registration". The result will be a map of our submitted data.
%{"registration" => registration_data} = paramsWe can do this match on the function head as below:
def create(conn, %{"registration" => registration_params}) do
endEncrypting Passwords
We have the submitted data available within our controller as registration_params and what we now need is a function to create a customer with this value.
The function name can be create_customer accepting a map of our customer field values.
The requirements for this function are:
-
It should return a tuple containing
{:ok, inserted_customer_struct}when the data given is valid. -
It should return
{:error, changeset}when the data is invalid. -
It should check for all the validations given in our user story.
-
Additionally, when we create a customer, we enter a plain text password. However, it should not store the plain text password, but rather store the encrypted version.
To satisfy the last condition, we need to make a couple of changes to our schema.
-
We need to disallow the
password_hashfield from being set by the incoming values to the changeset function. -
We need a virtual field
passwordto accept the plain text password from the user. Virtual fields are not stored to the database but created for storing temporary values from the user. We use this virtual field for validation if the password is correctly set by the user and to display any errors related to the password if not. -
Finally we will use a library called
Comeoninto encrypt the given plain text password and then manually add it to thepassword_hashfield in the changeset before inserting the new customer into the database.
Add the following test to test/mango/crm/crm_test.exs file.
test "create_customer/1 returns a customer for valid data" do
valid_attrs = %{
"name" => "John",
"email" => "john@example.com",
"password" => "secret",
"residence_area" => "Area 1",
"phone" => "1111"
}
assert {:ok, customer} = CRM.create_customer(valid_attrs)
assert Comeonin.Bcrypt.checkpw(valid_attrs["password"], customer.password_hash) (1)
end
test "create_customer/1 returns a changeset for invalid data" do
invalid_attrs = %{}
assert {:error, %Ecto.Changeset{}} = CRM.create_customer(invalid_attrs)
end| 1 | Assuming the plain text password "secret" is encrypted and stored in the customer record,
we check if the stored password_hash is indeed valid for the given pass. checkpw returns true for valid pass and hash combination and returns false otherwise. |
Open mix.exs file and add comeonin as dependency to the deps function and run mix deps.get to download it.
{:comeonin, "~> 3.0"}Creating Virtual Schema Field
Open lib/mango/crm/customer.ex to make the modifications to the customer schema as discussed above.
(...)
schema "customers" do
field :email, :string
field :name, :string
field :password, :string, virtual: true (1)
field :password_hash, :string
field :phone, :string
field :residence_area, :string
timestamps()
end
(...)| 1 | Add this line. The option virtual: true makes it non-persistent i.e., it doesn’t get saved to the database. |
We also need to change our changeset function in the same file to accept the value for the virtual field :password and to set validations for the other fields.
def changeset(%Customer{} = customer, attrs) do
customer
|> cast(attrs, [:name, :email, :residence_area, :password, :phone]) (1)
|> validate_required([:name, :email, :residence_area, :password]) (2)
|> validate_format(:email, ~r/@/, message: "is invalid")
|> validate_length(:password, min: 6, max: 100)
|> unique_constraint(:email)
end| 1 | Change :password_hash to :password in the call to cast. |
| 2 | Change :password_hash to :password in the call to validate_required |
Now that we have removed the password_hash field from the casting, we need to set it manually with the hashed content of plain text password.
To generate the hash, we will use the comeonin Elixir library that we installed which uses a secure algorithm to hash the password.
defmodule Mango.CRM.Customer do
(...)
import Comeonin.Bcrypt, only: [hashpwsalt: 1]
def changeset(%Customer{} = customer, attrs) do
customer
|> cast(attrs, [:name, :email, :residence_area, :password, :phone])
|> validate_required([:name, :email, :residence_area, :password])
|> validate_format(:email, ~r/@/, message: "is invalid")
|> validate_length(:password, min: 6, max: 100)
|> unique_constraint(:email)
|> put_hashed_password() (1)
end
defp put_hashed_password(changeset) do (2)
case changeset.valid? do
true ->
changes = changeset.changes
put_change(changeset, :password_hash, hashpwsalt(changes.password))
_ ->
changeset
end
end
end| 1 | Add a new function to the pipeline. |
| 2 | Checks if the changeset is valid. If so get the password from the changeset, hash it using Comeonin.Bcrypt.hashpwsalt and return a new changeset with the password_hash field value set.
If the changeset is invalid, i.e., some other validation already failed, we don’t spend time encrypting the password and return the changeset as it is. |
With all those changes done in the Customer module, let’s create a new function in CRM context module to create a customer.
defmodule Mango.CRM do
(...)
def create_customer(attrs) do
attrs
|> build_customer
|> Repo.insert
end
endWith this change, let’s check if our new unit tests for CRM pass.
mix test test/mango/crm/crm_test.exs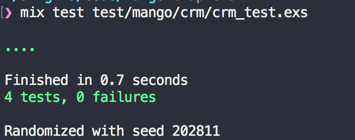
Continuing the Registration Process
All tests pass and now we could make use of our new functions in the create action of our registration controller.
def create(conn, %{"registration" => registration_params}) do
case CRM.create_customer(registration_params) do
{:ok, customer} ->
conn
|> put_flash(:info, "Registration successful")
|> redirect(to: page_path(conn, :index))
{:error, changeset} ->
conn
|> render(:new, changeset: changeset)
end
endWe make a call to CRM.create_customer(registration_params) and we pattern match on the return value.
If it matches {:ok, customer}, then we use put_flash to set the success message and finally redirect to the homepage.
If the return value matches the pattern {:error, changeset} we render the new.html template passing the error changeset to template.
The Phoenix form helpers automatically show the error in each field in the rendered template.
Now open up http://localhost:4000/register and submit the form without entering any values.
It will display the registration form again with error messages against each field.
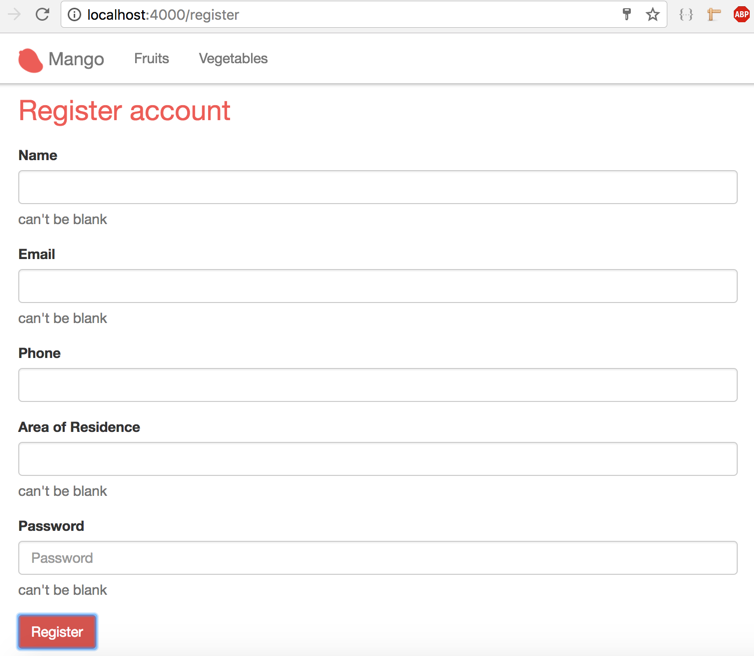
Now run the test mix test test/mango_web/acceptance/registration_test.exs and we should have the test for valid form submission pass while the other fail.
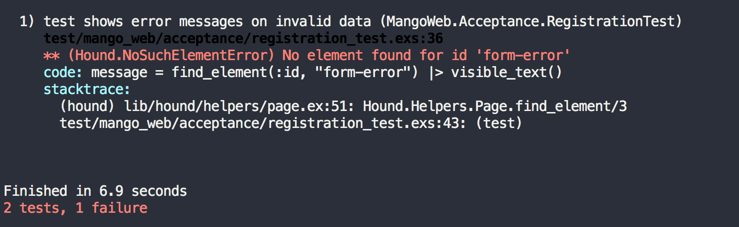
Acceptance Test Passing
Our invalid form submission test expects a message to be shown on the form if there are errors present. In order to get our Acceptance Test Passing we need to add this message. Open the registration template and add this code inside the form_for block.
<h1>Register account</h1>
<%= form_for @changeset, registration_path(@conn, :create), [as: :registration, id: "registration-form"], fn f -> %>
# Add code below:
<%= if @changeset.action do %>
<div id="form-error" class="alert alert-danger">
<p>Oops, something went wrong! Please check the errors below.</p>
</div>
<% end %>
(...)The above code checks if the action value is present in @changeset. If present, it shows the message. The action value is set in the changeset when Repo.insert fails to inserting the changeset.
Now running the test again, both the tests should pass.
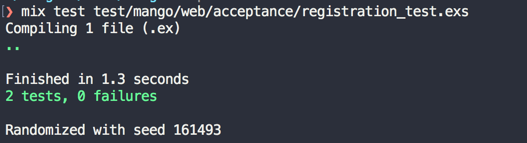
We will run our complete test suite to check ensure we did not introduce any regressions.
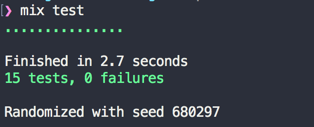
No errors. We are good to go so lets modify the registration form to satisfy the last requirement of our user story:
Since for now, Mango operates only in Auroville community only the list of residential area from Auroville should be shown in the registration form.
We can modify the residence_area field in the registration form as shown below to convert it into a select box:
<%= select f, :residence_area, ["Area 1", "Area 2", "Area 3"], prompt: "Choose your residence area", class: "form-control" %>The select function creates an HTML select box with the options passed to it as a list. In the above code, we are creating a select box in the registration form showing three options with the prompt "Choose your residence area" as shown below:

In a real world application, we would probably get this list from an external service that provides a JSON list of residence areas.
Third party integration code that are not specific to our application can be added as top level directories under the lib folder. Create a new file lib/auroville/residence_service.ex with the code shown below:
defmodule Auroville.ResidenceService do
def list_areas do
["Area 1", "Area 2", "Area 3"]
end
endThe folder lib/auroville serves as the context for our external integration code. In the above example, we have a hard coded list of areas. However, in a real world application, this list will be replaced with an HTTP request for an external API that provides the real-time list of residence areas. Elixir has several HTTP client libraries such as HTTPoison and HTTPotion. You may use them to get the list of areas from an external service. For example:
# Pseudocode
defmodule Auroville.ResidenceService do
def list_areas do
response = HTTPoison.get "http://api.auroville.org.in/residence"
# The assumption here is that the above API will provide a list of residence areas as JSON data.
Poison.decode!(response.body)
# Poison library is already available in our Phoenix project.
# We call the `decode!/1` function to convert the response body into an Elixir List.
end
endNow, let’s change the registration controller as shown below:
(...)
def new(conn, _) do
changeset = CRM.build_customer()
residence_areas = Auroville.ResidenceService.list_areas (1)
render(conn, "new.html", changeset: changeset, residence_areas: residence_areas) (2)
end
def create(conn, %{"registration" => registration_params}) do
case CRM.create_customer(registration_params) do
{:ok, _customer} ->
conn
|> put_flash(:info, "Registration successful")
|> redirect(to: page_path(conn, :index))
{:error, changeset} ->
residence_areas = Auroville.ResidenceService.list_areas (3)
conn
|> render(:new, changeset: changeset, residence_areas: residence_areas) (4)
end
end
(...)(1 - 4) — We are getting the list of residence areas from the external service module that we just created and we pass on this value to the template in both the new and create actions.
Let’s modify the template to use this value. Open templates/registration/new.html.eex and modify the residence_area field as shown below:
<%= select f, :residence_area, @residence_areas, prompt: "Choose your residence area", class: "form-control" %>If we run our test now, the acceptance test for the registration form will be broken.
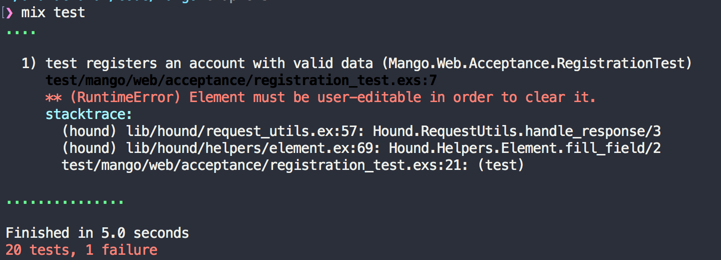
This is because our existing acceptance test treats the residence area field as a text box. We have now changed it to a select box in the registration form. So we need to modify the test file as well. Open test/mango_web/acceptance/registration_test.exs and modify the residence_area field as shown below:
Replace this line
find_within_element(form, :name, "registration[residence_area]")
|> fill_field("Area 1")With this line:
find_element(:css, "#registration_residence_area option[value='Area 1']")
|> clickView Gist of the modified change in the test file.
Now run mix test and all tests should pass as earlier.
Login

Acceptance Test
We will start with an acceptance test for capturing the details above.
defmodule MangoWeb.Acceptance.SessionTest do
use Mango.DataCase
use Hound.Helpers
hound_session()
setup do
## GIVEN ##
# There is a valid registered user
alias Mango.CRM
valid_attrs = %{
"name" => "John",
"email" => "john@example.com",
"password" => "secret",
"residence_area" => "Area 1",
"phone" => "1111"
}
{:ok, _} = CRM.create_customer(valid_attrs)
:ok
end
## Test should be added here.
endIn the setup, we create a new customer with valid details so that the following tests can be made in the context of this customer trying to login.
Add the following test to check login validity
test "successful login for valid credential" do
## When ##
navigate_to("/login")
form = find_element(:id, "session-form")
find_within_element(form, :name, "session[email]")
|> fill_field("john@example.com")
find_within_element(form, :name, "session[password]")
|> fill_field("secret")
find_within_element(form, :tag, "button")
|> click
## THEN ##
assert current_path() == "/"
message = find_element(:class, "alert-info")
|> visible_text()
assert message == "Login successful"
endAdd the following test for invalid login.
test "shows error message for invalid credentials" do
## WHEN ##
navigate_to("/login")
form = find_element(:id, "session-form")
find_within_element(form, :tag, "button")
|> click
## THEN ##
assert current_path() == "/login"
message = find_element(:class, "alert-danger") |> visible_text()
assert message == "Invalid username/password combination"
endShow the Login Form
As with registration, we need two routes: one for displaying the login form and another for processing the submitted data.
Open router.ex and add these two routes.
get "/login", SessionController, :new (1)
post "/login", SessionController, :create (2)| 1 | Used for displaying the login form |
| 2 | Used for processing the login form |
Create the session controller with the following content:
defmodule MangoWeb.SessionController do
use MangoWeb, :controller
def new(conn, _params) do
render(conn, "new.html")
end
endCreate a new view at mango_web/views/session_view.ex with the following content.
defmodule MangoWeb.SessionView do
use MangoWeb, :view
endFinally, create a new template mango_web/templates/session/new.html.eex with the following code.
<div class="row">
<div class="col-md-4 col-md-offset-4">
<h1>Mango Customer Login</h1>
<%= form_for @conn, session_path(@conn, :create), [as: :session, id: "session-form"], fn f -> %>
<div class="form-group">
<%= text_input f, :email, placeholder: "Email", class: "form-control" %>
</div>
<div class="form-group">
<%= password_input f, :password, placeholder: "Password", class: "form-control" %>
</div>
<%= submit "Log in", class: "btn btn-primary" %>
<% end %>
</div>
</div>In the previous section when we created a form for registration, the form fields directly mapped to the customer struct. But now, what we need is a simple form for login with two fields which doesn’t map to any struct. For this purposes, we need to use @conn struct for creating the form.
At this stage, we now have a login form displayed. Try visiting http://localhost:4000/login to see the login form.
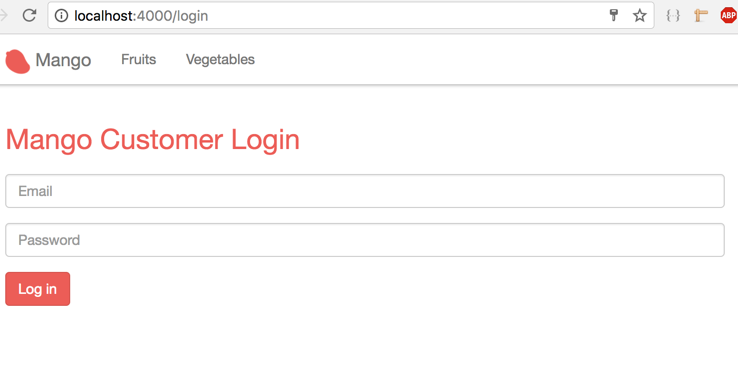
API Functions Required for Login
The form submission still doesn’t work because we haven’t added the create action yet. Let’s do that now.
Open session_controller.ex file and add the following content.
def create(conn, %{"session" => session_params}) do
# check and load the customer matching the given credentials
# if customer found, put the customer id on session data
# if not found return to login page with error
endWe have already pattern matched the form data on the function header in the previous section on Registrations. We are reapplying the same concept here for getting the session data as well. Now what we need is a way to validate the password and sign the customer in.
Since the form submission contains the email of the customer, we need a way to get a customer record from the database using their email as our query.
Next, we need to validate if the password given in the form data matches with the hashed password of the customer. If it matches we return the customer; if not we return an error.
Let’s write the unit tests for the function get_customer_by_email which fetches a customer from the database using the given email. Open test/mango/crm/crm_test.exs file and add the following test.
test "get_customer_by_email" do
valid_attrs = %{
"name" => "John",
"email" => "john@example.com",
"password" => "secret",
"residence_area" => "Area 1",
"phone" => "1111"
}
{:ok, customer1} = CRM.create_customer(valid_attrs)
customer2 = CRM.get_customer_by_email("john@example.com")
assert customer1.id == customer2.id
endThe above test creates a customer and then uses the new function (that we will write subsequently) to load the customer by email. Finally we check if the customer returned by our new function is the same as the customer created in our test.
We will write a similar test for the function get_customer_by_credentials which will load the customer after verifying the given password. If the password matches the encrypted password, then the function returns the customer. Our test setup is similar, and we check if our new function will return the customer using the email and password used to create the customer.
test "get_customer_by_credentials" do
valid_attrs = %{
"name" => "John",
"email" => "john@example.com",
"password" => "secret",
"residence_area" => "Area 1",
"phone" => "1111"
}
{:ok, customer1} = CRM.create_customer(valid_attrs)
customer2 = CRM.get_customer_by_credentials(valid_attrs)
assert customer1.id == customer2.id
endLet’s open the context file lib/mango/crm/crm.ex and add the following implementation code to pass the above tests.
def get_customer_by_email(email), do: Repo.get_by(Customer, email: email) (1)
def get_customer_by_credentials(%{"email" => email, "password" => pass} ) do
customer = get_customer_by_email(email)
cond do
customer && Comeonin.Bcrypt.checkpw(pass, customer.password_hash) -> (2)
customer
true ->
:error
end
end| 1 | We make use of the Ecto function Repo.get_by which allows any valid column on the database table to be queried. |
| 2 | We make use of the Comeonin.Bcrypt.checkpw function from Comeonin library to check if the given password matches the hashed value of the stored password. If it matches, then we return a tuple with the customer information. If the customer is not found or if the password doesn’t match, we return an {:error} tuple. |
Adding Session Data
Now we have all the API functions needed for performing a login. So let’s open up the session_controller.ex file and modify it as below. We will run through it line by line.
alias Mango.CRM
def create(conn, %{"session" => session_params}) do
case CRM.get_customer_by_credentials(session_params) do
:error ->
conn
|> put_flash(:error, "Invalid username/password combination")
|> render("new.html")
customer ->
conn
|> assign(:current_customer, customer)
|> put_session(:customer_id, customer.id)
|> configure_session(renew: true)
|> put_flash(:info, "Login successful")
|> redirect(to: page_path(conn, :index))
end
endThe session_params contains the email and password data entered by the user as an Elixir map. We pass this value to the function get_customer_by_credentials which will take care of validating the customer and password details given. Since we know the structure of the return value from this function, we now use a case statement to match the value and perform the appropriate action for either a successful or unsuccessful login.
For the unsuccessful attempt, we just put in a flash message and show the login form again. This is done by rendering the new.html.
For the successful login, we do a bit more:
-
We store the customer data in the
connas:current_customerso that we can make use of the@current_customervariable in the templates. -
We store the customer information in the session data so that when the customer visit the site next time or makes a new page request, we know the customer is logged in.
-
To add data to the session, the Plug library provides the function
put_sessionwhich takes in a key and a value. We use the key:customer_idand the value is theidfield of the customer data. -
We then use the function
configure_sessionto regenerate a new session id and redirect the user to the homepage with the message "Login successful".
-
If we now try to login with a valid credential, we will be logged in as shown in the screenshot below:
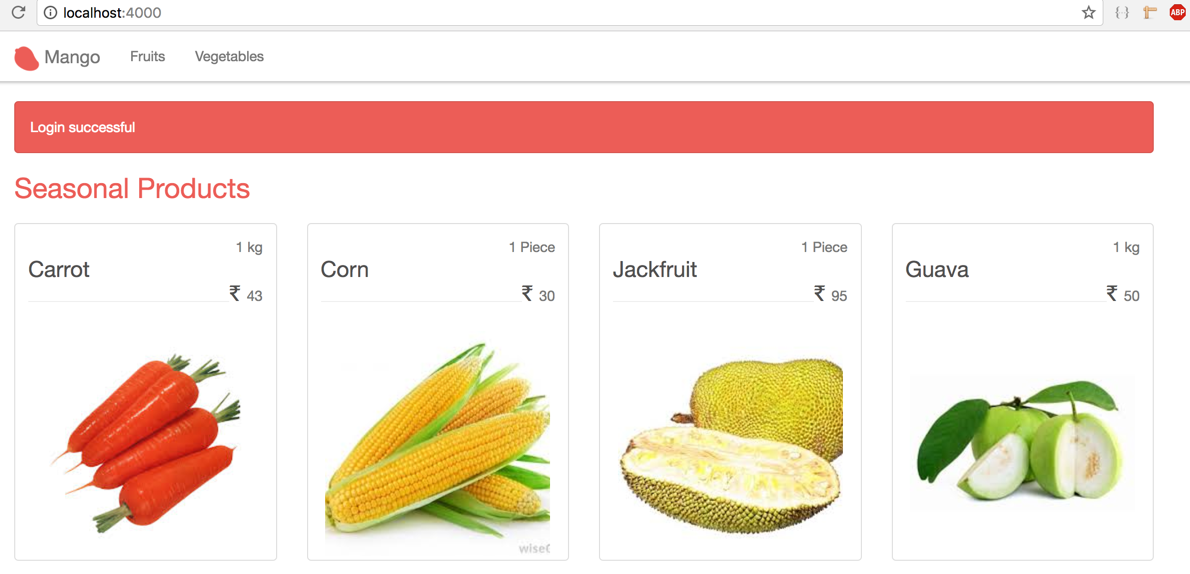
Recognizing Current User.
Learning Map

In the last section, we created the login form allowing the user to successfully login with valid credentials. We also stored the customer data in the conn struct as :current_user. However, since the conn struct values are reset for every page request, our current_customer value is not available for the next page reload. That means even though we have the id value of the logged in customer in the session data, our templates can no longer access the @current_user data.
Moreover, we can only make use of the data that we store in the conn through the assign function and cannot use the session value in templates. So that brings us to the question: how can we assign the value of current_user in the conn struct for every page request?
When we want to modify the conn struct in this way, the defacto way of doing it is to use a plug module. For a plug module to work, it needs to be added to a plug pipeline present in our app. Since we are learning several new concepts now, let’s take it one by one.
Let’s create a plug module first.
Creating Our First Plug
Any Elixir module can be called a plug module if it satisfies the following conditions.
-
It implements a
init/1function and can return any value. -
It implements a
call/2function taking a%Plug.Conn{}struct as the first argument, the return value frominitas the second argument, and it returns a%Plug.Conn{}struct as its output.
Create a new file at mango_web/plugs/load_customer.ex with the following code which satisfies the above definition of a plug module.
defmodule MangoWeb.Plugs.LoadCustomer do
def init(_opts), do: nil (1)
def call(%Plug.Conn{} = conn, _opts) do (2)
conn
end
end| 1 | Here we have an init/1 function but it doesn’t do any thing. That’s ok. We still adhere to the requirement that a plug module must define an init/1 function and that init/1 must return a value…nil in this case |
| 2 | We also have a call/2 function that takes a %Plug.Conn{} struct as its first argument. Since it takes the return value of init/1 as its second argument and since that value is nil in this case, we use the ignore operator. Again this function doesn’t do anything useful. It just returns the received conn as it is. |
Understanding Plug Pipeline
The plug that we wrote will sit idly in our app unless we put it to use. We use a plug by adding it to one of the plug pipelines in our applications. The pipelines available are
-
Endpoint
-
Controller
-
Router
We will understand what a pipeline is in a moment. For now, assume that it’s a place where you can put your plug module in order to access its functionality.
If you open up lib/mango_web/endpoint.ex file, you will see several calls to plug <this>. Snippet shown below:
plug Plug.RequestId
plug Plug.Logger
...
plug Plug.MethodOverride
plug Plug.HeadWe could add our plug module in the Endpoint list, but it’s not appropriate.
Endpoint plugs are meant to do low level grunt work like adding a logger, parsing HTTP request body etc. Our plug is meant to load our customer data which is very much application specific. So it’s not something that fits the Endpoint plug role.
Alternately, we could add our plug to any of our controller modules. But when added to a controller a plug only gets executed for paths that use that specific controller. Again, this is not what we need. We need the current_customer data to be available for all controllers.
The last option is to place the plug in the router pipeline so that any path using that pipeline will be able to call our new plug. This looks like what we need.
Open the router.ex file and add our plug to the code highlighted below:
pipeline :browser do
plug :accepts, ["html"]
plug :fetch_session
plug :fetch_flash
plug :protect_from_forgery
plug :put_secure_browser_headers
plug MangoWeb.Plugs.LoadCustomer (1)
end| 1 | Add our plug module here. |
A router pipeline is a list of plugs that are chained one after the other and is used by one or more paths defined in the router. In the case of our router, all routes defined with the scope "/" block use the above pipeline as configured by the line highlighted below:
scope "/", MangoWeb do
pipe_through :browser
(...)
endBecause of this configuration, all requests that pass through the scope "/" will call all the plugs listed in the :browser pipeline. Each plug receives a conn struct as input. Each plug also has the potential to change the value of the conn struct and return the newly updated conn. The updated conn value will then be used by the plug that follows. Since our plug is listed as the last one in the pipeline, the conn value returned by it will be passed to all controllers and then to the templates.
So if we check the customer_id in the session, load the customer for that id, and then assign it to the conn under the :current_customer key, then our controller and templates will be able to access this value automatically.
We don’t have a function in our CRM context to load the customer by id yet. Let’s define it before we move on to the plug.
def get_customer(id), do: Repo.get(Customer, id)The function takes id as an input and returns a customer record matching the id.
With all that set, let’s write a test for our new plug. Create a new file at:
test/mango_web/plugs/load_customer_test.exswith the code shown below:
defmodule MangoWeb.Plugs.LoadCustomerTest do
use MangoWeb.ConnCase (1)
alias Mango.CRM
@valid_attrs %{
"name" => "John",
"email" => "john@example.com",
"password" => "secret",
"residence_area" => "Area 1",
"phone" => "1111"
}
test "fetch customer from session on subsequent visit" do
# Create a new customer
{:ok, customer} = CRM.create_customer(@valid_attrs)
# Build a new conn by posting login data to "/session" path
conn = post build_conn(), "/login", %{"session" => @valid_attrs } (2)
# We reuse the same conn now instead of building a new one
conn = get conn, "/" (3)
# now we expect the conn to have the `:current_customer` data loaded in conn.
assert customer.id == conn.assigns.current_customer.id (4)
end
end| 1 | We are using MangoWeb.ConnCase instead of the Mango.DataCase that we have used so far because our test now interacts with the conn struct.
Using MangoWeb.ConnCase takes care of the grunt work in setting up our Plug so we just have to write our expectations for conn. |
| 2 | We create a new conn struct using build_conn and we make a POST request to /login path. |
| 3 | We reuse the same conn struct created in step 2 above and visit homepage /. |
| 4 | We assert that in the second visit to / path, the conn struct contains the current_customer info whose id value is the same as the customer id of the logged in user. |
To make this test pass, we will modify the LoadCustomer plug as follows:
defmodule MangoWeb.Plugs.LoadCustomer do
import Plug.Conn
alias Mango.CRM
def init(_opts), do: nil
def call(conn, _opts) do
customer_id = get_session(conn, :customer_id) (1)
customer = customer_id && CRM.get_customer(customer_id) (2)
assign(conn, :current_customer, customer) (3)
end
end| 1 | Get the customer_id from the session. |
| 2 | Load the customer for the given id |
| 3 | Assign the loaded customer to :current_customer. If customer_id is not present or a valid customer is not available for the given id, then a nil value gets stored. |
Run the test for the new plug and it should now pass indicating that our customer information is now available in conn.assigns.
→ mix test test/mango_web/plugs/load_customer_test.exsDisplay Menu for Logged in User
With all this heavy lifting by our LoadCustomerPlug, we can now work on displaying a menu specifically for the logged in user.
If the user is logged in, we display their name and show a Log out link, if not, we show links to the registration and sign in pages.
Open the layout file mango_web/templates/layout/app.html.eex and pass in the @current_customer value to our navigation partial.
<%= render "app_nav.html", conn: @conn, customer: @current_customer %>In the navigation partial, we will display different HTML content based on the value of @customer. Modify the app_nav partial with the HTML shown below.
<ul class="nav navbar-nav navbar-right">
<%= if @customer do %>
<li class="dropdown">
<a href="#" class="dropdown-toggle" data-toggle="dropdown"><%= @customer.name %><span class="caret"></span></a>
<ul class="dropdown-menu">
<li><%= link "Log Out", to: "/logout" %></li>
</ul>
</li>
<% else %>
<li><%= link "Register", to: registration_path(@conn, :new), class: "nav-link" %></li>
<li><%= link "Sign in", to: session_path(@conn, :new), class: "nav-link" %></li>
<% end %>
</ul>Now visit the site as a logged in user and you will be able to see the logged in user information in the nav bar.
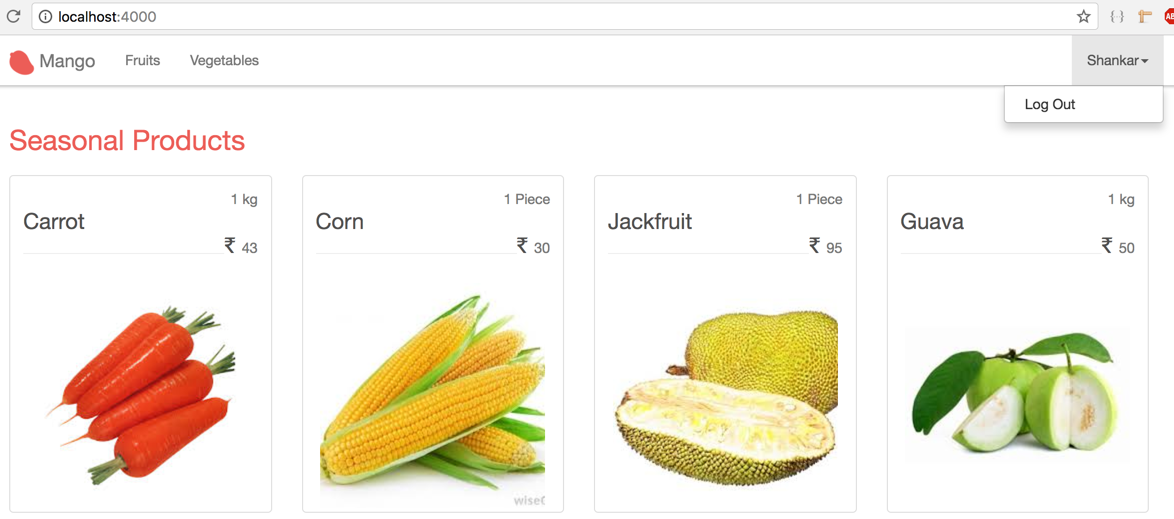
Logout
This is going to be the simplest user story we implement in this entire book. We already have a navigation menu item to logout.
But the path doesn’t exist yet. Let’s create it.
Open router.ex and add this route.
get "/logout", SessionController, :deleteWe could make use of the delete verb instead of get for this route. However, this would mean our logout link would then be rendered as an HTML form.
Getting Bootstrap to display an HTML form in the dropdown menu is not supported by default and would require some CSS hacking. So we will just use an old school get url for our logout.
Open the session_controller.ex and add the delete action to it.
def delete(conn, _) do
clear_session(conn)
|> put_flash(:info, "You have been logged out")
|> redirect(to: page_path(conn, :index))
endSince the session data holds the information about the logged in user, it’s just a matter of clearing the session data to logout the user. So the next time the user visits the site, our LoadCustomerPlug will not be able to find the customer_id it needed to load the customer data and hence our app will treat the user as not loged in.
Click on the logout link and you will see the logout message on the homepage.
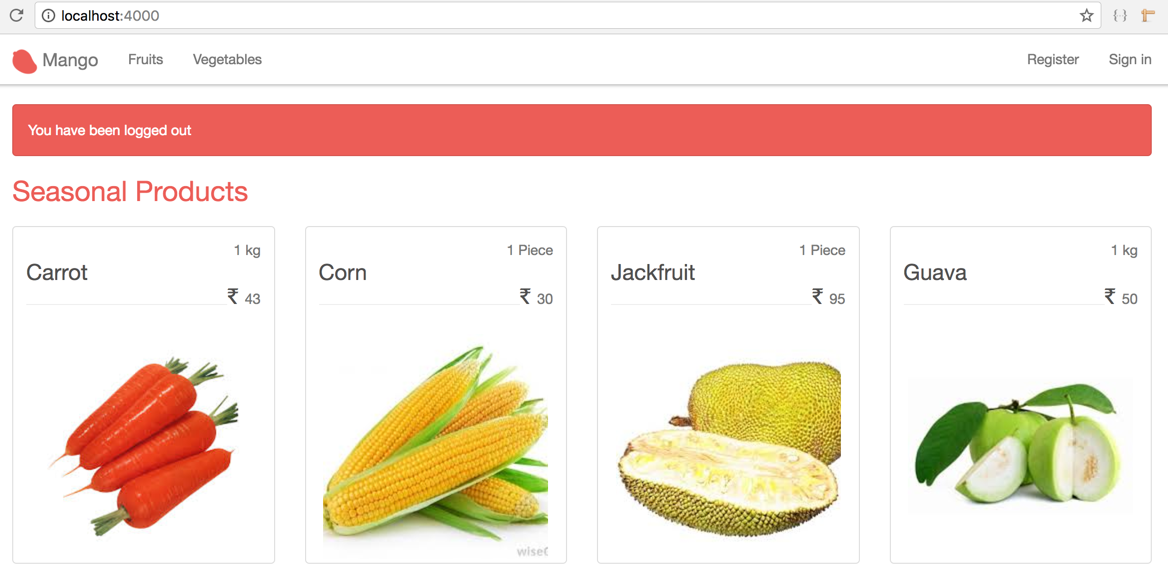
Summary
In this chapter we took a deep dive into Ecto and extended our knowledge about this important tool for using Phoenix.
The main focus was how to understand the Ecto.Changeset.
We played with Ecto in the IEx shell to understand how it helps us to validate data.
We also learnt how to utilize form_for HTML helpers to get input forms complete with built-in CSRF support
and how to process form values in our controller.
We learned to use a virtual field to receive and hold the plain text password and used the comeonin library for encrypting it within our changeset/2 function.
Along the way, in order to ensuring our TDD application was working as expected, we also did various acceptance tests in Hound.
Finally we worked to understand the most critical piece of information. That is how to keep a session active and help validate the customer details across multiple page request. We accomplished this task by writing a plug module and learned how to use it in the router.ex pipeline.
In keeping with this book’s intention to understand the Phoenix Framework and help you put the concepts to practical use building an application, we have started to dig into some of the most important concepts in Phoenix. We have worked on building some practical underpinnings of web development including registration, login, and logout functionalities. We have learned how and where to make changes (router, controller, templtes, etc.) to achieve important functionality that is applicable to any website. More broadly we have learned how to define routes and views, pass value from controllers, to templates, and on to template partials.
In order to reinforce this information we will utilize it multiple times in more complex scenarios as we progress though the rest of the book. Meanwhile, incase you have not fully grasped any of this information now may be a good time to review.
Cheers!
Cart
Iteration Planning
In this chapter we will cover the following user stories.
As a customer, I want to
-
Add products to cart
-
View cart
-
Modify cart
When a customer adds a product to the cart, we need to store the selected product and quantity.
We can create a new database table called orders to store this information by individual customers but mark the order status as Cart so that store admin doesn’t see them yet.
When the customer completes the checkout process with the selected products, we can change the order status to Confirmed.
If we follow the above approach to store the cart information, then the three user stories above translate to
-
Save Product selections in the Orders and set its state as "Cart"
-
View Product selections from the Orders with state as "Cart"
-
Modify the Product selections from the Orders with state as "Cart”
Obviously, we need a new business entity Order i.e., we need to create a database table and an Ecto Schema for Order.
Additionally, we will introduce a new type of schema called embedded schema to store the product information in the cart.
We will learn the rationale behind this choice when we create the order schema.
Assuming that we have an Order schema, we need a way to create an order in the Cart state when the customer first visits the site. Subsequently when the customer adds any product to their cart, we need to retrieve the same order and add the product. The same applies for viewing the cart or modifying it until the customer makes a checkout.
We have already seen how to use sessions in the previous chapter. In this chapter, we will use that knowledge to store the active cart information in the session data. We will also reuse the knowledge of creating HTML forms that we learned in the previous chapter to create Add to cart forms.
Finally we will add in some fancy AJAX to update our cart asynchronously. There is a lot to do, let’s get started.
Order schema
Traditionally an orders table works in conjunction with a line_items table.
The orders table would store information such as order state, customer id and total while the line_items table would store the products ordered.
Since an order can contain multiple products, this relationship is typically modeled as order has many line_items and line_item belongs to order.
Due to excellent support for array columns in Ecto, we can treat a column in the orders table as a virtual line_items table storing all line_item details belonging to an order as an array of maps.
If that sounds complex just bear with me and it will be easier to understand when we work out the details.
The minimal fields that we need in the orders table for our tasks at hand are
| Column name | Type |
|---|---|
id |
Primary key |
status |
String |
total |
Decimal |
line_items |
Array of maps |
We need more columns in our orders table such as for customer_id and address. We will add them in the next chapter when we tackle the Checkout process.
Again, we are sticking to the XP principle of adding only the simplest code that will do our job.
As discussed earlier, we will use a mix task to generate this table and the schema together. Before, we do that we also need to think of the context in which this schema will live. In Chapter 4, we created the Product schema in the Catalog context. An order doesn’t belong to this context. We will create a new Sales context for this purpose.
On our terminal, use the mix task phx.gen.schema to create the table and schema as follows:
→ mix phx.gen.schema Sales.Order orders status:string total:decimal line_items:array:map
* creating lib/mango/sales/order.ex
* creating priv/repo/migrations/20170611142428_create_orders.exs
Remember to update your repository by running the migration:
$ mix ecto.migrateThe above command creates a migration file and a schema file with the field definitions. Open up the generated migration file to confirm the generated commands are in fact as expected.
defmodule Mango.Repo.Migrations.CreateOrders do
use Ecto.Migration
def change do
create table(:orders) do
add :status, :string
add :total, :decimal
add :line_items, {:array, :map}
timestamps()
end
end
endOpen lib/mango/sales/order.ex to look at the generated schema file.
defmodule Mango.Sales.Order do
use Ecto.Schema
import Ecto.Changeset
alias Mango.Sales.Order
schema "orders" do
field :line_items, {:array, :map}
field :status, :string
field :total, :decimal
timestamps()
end
@doc false
def changeset(%Order{} = order, attrs) do
order
|> cast(attrs, [:status, :total, :line_items])
|> validate_required([:status, :total, :line_items])
end
endThe migration file contains the line_items field whose type is an array containing map values. This is represented by the Tuple {:array, :map} in the schema block. Though we can continue storing our line item data in this field as it is, we will get better support for validation if we use an embedded schema.
Create a new file lib/mango/sales/line_item.ex with the below content:
defmodule Mango.Sales.LineItem do
use Ecto.Schema
embedded_schema do
field :product_id, :integer
field :product_name, :string
field :pack_size, :string
field :quantity, :integer
field :unit_price, :decimal
field :total, :decimal
end
endThe embedded_schema in the above code creates a LineItem struct just like our Product struct, but unlike the Product struct, the data in the LineItem struct is retrieved and stored as part of another schema.
We will now modify the Order schema to store this embedded_schema.
defmodule Mango.Sales.Order do
use Ecto.Schema
import Ecto.Changeset
alias Mango.Sales.{Order, LineItem} (1)
schema "orders" do
field :status, :string
field :total, :decimal
embeds_many :line_items, LineItem, on_replace: :delete (2)
timestamps()
end
(...)
end| 1 | Add an alias |
| 2 | Change the field definition to embeds_many |
With the above change, the array field type line_items will now store multiple LineItem struct data.
Ecto will take care of storing the data in the database as a jsonb value. Upon retrieval it will convert the jsonb values back to LineItem structs without any overhead.
Add to cart
With the Order schema available to back up our cart functionality, let’s get started with implementing the Add to cart user story.
Acceptance test
Let’s start with an acceptance test. Create a new file test/mango_web/acceptance/cart_test.exs and add the following test code.
defmodule MangoWeb.Acceptance.CartTest do
use Mango.DataCase
use Hound.Helpers
hound_session()
setup do
alias Mango.Repo
alias Mango.Catalog.Product
Repo.insert %Product{ name: "Carrot", pack_size: "1 kg", price: 55, sku: "A123", is_seasonal: true }
Repo.insert %Product{ name: "Apple", pack_size: "1 kg", price: 75, sku: "B232", is_seasonal: true }
:ok
end
test "presence of cart form for each product" do
navigate_to("/")
products = find_all_elements(:css, ".product") (1)
assert Enum.count(products) != 0 (2)
products
|> Enum.each(fn(product) -> (3)
button = find_within_element(product, :tag, "button")
assert visible_text(button) == "Add to cart"
end)
end
end| 1 | We find all products on the homepage using the css class .product |
| 2 | We confirm that the products are indeed found by asserting the count is not equal to zero |
| 3 | We loop through each of the product and check if there is a child element of type "button" with the caption as "Add to cart"
|
We can now run just the cart acceptance test by executing mix test with the file name.
→ mix test test/mango_web/acceptance/cart_test.exsIt should fail now as there are no button elements in our product template yet.
Modifying product template
Open product template at mango_web/templates/product/product_card.html.eex to add the cart form.
<div class="product thumbnail">
(...)
<hr/>
<!-- add to cart code begins -->
<%= form_for @conn, "/cart", [as: :cart], fn f -> %>
<%= hidden_input f, :product_id, value: @product.id %>
<%= number_input f, :quantity, value: 1 %>
<%= submit "Add to cart" %>
<% end %>
<!-- add to cart code ends -->
(...)
</div>Also make sure to pass on the @conn variable to the product_card.html.eex template so that our cart form can access it.
Open page/index.html.eex and category/show.html.eex and modify the line shown below in both files by passing @conn.
<%= render MangoWeb.ProductView, "product_card.html", conn: @conn, product: product %>Adding more specs to test
Since we now have the expected "Add to cart" button on our product template, running our acceptance test again will now pass.
Let’s modify the acceptance test to actually test the functionality of adding the product to cart.
defmodule MangoWeb.Acceptance.CartTest do
(...)
test "add to cart" do
navigate_to("/")
[product | _rest] = find_all_elements(:css, ".product-thumbnail")
product_name = find_within_element(product, :name, "cart[product_name]")
|> attribute_value("value")
pack_size = find_within_element(product, :name, "cart[pack_size]")
|> attribute_value("value")
find_within_element(product, :name, "cart[quantity]")
|> fill_field(2)
find_within_element(product, :tag, "button")
|> click
message = find_element(:css, ".alert")
|> visible_text()
assert message == "Product added to cart - #{product_name}(#{pack_size}) x 2 qty"
end
endThe modified test now finds the quantity field and changes the value to 2 and then clicks on the cart button.
It then checks if there is a success message such as "Product added to cart - Apple(1 kg) x 2 qty".
To generate the message to verify after successfully adding a product to cart, it uses the two new fields expected in the cart form namely the product name and pack size field. We can use hidden fields to present this information in the form.
Modifying the product template
Since our product template is now growing in size, it’s good to refactor it by extracting the cart form to a separate template.
Modify the product template to include the partial.
<div class="product thumbnail">
<div class="caption">
<span class="text-muted pull-right"><%= @product.pack_size %></span>
<h2>
<div class="product-name"><%= @product.name %></div>
<span class="pull-right">INR
<small class="product-price"><%= @product.price %></small>
</span>
</h2>
<hr/>
<%= render "cart_form.html", product: @product, conn: @conn %> (1)
</div>
<img src="<%= @product.image %>" />
</div>| 1 | Replace the cart form code with this line. |
Create a new partial cart_form.html.eex inside the product template folder with the content below.
<%= form_for @conn, "/cart", [class: "cart-form form-inline", as: :cart], fn f -> %>
<div class="form-group">
<div class="input-group">
<%= hidden_input f, :product_name, value: @product.name %> (1)
<%= hidden_input f, :pack_size, value: @product.pack_size %> (2)
<%= hidden_input f, :product_id, value: @product.id %>
<div class="input-group-addon">Qty</div>
<%= number_input f, :quantity, value: 1, class: "form-control", style: "width: 70px" %>
</div>
<%= error_tag f, :quantity %>
</div>
<%= submit "Add to cart", class: "btn btn-primary pull-right" %>
<% end %>| 1 | Adds a new hidden field containing the product name. |
| 2 | Adds a new hidden field containing the pack size. |
Now if we visit the homepage, we should be able to see the Cart form displayed for each product with all the necessary fields:
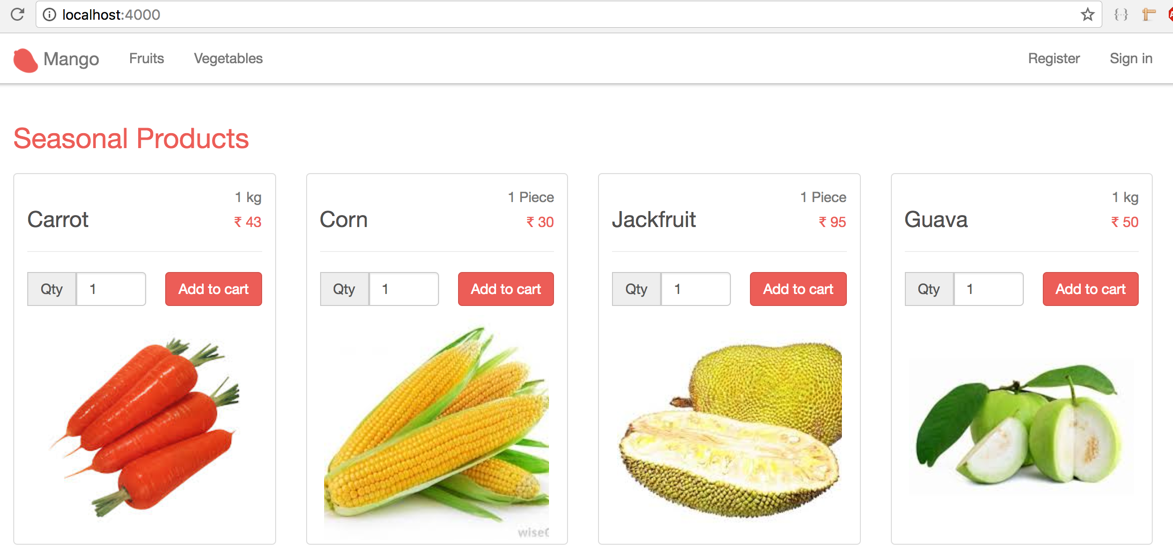
Adding route
Our add to cart form now submits the content to the /cart path. By default form_for submits using POST method. We don’t have this route yet. Let’s add it.
scope "/", MangoWeb do
(...)
post "/cart", CartController, :add
endCreate cart controller
Create a new cart controller file at lib/mango_web/controllers/cart_controller.ex and add the following code. Some observations of the code are appended below the code.
defmodule MangoWeb.CartController do
use MangoWeb, :controller
alias Mango.Sales (1)
def add(conn, %{"cart" => cart_params}) do
cart = "?" (2)
case Sales.add_to_cart(cart, cart_params) do (3)
{:ok, _} ->
# do something on success (4)
{:error, _} ->
# handle the failure (5)
end
end
end| 1 | Alias the Mango.Sales context module as our cart belong to this context. We need functions from this module to add products to our cart. |
| 2 | Since we don’t currently have a function to get the cart in our controller we use "?" as a place holder. |
| 3 | Assuming we have the cart, we need a function in our Sales context that can handle adding product to it. |
| 4 | If all goes well, we need to handle the success case. |
| 5 | If any error happens, we need to handle the error case. |
There are quite a few missing pieces of code here. But we can start filling in blanks wherever we have insight about what is needed. Lets start!
Handling the success case
The function Sales.add_to_cart/2 doesn’t exist yet. Assuming it exists and returns a success tuple, we can put a flash message on screen as expected by our acceptance test.
%{"product_name" => name, "pack_size" => size, "quantity" => qty } = cart_params
message = "Product added to cart - #{name}(#{size}) x #{qty} qty"
conn
|> put_flash(:info, message)
|> redirect(to: page_path(conn, :index))Here again we resort to pattern matching to unpack the submitted data in distinct variable names. We then use the variables to construct the message using interpolation. Finally we redirect the user to the homepage and display the flash message.
Handling the failure case
In case the add_to_cart function returns a failure response we again redirect to the homepage, but this time we display a flash message explaining what went wrong.
conn
|> put_flash(:info, "Error adding product to cart")
|> redirect(to: page_path(conn, :index))Assembling all these pieces in our cart controller, we end up with this code:
defmodule MangoWeb.CartController do
use MangoWeb, :controller
alias Mango.Sales
def add(conn, %{"cart" => cart_params}) do
cart = "?" (1)
case Sales.add_to_cart(cart, cart_params) do (2)
{:ok, _} ->
%{"product_name" => name, "pack_size" => size, "quantity" => qty } = cart_params
message = "Product added to cart - #{name}(#{size}) x #{qty} qty"
conn
|> put_flash(:info, message)
|> redirect(to: page_path(conn, :index))
{:error, _} ->
conn
|> put_flash(:info, "Error adding product to cart")
|> redirect(to: page_path(conn, :index))
end
end
end| 1 | We still haven’t figured out how to find the current cart. |
| 2 | We also have not yet created the add_to_cart/2 function in our Sales context. |
Finding the current cart
HINT: It needs to exists before you find it.
As discussed earlier, the cart is nothing but an order in the "Cart" state. We will first create two functions
-
A function to create an empty order in the "Cart" state
-
A function to retrieve an order in the "Cart" status given an order ID.
Once we have both these functions we will go about finding the current cart for a given user.
Let’s create our test code thereby setting our expectations for these two functions.
Create a new test file test/mango/sales/sales_test.exs with the content below:
defmodule Mango.SalesTest do
use Mango.DataCase
alias Mango.{Sales, Repo}
alias Mango.Sales.Order
test "create_cart" do
assert %Order{status: "In Cart"} = Sales.create_cart (1)
end
test "get_cart/1" do
cart1 = Sales.create_cart
cart2 = Sales.get_cart(cart1.id)
assert cart1.id == cart2.id (2)
end
end| 1 | Sales.create_cart/0 needs to create a new order in the cart status. |
| 2 | Sales.get_cart/1 should return a cart when given a valid cart id. |
To pass the above tests, create a new file lib/mango/sales/sales.ex with the code below.
defmodule Mango.Sales do
alias Mango.Repo
alias Mango.Sales.Order
def get_cart(id) do
Order
|> Repo.get_by(id: id, status: "In Cart")
end
def create_cart do
%Order{status: "In Cart"} |> Repo.insert!()
end
endRun mix test test/mango/sales_test.exs to confirm the test passes.
With those two functions ready, we now get into the meat of our work. That is,finding the current cart.
What is current cart?
-
When a user visits the site for the first time, we create a new cart and store it in the
connstruct. -
When the user visits the site subsequently, we find the cart present in the session data, fetch it and store it again in the
connstruct.
In both cases, the cart present in the conn struct is our current cart for the user adding the product. The current cart is available in conn using the accessor conn.assigns.cart.
Since we are working with manipulating data in the conn, we can again achieve this by writing a module that adheres to the Plug specifications.
We start by defining our expectations in a test file at test/mango_web/plugs/fetch_cart_test.exs
defmodule MangoWeb.Plugs.FetchCartTest do
use MangoWeb.ConnCase (1)
alias Mango.Sales.Order
test "create and set cart on first visit" do (2)
conn = get build_conn(), "/"
cart_id = get_session(conn, :cart_id)
assert %Order{status: "In Cart"} = conn.assigns.cart
assert cart_id == conn.assigns.cart.id
end
test "fetch cart from session on subsequent visit" do (3)
conn = get build_conn(), "/" # first visit
cart_id = get_session(conn, :cart_id) # cart id from first visit
conn = get conn, "/" # second visit
assert cart_id == conn.assigns.cart.id
end
end| 1 | Again, we are using MangoWeb.ConnCase instead of Mango.DataCase because our test is interacting with the conn struct.
Using MangoWeb.ConnCase ensures that several low level tasks in setting up our Plug are taken care of and we just have to write our expectations with conn. |
| 2 | During the first visit, we expect conn.assigns.cart to contain a new Order in our cart status and we expect the session data to contain the ID of this order in the key cart_id. |
| 3 | During subsequent visits, which are marked by the line get conn, /, we expect the cart id stored in the session to be the same as the ID of the cart in conn. That is, do not create a new cart for subsequent requests. |
We will add our plug to the :browser pipeline as we did with the LoadCustomerPlug. Open router.ex and add our plug as indicated below:
pipeline :browser do
plug :accepts, ["html"]
plug :fetch_session
plug :fetch_flash
plug :protect_from_forgery
plug :put_secure_browser_headers
plug MangoWeb.Plugs.LoadCustomer
plug MangoWeb.Plugs.FetchCart (1)
end| 1 | Add our plug here. |
Creating Fetch Cart Plug
We will create a new plug that will work exactly as the LoadCustomerPlug works.
The completed plug module code below will suffice to make our failing test pass. A line by line explanation is given below the code.
defmodule MangoWeb.Plugs.FetchCart do
import Plug.Conn (1)
alias Mango.Sales
alias Mango.Sales.Order
def init(_opts), do: nil
def call(conn, _) do
with cart_id <- get_session(conn, :cart_id),
true <- is_integer(cart_id),
%Order{} = cart <- Sales.get_cart(cart_id)
do (3)
conn |> assign(:cart, cart)
else (2)
_ -> cart = Sales.create_cart()
conn
|> put_session(:cart_id, cart.id)
|> assign(:cart, cart)
end
end
end| 1 | Import Plug.Conn so that we can use functions such as get_session/2, put_session/3 etc. |
| 2 | Control flow for first visit |
| 3 | Control flow for subsequent visit |
In the above code, we make use of the two functions Sales.create_cart and Sales.get_cart!/1 that we created earlier. We start with the assumption that the request is a repeat visitor. A returning visitor should satisfy the following conditions:
-
It should have session data with the key
:cart_id. -
The value present in
:cart_idshould be an integer. -
Sales.get_cart/1should return cart data for this value.
If all these pass, we assign the cart data to the incoming conn struct and return the new conn struct.
If any of these conditions fail, we treat the user as visiting for the first time. In this case,
-
We create a new cart using
Sales.create_cart -
Set the
:cart_idof the session to the ID of the newly created cart -
Finally we store the entire cart struct in the
conn
With this new plug in place, we are now able to access the current cart anywhere in our application using the conn.assigns.cart accessor.
Where were we?
Oh yes! We forked out to create this plug as part of solving the problems we faced in the CartController.
defmodule MangoWeb.CartController do
use MangoWeb, :controller
alias Mango.Sales
def add(conn, %{"cart" => cart_params}) do
cart = conn.assigns.cart (1)
case Sales.add_to_cart(cart, cart_params) do (2)
{:ok, _} ->
%{"product_name" => name, "pack_size" => size, "quantity" => qty} = cart_params
message = "Product added to cart - #{name}(#{size}) x #{qty} qty"
conn
|> put_flash(:info, message)
|> redirect(to: page_path(conn, :index))
{:error, _} ->
conn
|> put_flash(:info, "Error adding product to cart")
|> redirect(to: page_path(conn, :index))
end
end
end| 1 | Now we are able to replaced our place holder value "?" with the current cart value which is stored in the conn.assigns. |
| 2 | We have yet to create this function in our Sales context. |
The last piece of this puzzle is to create the add_to_cart/2.
Let’s set out to write the expectations for this function. Open up test/mango/sales/sales_test.exs and add the code below.
alias Mango.Catalog.Product
test "add_to_cart/2" do
product = %Product{
name: "Tomato",
pack_size: "1 kg",
price: 55,
sku: "A123",
is_seasonal: false, category: "vegetables" } |> Repo.insert!
cart = Sales.create_cart (1)
{:ok, cart} = Sales.add_to_cart(cart, %{"product_id" => product.id, "quantity" => "2"})
assert [line_item] = cart.line_items
assert line_item.product_id == product.id
assert line_item.product_name == "Tomato"
assert line_item.pack_size == "1 kg"
assert line_item.quantity == 2
assert line_item.unit_price == Decimal.new(product.price)
assert line_item.total == Decimal.mult(Decimal.new(product.price), Decimal.new(2))
endThe above test translates to:
Given we have a product and a cart,
when we call Sales.add_to_cart/2 with cart and a map containing the product id and quantity,
we expect the returned cart to contain a list of 1 line item corresponding to the product added.
The line item should also include all its properties: product_id, product_name, pack_size, quantity, unit_price and total.
The approach we are going to take is to alter the changeset function for our Order schema to accept values for line_items which is managed by the LineItem schema.
If you are familiar with Rails, this is similar to accept_nested_attributes_for in ActiveRecord models.
We can also specify a function that needs to be called to validate the LineItem data managed through Order schema.
If all this sounds unclear, thats okay. It will all become clear as we work through the code in an incremental way.
Add the following functions to the Sales module.
def add_to_cart(%Order{line_items: []} = cart, cart_params) do
attrs = %{line_items: [cart_params]}
update_cart(cart, attrs)
end
def add_to_cart(%Order{line_items: existing_line_items} = cart, cart_params) do
new_item = %{
product_id: String.to_integer(cart_params["product_id"]),
quantity: String.to_integer(cart_params["quantity"])
}
existing_line_items = existing_line_items |> Enum.map(&Map.from_struct/1)
attrs = %{line_items: [new_item | existing_line_items]}
update_cart(cart, attrs)
end
def update_cart(cart, attrs) do
cart
|> Order.changeset(attrs)
|> Repo.update
endSince we are not adding the line_items directly but managing them through the parent schema Order, we need both the order struct and a map containing the changes to the order struct to be passed to the changeset function.
The structure of our cart, as per our Order schema is
%Order{
status: "In Cart",
total: nil,
line_items: []
}We need a map with the keys in the order struct to update our cart data. For now, we only want to update the line_items data.
So we create a map with just :line_items as the key and wrap the incoming cart_params in a list.
attrs = %{line_items: [cart_params]}We can now pass this map to the Order.changeset/2 function, and expect it to set the values of line_items with the values from our map.
Since the line_items are managed by the LineItem struct and are only embedded in the Order struct, we need to use cast_embed in our order changeset.
Open up order.ex file and modify the changeset function as below:
def changeset(%Order{} = order, attrs) do
order
|> cast(attrs, [:status, :total]) (1)
|> cast_embed(:line_items, required: true, with: &LineItem.changeset/2) (2)
|> set_order_total (3)
|> validate_required([:status, :total]) (4)
end
defp set_order_total(changeset) do
items = get_field(changeset, :line_items)
total = Enum.reduce(items, Decimal.new(0), fn(item, acc) ->
Decimal.add(acc, item.total)
end)
changeset
|> put_change(:total, total)
end| 1 | Remove :line_items from the list of fields to be cast because it’s an embedded schema. |
| 2 | Add this line so that any incoming data for order struct with :line_items key will be forwarded to the LineItem.changeset/2 function. |
| 3 | We add a function to calculate the order total from the line_items and set the order total value in the changeset. |
| 4 | We also remove the :line_items key from validate_required list because it’s an embedded schema and we set the required status in the cast_embed call above. |
In the LineItem module, we need the following changeset function to be added. It sets the product details on the line_item struct and calculates the line_item total.
import Ecto.Changeset
alias Mango.Catalog
alias Mango.Sales.LineItem
@doc false
def changeset(%LineItem{} = line_item, attrs) do
line_item
|> cast(attrs, [:product_id, :product_name, :pack_size, :quantity, :unit_price, :total])
|> set_product_details
|> set_total
|> validate_required([:product_id, :product_name, :pack_size, :quantity, :unit_price])
end
defp set_product_details(changeset) do
case get_change(changeset, :product_id) do
nil -> changeset
product_id ->
product = Catalog.get_product!(product_id)
changeset
|> put_change(:product_name, product.name)
|> put_change(:unit_price, product.price)
|> put_change(:pack_size, product.pack_size)
end
end
defp set_total(changeset) do
quantity = get_field(changeset, :quantity) |> Decimal.new
unit_price = get_field(changeset, :unit_price)
changeset
|> put_change(:total, Decimal.mult(unit_price, quantity))
endOpen lib/mango/catalog/catalog.ex and add a function to query for products by their id.
def get_product!(id), do: Product |> Repo.get!(id)Run mix test to run all our tests. They they should all pass now.
View cart
View Cart
Let’s start with creating a new route in router.ex file to view the cart.
scope "/", MangoWeb do
(...)
get "/cart", CartController, :show (1)
end| 1 | GET request /cart is now handled by CartController.show/2 |
Add a new function for the show action in the CartController.
defmodule MangoWeb.CartController do
use MangoWeb, :controller
alias Mango.Sales
(...)
def show(conn, _params) do
cart = conn.assigns.cart
render conn, "show.html", cart: cart
end
endWe render the show.html template passing in the cart variable.
Create a CartView module as shown below:
defmodule MangoWeb.CartView do
use MangoWeb, :view
endFinally we create a new template show.html.eex with the following code.
<h1>Cart</h1>
<%= if Enum.empty?(@cart.line_items) do %>
<p>Your cart is empty</p>
<% else %>
<table class="table">
<thead>
<tr>
<th>Product name</th>
<th>Pack size</th>
<th>Quantity</th>
<th>Unit Price</th>
<th>Subtotal</th>
</tr>
</thead>
<tbody>
<%= for item <- @cart.line_items do %>
<tr>
<td><%= item.product_name %></td>
<td><%= item.pack_size %></td>
<td><%= item.quantity %></td>
<td>INR <%= item.unit_price %></td>
<td>INR <%= item.total %></td>
</tr>
<% end %>
<tr>
<td colspan=4>Order Total</td>
<td>INR <%= @cart.total %></td>
</tr>
</tbody>
</table>
<% end %>Add link to view cart
In order to add a link to view cart in the navbar, open up app_nav.html.eex file inside lib/mango_web/templates/layout and add the following code.
<ul class="nav navbar-nav navbar-right">
<li><%= link "Cart", to: cart_path(@conn, :show), class: "cart nav-link" %></li>
(...)
</ul>To display the cart count, we need to get access to the current cart data.
Since our plug FetchCart stores the current cart in the conn struct, we can retrieve it easily on our templates by accessing @conn.assigns.cart.
We will need to do a little scripting to calculate the total items in the cart. This type of scritping is a bit messy to do inside our template file. Instead, let’s move it all to a function inside CartView.
defmodule MangoWeb.CartView do
use MangoWeb, :view
alias Mango.Sales.Order
def cart_count(conn = %Plug.Conn{}) do
cart_count(conn.assigns.cart)
end
def cart_count(cart = %Order{}) do
Enum.reduce(cart.line_items, 0, fn(item, acc) ->
acc + item.quantity
end)
end
endWe define two functions, both named cart_count but accepting different data types.
When the cart_count/1 is called by passing a conn struct, it fetches the cart assigned in it and calls cart_count/1 with the cart data.
But this time the second function head matches which loops through each item in the cart’s lineitems and finds the total items using Enum.reduce/3.
Finally let’s make use of this function in our navigation partial.
<ul class="nav navbar-nav navbar-right">
<li><%= link "Cart(#{MangoWeb.CartView.cart_count(@conn)})", to: cart_path(@conn, :show), class: "cart nav-link" %></li>
</ul>Argh! That’s looking pretty long and difficult to read. We can do better.
Open up layout_view.ex and import the function from CartView as below:
defmodule MangoWeb.LayoutView do
use MangoWeb, :view
import MangoWeb.CartView, only: [cart_count: 1]
endNow back in app_nav.html.eex template, we can remove the module name prefix.
<ul class="nav navbar-nav navbar-right">
<li><%= link "Cart(#{cart_count(@conn)})", to: cart_path(@conn, :show), class: "cart nav-link" %></li>
</ul>That looks better. If the count is 5 it now displays a link with text "Cart(5)". What if we want to display a cart icon instead of the text?
The code needs to be modified as
<li><%= link raw("<i class=\"fa fa-shopping-cart\" aria-hidden=\"true\"></i> <span class=\"cart-count\">#{cart_count(@conn)}</span>"), to: cart_path(@conn, :show), class: "cart nav-link" %></li>Look at those additional calls to the raw/1 function and all those escaped double quotes. Even if we replace the inner double quotes with single quotes, it is still a big complex EEx expression.
Again, we can do better. Open up layout_view.ex and add this new function.
defmodule MangoWeb.LayoutView do
use MangoWeb, :view
import MangoWeb.CartView, only: [cart_count: 1]
def cart_link_text(conn) do
raw """
<i class="fa fa-shopping-cart"></i> <span class="cart-count">#{cart_count(conn)}</span>
"""
end
endThe code for the cart link in our app_nav.html.eex can now be simplified as below:
<ul class="nav navbar-nav navbar-right">
<li><%= link cart_link_text(@conn), to: cart_path(@conn, :show), class: "cart nav-link" %></li>
</ul>Update cart
Since the user updates the cart from the cart’s show page, let’s start working from there. Right now when we view a cart page, we only see a tabular listing of the cart’s contents. The change that we need in the cart’s show page is to display a form for updating the order. We will retain the existing table structure showing the cart contents but we will insert form fields to update line item quantities and to remove individual line items.
<h1>Cart</h1>
<%= if Enum.empty?(@cart.line_items) do %>
<p>Your cart is empty</p>
<% else %>
<%= form_for @cart_changeset, "/cart", fn f -> %> (1)
<table class="table">
<thead>
<tr>
<th>Product name</th>
<th>Pack size</th>
<th>Quantity</th>
<th>Unit price</th>
<th>Subtotal</th>
<td>Remove?</td>
</tr>
</thead>
<tbody>
<%= inputs_for f, :line_items, fn lf -> %> (2)
<tr>
<td><%= lf.data.product_name %></td>
<td><%= lf.data.pack_size %></td>
<td>
<%= hidden_input lf, :product_id %>
<%= number_input lf, :quantity %>
<%= error_tag lf, :quantity %>
</td>
<td>INR <%= lf.data.unit_price %></td>
<td>INR <%= lf.data.total %></td>
<td><%= checkbox lf, :delete %></td>
</tr>
<% end %>
<tr>
<td colspan=4>Total</td>
<td>INR <%= @cart.total %></td>
<td></td>
</tr>
</tbody>
</table>
<div class="form-group">
<%= submit "Update Cart", class: "btn btn-primary" %>
</div>
<% end %>
<% end %>| 1 | We wrap the entire table content inside a form_for element. |
| 2 | Instead of looping through @cart.line_items which is a simple list, we use the inputs_for form helper, which again loops but this time creating a form struct for each value in the list. |
The main change between the previous code and the current one is the code for printing the line items.
<%= for item <- @cart.line_items do -> %>
<tr>
<td><%= item.product_name %></td>
<td><%= item.pack_size %></td>
<td><%= item.quantity %></td>
<td>INR <%= item.unit_price %></td>
<td>INR <%= item.total %></td>
</tr>
<% end %><%= inputs_for f, :line_items, fn lf -> %>
<tr>
<td><%= lf.data.product_name %></td>
<td><%= lf.data.pack_size %></td>
<td>
<%= hidden_input lf, :product_id %>
<%= number_input lf, :quantity %>
</td>
<td>INR <%= lf.data.unit_price %></td>
<td>INR <%= lf.data.total %></td>
<td><%= checkbox lf, :delete %></td>
</tr>
<% end %>Within the input_for block, lf represents the form struct for each line item and it’s used to generate the form fields. If we want to access the plain line item struct, we can access it by lf.data.
We make use of lf for creating input fields and use lf.data for directly printing the line item data.
Additionally, we also show a checkbox to allow users to remove a product from the cart.
Our template makes use of @cart_changeset but it’s not yet in our CartController. Open cart_controller.ex file and modify the show action
def show(conn, _params) do
cart = conn.assigns.cart
cart_changeset = Sales.change_cart(cart) (1)
render conn, "show.html", cart: cart, cart_changeset: cart_changeset (2)
end| 1 | Create a cart changeset |
| 2 | Pass the cart changeset to template. |
The function Sales.change_cart/1 doesn’t exist yet. Let’s create it now. Open lib/mango/sales/sales.ex file and add the new function.
def change_cart(%Order{} = order) do
Order.changeset(order, %{})
endNow we have modified the cart show page to display the cart contents within an HTML form. The form however is not working yet. We need a new route to handle the form submission.
Open router.ex file and add this new route
put "/cart", CartController, :updateOpen up cart_controller.ex to add the update action.
def update(conn, %{"order" => cart_params}) do
cart = conn.assigns.cart
case Sales.update_cart(cart, cart_params) do
{:ok, _} ->
conn
|> put_flash(:info, "Cart updated successfully")
|> redirect(to: cart_path(conn, :show))
{:error, _} ->
conn
|> put_flash(:info, "Error updating cart")
|> redirect(to: cart_path(conn, :show))
end
endTry updating the cart contents and it should now work except for removing the products from the cart. Selecting the checkbox seems to have no effect on the cart items. That’s because our LineItem changeset doesn’t use it yet.
Open lib/mango/sales/line_item.ex and change as below
def changeset(%LineItem{} = line_item, attrs) do
line_item
|> cast(attrs, [:product_id, :product_name, :pack_size, :quantity, :unit_price, :total, :delete]) (1)
|> set_product_details
|> set_total
|> validate_required([:product_id, :product_name, :pack_size, :quantity, :unit_price])
end| 1 | Add :delete to the list of allowed items in the cast. |
However, we can only allow fields that are present in the LineItem struct. :delete is not a valid field on the LineItem struct.
We can overcome this by declaring :delete as a virtual field on LineItem, which means the value for :delete doesn’t get stored in the database but we can still set a value for it.
defmodule Mango.Sales.LineItem do
(...)
embedded_schema do
(...)
field :delete, :boolean, virtual: true (1)
end
(...)
end| 1 | Add :delete as a virtual field. |
We will now make use of this new virtual attribute to determine if the line item has to be deleted or not. When the user selects the checkbox to remove an item from the cart, it changes the delete value of the line_item to true.
This delete attribute on the LineItem is not anything special. Infact, it can be named anything we want. What matters is that we set the :action value of the line item changeset to :delete.
Let’s modify the changeset to set this :action attribute to :delete on the LineItem we want to delete.
def changeset(%LineItem{} = line_item, attrs) do
line_item
|> cast(attrs, [:product_id, :product_name, :pack_size, :quantity, :unit_price, :total, :delete])
|> set_delete (1)
|> set_product_details
|> set_total
|> validate_required([:product_id, :product_name, :pack_size, :quantity, :unit_price])
end| 1 | Add this new function call. |
Create the private function set_delete which checks if the changeset for the line_item has a new value for :delete. Why aren’t we checking if it’s true? Since the field is virtual, it’s not stored in the database. If the changeset shows this value has been changed, then it’s surely marked for deletion.
defp set_delete(changeset) do
if get_change(changeset, :delete) do
%{changeset| action: :delete}
else
changeset
end
endWith this new addition, we now have a fully working update functionality for our cart. That’s a lot less work than we did for add_to_cart!
AJAX cart
In the last section we saw how to use add to cart functionality for our products. It works but a quick ajax update would be nice instead of a full page refresh on each addition of a product to the cart.
Surprisingly this is very easy to achieve. The list of things that we need to do are
-
Ensure jQuery is loaded before any other javascript library.
-
Prevent the form from performing the standard submission and post the form data via ajax.
-
Modify the cart controller to respond via json on a successful update.
-
Display the json data back to the user.
Javascript Changes
When a new Phoenix project is generated through mix phx.new, it doesn’t include jQuery or Bootstrap javascript files in it by default.
Since we used the mix phx.new command to get started this applies to our project as well.
However, as part of the asset files that we copied when setting up Mango, we have both jQuery and bootstrapGrowl library in our assets folder.
Without any configuration, Brunch doesn’t know the order in which these files needs to be concatenated. The default concatenation order which is alphabetical is not what we need.
Open assets/brunch-config.js and ensure the entire value of javascripts key reads as follows:
javascripts: {
joinTo: "js/app.js", (1)
order: {
before: [
"vendor/js/jquery-3.2.1.min.js",
"vendor/js/bootstrap.min.js"
]
}
},| 1 | Make sure, you add a , at the end of this line. |
The above configuration ensures that jquery-3.2.1.min.js is loaded first, followed by bootstrap.min.js, and then any other js files present in the assets folder are added in the default order. If you followed the instruction in Chapter 3 to setup assets for Mango project, you don’t have to make any changes to brunch-config.js as it already has the necessary changes.
Add a new javascript file assets/js/ajax_cart.js with the below content.
function ajaxHandler(e) {
e.preventDefault()
var post_url = $(this).attr("action"); //get form action url
var form_data = $(this).serialize(); //Encode form elements for submission
$.post( post_url, form_data, function( response ) {
$.bootstrapGrowl(response.message, {
offset: {from: 'top', amount: 60},
type: 'success'
});
$(".cart-count").text(response.cart_count)
});
}
var ajaxCart = {
init: function() {
$(function(){
$(".cart-form").on('submit', ajaxHandler)
})
}
}
export default ajaxCartIt prevents the cart from submitting and sends the form data through ajax. On response from the server, it uses bootstrapGrowl jQuery plugin to display the message and updates the cart count.
Finally we need to import our javascript module on assets/js/app.js and call the init method to have our js executed.
import ajaxCart from "./ajax_cart"
ajaxCart.init()CartController changes
We should change the add function on our cart_controller.ex so that it now returns a json template instead of redirecting the users. We can either create an add.json file inside our templates/cart folder or create a function inside the CartView. We are going to create a function inside the CartView module.
def add(conn, %{"cart" => cart_params}) do
cart = conn.assigns.cart
case Sales.add_to_cart(cart, cart_params) do
{:ok, cart} -> (1)
render(conn, "add.json", cart: cart, cart_params: cart_params) (2)
{:error, %Ecto.Changeset{} = changeset} ->
conn
|> put_flash(:info, "Error adding product to cart")
|> redirect(to: page_path(conn, :index))
end
end| 1 | Capture the update cart information in cart variable, instead of ignoring it as previously. |
| 2 | Replace the existing code with this line to render a json response. |
CartView changes
Add the following code
defmodule MangoWeb.CartView do
use MangoWeb, :view
alias Mango.Sales.Order
def render("add.json", %{cart: cart, cart_params: cart_params}) do
%{"product_name" => name, "pack_size" => size, "quantity" => qty } = cart_params
%{
message: "Product added to cart - #{name}(#{size}) x #{qty} qty",
cart_count: cart_count(cart)
}
end
(...)
endLet’s run mix test to see if we broke any test:
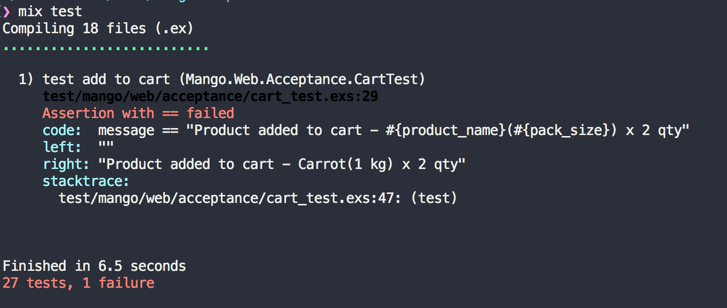
The cart acceptance test is broken. This is because our test checks for the message inside the alert class. Since bootstrapGrowl creates a new element with an alert class, there exists multiple alert classes in the page now and Hound checks only the first found element which doesn’t contain the text we are asserting. We can modify the test to check the text inside the alert-success class, which is created by bootstrapGrowl notification. Modify cart_test.exs as shown below:
defmodule MangoWeb.Acceptance.CartTest do
(...)
test "add to cart" do
(...)
message = find_element(:css, ".alert-success")
|> visible_text()
assert message =~ "Product added to cart - #{product_name}(#{pack_size}) x 2 qty"
end
endNow run mix test and all tests should once again pass.
Summary
We are gradually upping the ante on the complexity of an ecommerce site. We are now using Carts, we learned how to use embedded schema for line items and how to validate data throughout the cart process.
For the implementation of the cart we depended on knowledge gained in the previous chapter. We set the session value, created a new plug and used changesets. As promised, the complexity involved has increased from what we saw in the previous chapter. However, it has increased in a measured way that is not overwhelming.
Through out, we created the functions using TDD. We added the AJAX implementation to our cart which was surprisingly easy and fun. Finally, thanks to Phoenix Views, we were able to send JSON data without much hassle.
We are making great progress, so lets continue on!
Checkout
Iteration Planning
In this chapter, we will work on the following user stories
As an anonymous user, I should be redirected to the login page during checkout.
As a customer, I want to complete my purchase through a checkout process.
To complete these user stories we need to write a new Plug module for authorization and add a few new routes for the checkout process. Since we are adding a new Plug module to the router pipeline and adding more routes, this is a perfect time to refactor our Router file so that we can have separate router scopes for authenticated users and Unauthenticated users.
Finally, we will do the now familiar Controller-View-Template drill for the checkout page. By the end of this chapter, you will be comfortable with writing a Plug module and dealing with session data.
Require authenticated customer
Let’s add a new route for checkout and add a checkout link on the cart page.
Since we know the process needed to create a page, we will go through it quickly.
Add a route in mango_web/router.ex for the checkout page as shown below:
get "/checkout", CheckoutController, :editAdd a link to checkout on the cart page. Modify the template cart/show.html.eex and add the link as shown below:
<%= if Enum.empty?(@cart.line_items) do %>
<p><%= Your cart is empty %></p>
<% else %>
...
<%= link "Checkout", to: checkout_path(@conn, :edit), class: "btn btn-primary pull-right " %>
<% end %>Now create a controller, view and template as shown below:
defmodule MangoWeb.CheckoutController do
use MangoWeb, :controller
def edit(conn, _params) do
render conn, "edit.html"
end
enddefmodule MangoWeb.CheckoutView do
use MangoWeb, :view
end<h1>Checkout</h1>With the previous setup complete, we should now be able to access http://localhost:4000/checkout irrespective of the customers' authentication status. Our job now is to make sure that the checkout page is accessible only for signed in users. If someone tries to visit this page without signing in they should be redirected to the login page.
Before we work on that, let’s refactor our router.ex file as indicated below:
pipeline :frontend do
# Add plugs related to frontend
end
# Unauthenticated scope
scope "/", MangoWeb do
pipe_through [:browser, :frontend]
# Add all routes for unauthenticated users
end
# Authenticated scope
scope "/", MangoWeb do
pipe_through [:browser, :frontend, MangoWeb.Plugs.AuthenticateCustomer]
# Add routes that require authentication
endStarting with the pipeline, we will move our existing plugs into a new pipeline called :frontend. The idea here is that we leave the default :browser pipeline untouched and restrict it to the default list of Plugs that are required for any browser request. We create a new :frontend pipeline to which we add our application specific plugs.
pipeline :frontend do
plug MangoWeb.Plugs.LoadCustomer
plug MangoWeb.Plugs.FetchCart
endLater in this book, we will add a pipeline called backend which contains the Plugs for the admin dashboard. So we are already working towards a clear separation of Plugs based on their usage.
So far we have all the routes under a single scope do…end block. A scope block helps us to group a set of routes that can be passed through a common pipeline. We will now create two scope blocks, one for all routes that don’t require authentication and another for routes that require authentication.
scope "/", MangoWeb do
pipe_through [:browser, :frontend] (1)
# Add all routes that don't require authentication
get "/login", SessionController, :new
post "/login", SessionController, :create
get "/register", RegistrationController, :new
post "/register", RegistrationController, :create
get "/", PageController, :index
get "/categories/:name", CategoryController, :show
get "/cart", CartController, :show
post "/cart", CartController, :add
patch "/cart", CartController, :update
put "/cart", CartController, :update
end| 1 | Note that we are using the new frontend pipeline, in addition to the browser pipeline. |
scope "/", MangoWeb do
pipe_through [:browser, :frontend, Mango.Plugs.AuthenticateCustomer] (1)
# Add all routes that do require authentication
get "/logout", SessionController, :delete
get "/checkout", CheckoutController, :edit
end| 1 | We are again passing through the browser and frontend pipelines. Additionally, we are passing in a new plug Mango.Plugs.AuthenticateCustomer to authenticate customers. This plug will allow access to the URLs inside this scope only to logged in customers. Hence we can add all routes that require authentication in this scope. |
With this refactoring in place, we can go ahead and write our new plug AuthenticateCustomer that we used in the router.
Writing Authentication Plug
The logic behind the authentication plug is simple. We will check if the current_customer value is present in the conn. Since this plug is run after the LoadCustomer plug, we will have the current_customer value in the conn struct if the user is logged in. If the current_customer value is present, our new plug will just happily return the given conn without doing any work. If the value for current_customer is not present, it will redirect the user to the login page and simply halt the plug pipeline preventing other plugs from executing.
defmodule MangoWeb.Plugs.AuthenticateCustomer do
import Plug.Conn
import Phoenix.Controller, only: [redirect: 2, put_flash: 3]
def init(_opts), do: nil
def call(conn, _opts) do
case conn.assigns[:current_customer] do
nil -> (1)
conn
|> put_flash(:info, "You must be signed in")
|> redirect(to: "/login")
|> halt
_ -> (2)
conn
end
end
end| 1 | Redirect to /login if the customer data is not present in conn |
| 2 | Just return conn without doing any work if the customer data is present. |
Now, if we try to visit /checkout without signing in we will be redirected to the /login page with the message "You must be signed in".
Remember redirect path
Checkout is now accessible only to authenticated customers. However, there is a UX issue with our implementation. If the customer gets redirected to the login page when visiting the checkout link, we expect the customer to be returned to the checkout page after they login. However, in our current implementation, the customer gets redirected to the homepage after login which is an unexpected behavior from a usability point of view.
How do we solve this?
Before redirecting, we need to store the path requested by the user in the session data as intending_to_visit.
When the user signs in, we check if intending_to_visit has data. If so, we use the stored value to forward the user on to their intended destination; otherwise we redirect them to the homepage.
defmodule MangoWeb.Plugs.AuthenticateCustomer do
import Plug.Conn
import Phoenix.Controller, only: [redirect: 2, put_flash: 3]
def init(opts), do: nil
def call(conn, _opts) do
case conn.assigns[:current_customer] do
nil ->
conn
|> put_session(:intending_to_visit, conn.request_path) (1)
|> put_flash(:info, "You must be signed in")
|> redirect(to: "/login")
|> halt
_ ->
conn
end
end
end| 1 | Store the path that the user has requested in the session under the key intending_to_visit. |
Now edit the SessionController file and modify the redirect path after login.
def create(conn, %{"session" => session_params}) do
case CRM.get_customer_by_credentials(session_params) do
:error ->
conn
|> put_flash(:error, "Invalid username/password combination")
|> render("new.html")
customer ->
path = get_session(conn, :intending_to_visit) || page_path(conn, :index) (1)
conn
|> assign(:current_customer, customer)
|> put_session(:customer_id, customer.id)
|> configure_session(renew: true)
|> put_flash(:info, "Login successful")
|> redirect(to: path) (2)
end
end| 1 | Add this line to choose the path to redirect after login. |
| 2 | Change this line to redirect to the path stored in step 1. |
With this minor change, we can now try going to /checkout. We will be prompted to sign in and when signed in, we will automatically be redirected to the /checkout page.
What happens if we aren’t registered and want to create an account during the checkout process? Our implementation above will still work if we try to register for an account after being redirected to the login screen. Once registered, the login page will still redirect to the checkout page. See if you can try to figure out how this redirect works.
Processing Checkout
Preparing the Datastore and Schema
Our order table doesn’t have fields for storing order comments or customer related information.
Let’s add these fields to our existing order table through a database migration.
Run mix ecto.gen.migration add_checkout_fields_to_orders
Open the new migration file and add the following database changes.
defmodule Mango.Repo.Migrations.AddCheckoutFieldsToOrders do
use Ecto.Migration
def change do
alter table(:orders) do
add :comments, :text
add :customer_id, references(:customers)
add :customer_name, :string
add :email, :string
add :residence_area, :string
end
create index(:orders, [:customer_id])
end
endNow run mix ecto.migrate to execute the database changes.
We also need to modify
-
The Order schema to add these new fields
-
The changeset function to allows these new values to be stored in the database.
defmodule Mango.Sales.Order do
(...)
schema "orders" do
embeds_many :line_items, LineItem, on_replace: :delete
field :status, :string
field :total, :decimal
# --> newly added from here
field :comments, :string
field :customer_id, :integer
field :customer_name, :string
field :email, :string
field :residence_area, :string
# <-- upto here
timestamps()
end
(...)
endThe changeset function needs to be modified to allow newly added fields in cast. However, we cannot change the existing changeset because doing so will cause a regression — none of our cart features will work because at the time of adding products or updating the cart, we don’t have any details about either the customer or the order comments.
The goal here is to use a new changeset while at the same time avoiding code duplication.
Mango.Sales.Orderdef changeset(%Order{} = order, attrs) do
order
|> cast(attrs, [:status, :total])
|> cast_embed(:line_items, required: true, with: &LineItem.changeset/2)
|> set_order_total
|> validate_required([:line_items, :status, :total])
endMango.Sales.Order Reusing the Existing Changeset.def checkout_changeset(%Order{} = order, attrs) do
changeset(order, attrs) (1)
|> cast(attrs, [:customer_id, :customer_name, :residence_area, :email, :comments])
|> validate_required([:customer_id, :customer_name, :residence_area, :email])
end| 1 | We make use of the existing changeset/2 function and chain in additional validation for the new fields. |
Preparing the Router
We need two routes for performing the above actions:
-
first to show the checkout form.
-
second to process the checkout submission.
We already have the first route created and the template just needs to be modified to show the checkout form.
We will add the second route to our router.ex inside the authenticated scope.
put "/checkout/confirm", CheckoutController, :updateCheckout Page Form
The checkout page is similar to the "Cart update" page in the sense in that, we are going to show the cart contents but not allow the customer to edit them. Additionally we are going to show a comment field for the customer to enter any order comments.
Modify the CheckoutController as shown below to pass the order and order_changeset value to the template.
defmodule MangoWeb.CheckoutController do
use MangoWeb, :controller
alias Mango.Sales
def edit(conn, _params) do
order = conn.assigns.cart
order_changeset = Sales.change_cart(order)
render conn, "edit.html",
order: order,
order_changeset: order_changeset,
end
endIn the template file add the following code to show an HTML form with an option to add comments.
<%= form_for @order_changeset, checkout_path(@conn, :update), fn f -> %>
<div class="row">
<div class="col-md-6 col-md-offset-3">
<h2>Order Summary</h2>
<table class="table">
<thead>
<tr>
<th>ID</th>
<th>Product name</th>
<th>Pack size</th>
<th class="text-right">Quantity</th>
<th class="text-right">Subtotal</th>
</tr>
</thead>
<tbody>
<%= for {item, i} <- Enum.with_index(@order.line_items, 1) do %>
<tr>
<td><%= i %></td>
<td><%= item.product_name %></td>
<td><%= item.pack_size %></td>
<td class="text-right"><%= item.quantity %></td>
<td class="text-right">INR <%= item.total %></td>
</tr>
<% end %>
<tr>
<td colspan=4 class="text-right">Total</td>
<td class="text-right">INR <%= @order.total %></td>
</tr>
</tbody>
</table>
<div class="form-group"> (1)
<%= label f, :comments, class: "control-label" %>
<%= textarea f, :comments, class: "form-control" %>
<%= error_tag f, :comments %>
</div>
<div class="form-group float-right">
<%= submit "Confirm", class: "btn btn-primary" %>
</div>
</div>
</div>
<% end %>| 1 | Add the comments field for the order. |
The above form template is similar to the form template of the Cart update page, with the addition of the comments field. The form submission is sent back to the update action of CheckoutController. Let’s create it now.
Edit the CheckoutController modifying it as shown below.
defmodule MangoWeb.CheckoutController do
use MangoWeb, :controller
alias Mango.Sales
(...)
def update(conn, %{"order" => order_params}) do
order = conn.assigns.cart
order_params = associate_user_from_session(conn, order_params) (1)
case Sales.confirm_order(order, order_params) do
{:ok, _} ->
conn
|> put_flash(:info, "Your order has been confirmed.")
|> redirect(to: "/")
{:error, order_changeset} ->
render conn, "edit.html", order: order, order_changeset: order_changeset
end
end
def associate_user_from_session(conn, params) do
customer = conn.assigns.current_customer
params
|> Map.put("customer_id", customer.id)
|> Map.put("customer_name", customer.name)
|> Map.put("residence_area", customer.residence_area)
|> Map.put("email", customer.email)
end
end| 1 | The order params from the form submission doesn’t contain the customer details needed for completing the order. We define a new function associate_user_from_session to add these missing customer details to order params. |
We have the current customer information in the conn struct. With the helper function associate_user_from_session, we are merging this customer data into the order_params.
Finally let’s create Sales.confirm_order to complete the checkout process. Open sales.ex and add the following code.
def confirm_order(%Order{} = order, attrs) do
attrs = Map.put(attrs, "status", "Confirmed")
order
|> Order.checkout_changeset(attrs) (1)
|> Repo.update()
end| 1 | We make use of the new changeset that we have created with additional validation. |
Summary
In this chapter, we implemented the authentication requirement. In the process we learned how to refactor the router file to clearly divide the routes that require authentication from those that do not. We also created new router pipelines and used them inside router scopes.
We wrote a module Plug that does the authentication and in the process learned how to halt a Plug pipeline. We reused our existing knowledge of adding and retrieving data from the session in order to redirect the users back to the protected route they were trying to visit — i.e. the checkout page after login.
As we began to modify the datastore to hold additional information on checkout, we
-
used Ecto migration to modify our existing
orderstable to store missing customer data. -
modified our schema definitions and changeset functions for the updated
orderstable. -
Learned when and how to use multiple changesets by creating a new
order_changesetfunction to complete our checkout process.
We have taken a long journey from initially showing the products on the homepage to completing the checkout process as a customer. Take time to recap the journey from Chapter 3 and recall the various steps we have taken to arrive here. Also, take time to review any information that is unclear and let move on!
My Profile and Preference
Iteration Planning
In this chapter we will tackle three user stories:
-
As a customer, I want to see my order history.
-
As a customer, I want to manage support tickets for my order.
-
As a customer, I want to browse the site in multiple languages.
We have seen a few user stories where we created a router, a controller, a view and a template and displayed information queried from the database. For example, the cart page displays the list of items in the cart by loading the order information from the database. Viewing of an order history by a customer is just more of the same. We create a bunch of router-to-template transformation for displaying the list of orders and for viewing a single order. To keep the content in this book interesting and spend time on learning new and interesting stuff, this user story is given as an exercise for you to test your understanding to this point.
So far we haven’t used a CRUD generator for any of the user stories that we developed. CRUD generators have their place for simple user stories. However, it is difficult to comprehend why it’s not suitable when developing a full fledged user story. Having trained people who come from a CRUD generator mindset to TDD, a simple exercise to demonstrate a case against CRUD generators and a case for CRUD generators is normally easier to understand, than a statement based on someone else’s experience. The user story for managing support tickets is a case against CRUD generators explaining when and why you shouldn’t use them. In the next chapter, we will look at a case in favor of CRUD generators to complement this topic and to be nice to CRUD generators for offending their sensitivities in this chapter ;-)
Finally, we will look into implementing an interface language translation by using the Gettext library which is preconfigured with Phoenix. Internationalization in Phoenix is so simple that we can cover this in a single short chapter.
My Orders
As explained earlier, this user story is an exercise for you to workout by yourself by applying the concepts learned so far. Specifications for this user story are given below:
Specifications
-
There should be a link "My Orders" on the nav bar under the user menu.
-
Clicking on this "My Orders" link should take users to the
/orderspage which lists all orders for the currently logged in customer in an HTML table. -
The table should list the following details of each order:
-
Order ID
-
Status
-
Products Ordered
-
Total
-
-
Each order should have a "View" link that takes users to
/orders/:idto view the complete details of the order. -
If customers try to view an order that doesn’t belong to them, then a
404page should be returned.
Exercise details
-
Write acceptance tests for all the scenarios covered in the user story specification.
-
Write unit tests for all new functions written for the purpose of this user story.
-
Finally make all the tests pass by writing the actual implementation code.
Manage Tickets
— a case against use of CRUD generators
So far we have worked on the user stories one by one without using a full scaffold helper. For the sake of completeness, let’s go through using the full scaffold generator for a complete CRUD operation of a resource.
| But first consider git: |
In Rails we have the command rails g scaffold to scaffold the entire resource as shown below in the phx.gen.html . Rails also provides rails d scaffold to undo the changes if we made a mistake in the generator command. However, in Phoenix there is no undo command for phx.gen.html.
So before running the mix command above, it’s good to commit all changes in a Git repo. This ensures that we can always go back to the previous state by git checkout . && git clean -fd if we made a mistake in running our mix task. Otherwise we will be forced to undo the changes manually which is time consuming, error prone, and frustrating.
Now run the following command
→ mix phx.gen.html CRM Ticket tickets subject message:text status customer_id:references:customersIn the above command
-
CRMdenotes the context module name -
Ticketdenotes the schema module name -
ticketsdenotes the plural form of the schema which is used for creating the database table -
Finally, we provide a list of fields in the schema and their type.
The field definition customer_id:references:customers created a field customer_id in the tickets table with foreign key constraint to customers table.
The above will generate a lot of files for you and print instructions to follow.
* creating lib/mango_web/controllers/ticket_controller.ex
* creating lib/mango_web/templates/ticket/edit.html.eex
* creating lib/mango_web/templates/ticket/form.html.eex
* creating lib/mango_web/templates/ticket/index.html.eex
* creating lib/mango_web/templates/ticket/new.html.eex
* creating lib/mango_web/templates/ticket/show.html.eex
* creating lib/mango_web/views/ticket_view.ex
* creating test/mango_web/controllers/ticket_controller_test.exs
* creating lib/mango/crm/ticket.ex
* creating priv/repo/migrations/20170614070732_create_tickets.exs
* injecting lib/mango/crm/crm.ex
* creating test/mango/crm/crm_test.exs
* injecting test/mango/crm/crm_test.exs
Add the resource to your browser scope in lib/mango_web/router.ex:
resources "/tickets", TicketController
Remember to update your repository by running migrations:
$ mix ecto.migrateOpen up the router.ex file and add the following line inside the authenticated scope.
resources "/tickets", TicketControllerThis is the first time we are using the resources macro. It generates several paths for managing a resource which in this case is a ticket. The above line generates the following paths and maps them to TicketController actions as shown below:
ticket_path GET /tickets TicketController :index
ticket_path GET /tickets/:id/edit TicketController :edit
ticket_path GET /tickets/new TicketController :new
ticket_path GET /tickets/:id TicketController :show
ticket_path POST /tickets TicketController :create
ticket_path PATCH /tickets/:id TicketController :update
PUT /tickets/:id TicketController :update
ticket_path DELETE /tickets/:id TicketController :deleteNow run mix ecto.migrate to run the migration file.
Now we can go to http://localhost:4000/tickets and start playing with the newly created CRUD interface without requiring us to write a single line of code on our own.
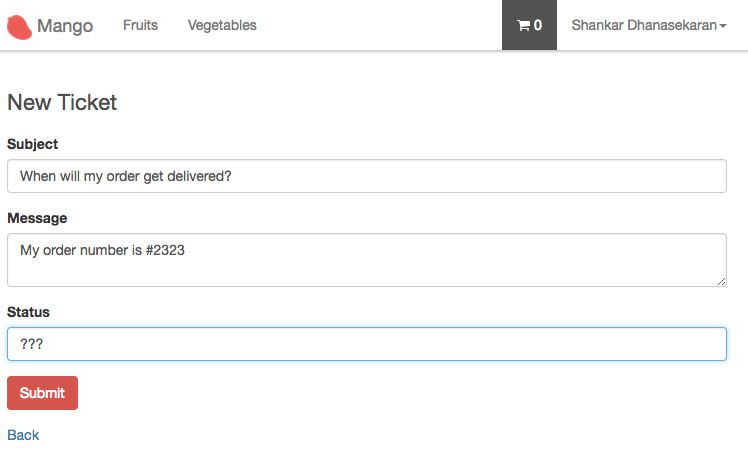
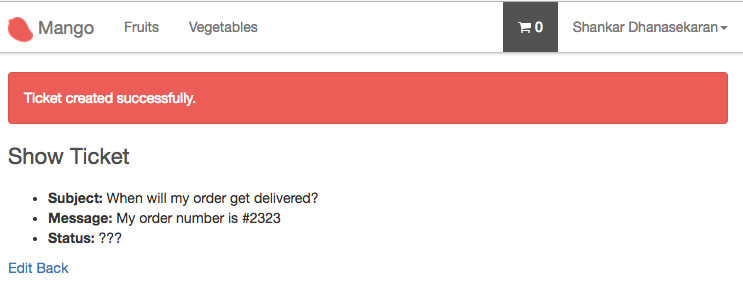
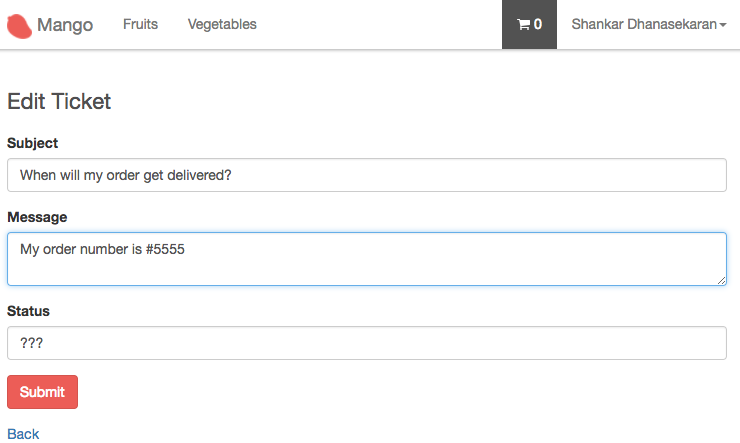
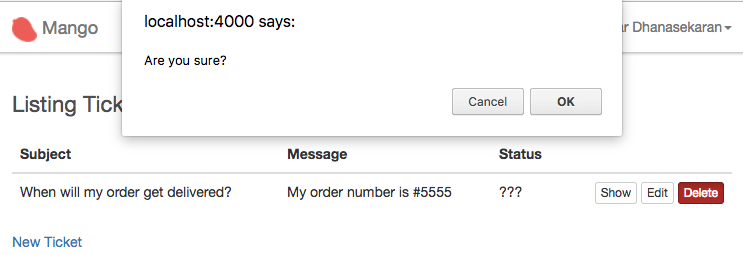
This looks fantastic. Why didn’t we use it earlier and save a lot of time?
The answer is, while it looks impressive to have all this functionality created in a single command, the code generated is very generic. It doesn’t follow the business rules of a support ticket system and moreover we cannot expect a generic code generator to do more.
For example,
-
http://localhost:4000/tickets lists all tickets created by any user.
-
Creation of a new ticket doesn’t associate the current user with the ticket created.
-
A customer can view, edit or delete any tickets in the system.
Obviously we can fix all these problems by modifying the generated code. However, the above listed shortcomings span multiple user stories each having its own list of tasks to be done.
For eg., The third problem stated above
A customer can view, edit or delete any tickets in the system.
translates to the user story
-
As a customer, I want to view my tickets
Acceptance test should cover cases such as
-
viewing own ticket should give no error
-
trying to view anyone else ticket should give 404 error
-
-
As a customer, I want to edit my tickets
Acceptance test should cover cases such as
-
editing own ticket should give no error
-
trying to edit anyone else ticket should give 404 error
-
preventing the user from editing the ticket if it’s in closed status.
-
-
Deleting the ticket may not exist as a feature for the ticketing system as the business may want to keep a full history and not allow deletion.
As you can see above, each of these user stories consists of a lot of work. The generated code contains missing business rules and/or sometimes has undesirable functionality — e.g. deleting tickets.
So far we have created acceptance test before working on each story and by the time we get the acceptance test passing, we have code for a completely deployable piece of functionality. There is no hanging code with undesired behaviour or dead code doing nothing. This gives a nice sense of confidence for everything we ship.
Contrast that with the current case, if we start writing acceptance tests for the generated code then a All test pass message is not a sure sign of deployable code.
While we write a single acceptance test to create a ticket and make it pass, there are several pieces of code that are untested.
Additionally, we will see now what it takes to modify the generated code to suit our business needs. It will also be clear that it’s NOT the right approach when we are trying to learn how things work. We will be modifying a lot of code which defeats the entire purpose of using mix phx.gen.html.
First, let’s delete all the code that we don’t want.
Removing the unwanted code:
-
Mango doesn’t want the ticket to be edited or deleted once it’s created.
-
Edit router.ex and modify the route as below:
resources "/tickets", TicketController, except: [:edit, :update, :delete] -
Open the
ticket_controller.exand delete theedit,updateanddeleteactions. The controller should now look as shown below:defmodule MangoWeb.TicketController do use MangoWeb, :controller alias Mango.CRM def index(conn, _params) do tickets = CRM.list_tickets() render(conn, "index.html", tickets: tickets) end def new(conn, _params) do changeset = CRM.change_ticket(%Mango.CRM.Ticket{}) render(conn, "new.html", changeset: changeset) end def create(conn, %{"ticket" => ticket_params}) do case CRM.create_ticket(ticket_params) do {:ok, ticket} -> conn |> put_flash(:info, "Ticket created successfully.") |> redirect(to: ticket_path(conn, :show, ticket)) {:error, %Ecto.Changeset{} = changeset} -> render(conn, "new.html", changeset: changeset) end end def show(conn, %{"id" => id}) do ticket = CRM.get_ticket!(id) render(conn, "show.html", ticket: ticket) end end -
Remove unwanted templates code.
-
Delete the file
lib/mango_web/templates/tickets/edit.html.eex -
Remove the following code from
index.html.eexwhich renders the Edit and the Delete links.<span><%= link "Edit", to: ticket_path(@conn, :edit, ticket), class: "btn btn-default btn-xs" %></span> <span><%= link "Delete", to: ticket_path(@conn, :delete, ticket), method: :delete, data: [confirm: "Are you sure?"], class: "btn btn-danger btn-xs" %></span> -
Remove the following code from
show.html.eexwhich renders the Edit link<span><%= link "Edit", to: ticket_path(@conn, :edit, @ticket) %></span>
-
-
Open
lib/mango/crm/crm.exand delete the following functions and their documentation:-
update_ticket/2 -
delete_ticket/2
-
-
Delete all the test functions added to
test/mango/crm/crm.exsrelated to tickets as all of them need to be changed based on our business rules. -
Delete the generated controller test file
test/mango_web/controllers/ticket_controller_test.exsas the test generated is not valid and is not worth retaining.
-
Now go back to http://localhost:4000/tickets. It should have only the desired features and should work without any errors at this point.
That’s a lot of clean up already. But that’s just the beginning. We have a lot more to do as we add the business rules.
Creating a ticket
We can now create a ticket by going to http://localhost:4000/tickets/new. However, it needs the following changes:
-
The status field should not be shown to the user creating the ticket. It should be set to "New" by default.
-
The ticket should be associated with the currently logged in customer.
Let’s first remove the status field from the template for creating tickets.
Open lib/mango_web/templates/ticket/form.html.eex and remove the following code.
<div class="form-group">
<%= label f, :status, class: "control-label" %>
<%= text_input f, :status, class: "form-control" %>
<%= error_tag f, :status %>
</div>Now to associate the ticket with the currently logged in user, we need more than a simple code change.
Currently the generated code demonstrates no knowledge of the relationships that exists between different entities. We must first teach the code that a ticket and a customer are related.
Open Ticket schema ticket.ex and replace the line
field :customer_id, :idwith
belongs_to :customer, CustomerAdd an alias to Mango.CRM.Customer at the top.
The completed schema file now reads like this.
defmodule Mango.CRM.Ticket do
use Ecto.Schema
import Ecto.Changeset
alias Mango.CRM.{Ticket, Customer} (1)
schema "tickets" do
field :message, :string
field :status, :string
field :subject, :string
belongs_to :customer, Customer (2)
timestamps()
end
@doc false
def changeset(%Ticket{} = ticket, attrs) do
ticket
|> cast(attrs, [:subject, :message, :status])
|> validate_required([:subject, :message, :status])
end
end| 1 | Add alias to Customer. |
| 2 | Modify the line as shown. |
We also need to set the other side of the relationship on the customer schema.
Open customer.ex and modify it as shown below:
defmodule Mango.CRM.Customer do
use Ecto.Schema
import Ecto.Changeset
alias Mango.CRM.{Customer, Ticket} (1)
schema "customers" do
field :email, :string
field :name, :string
field :password, :string, virtual: true
field :password_hash, :string
field :phone, :string
field :residence_area, :string
has_many :tickets, Ticket (2)
timestamps()
end
(...)
end| 1 | Add alias to Ticket |
| 2 | Add the relationship has_many |
Apart from the missing relationships in the schema files, the generated functions in the CRM context module also convey no relationships in their name or in their workings.
Consider the following sets of statements.
-
Create a ticket.
-
Create a customer ticket.
-
List tickets.
-
List customer tickets.
-
Get a ticket.
-
Get a customer ticket.
In each of the above sets, reading the first sentence gives no clue that a customer is required for the action. While the second one conveys the meaning that tickets are closely associated with customers.
The functions that got generated in the CRM context module read and work as the first sentences in each of the pairs above. For example, the generated code has get_ticket when it would be more expressive if named get_customer_ticket, because we don’t want to get a ticket by just its ID, but rather we want a ticket with the given ID for the given customer. Consider the example of displaying a ticket to the customer. If the function just accepts a ticket id, it has no means to check if the ticket can be viewed by the customer or not. However, if the function gets both customer and ticket id as input, it can check if the ticket is created by the user and return the appropriate response based on permissions.
Basically, we want the ticket to be managed through the customer entity, rather than treating it as a separate entity.
Back to in the ticket_controller.ex, we have the following code for new action.
def new(conn, _params) do
changeset = CRM.change_ticket(%Mango.CRM.Ticket{})
render(conn, "new.html", changeset: changeset)
endReplace it with
def new(conn, _params) do
customer = conn.assigns.current_customer
changeset = CRM.build_customer_ticket(customer)
render(conn, "new.html", changeset: changeset)
endWe are changing the function call from change_ticket/1 to build_customer_ticket/1.
Instead of passing an new Ticket struct, we are passing in a customer entity for which the ticket needs to be created.
Let’s modify the function change_ticket to build_customer_ticket in the CRM context module.
Replace this code
def change_ticket(%Ticket{} = ticket) do
Ticket.changeset(ticket, %{})
endwith
def build_customer_ticket(%Customer{} = customer, attrs \\ %{}) do
Ecto.build_assoc(customer, :tickets, %{status: "New"}) (1)
|> Ticket.changeset(attrs)
end| 1 | We are using Ecto.build_assoc to generate a ticket struct which sets the values for customer_id and status fields. |
The controller create action reads as below:
def create(conn, %{"ticket" => ticket_params}) do
case CRM.create_ticket(ticket_params) do
(...)
end
endLet’s modify it as below to associate the customer and the ticket created.
def create(conn, %{"ticket" => ticket_params}) do
customer = conn.assigns.current_customer
case CRM.create_customer_ticket(customer, ticket_params) do
(...)
end
endWe also need to replace the function defintion of create_ticket with create_customer_ticket.
In lib/mango/crm/crm.ex file,
Replace
def create_ticket(attrs \\ %{}) do
%Ticket{}
|> Ticket.changeset(attrs)
|> Repo.insert()
endwith
def create_customer_ticket(%Customer{} = customer, attrs \\ %{}) do
build_customer_ticket(customer, attrs) (1)
|> Repo.insert()
end| 1 | We are reusing the build_customer_ticket function created earlier and pass the resulting value to Repo.insert to insert the record into the database. |
With all those changes done, we now have a fully functional "create ticket" user story ready.
The other two actions: listing all tickets; and viewing a single ticket still don’t filter by the currently logged in customer.
Back to the ticket controller, instead of
def index(conn, _params) do
tickets = CRM.list_tickets()
render(conn, "index.html", tickets: tickets)
end
def show(conn, %{"id" => id}) do
ticket = CRM.get_ticket!(id)
render(conn, "show.html", ticket: ticket)
endwe need
def index(conn, _params) do
customer = conn.assigns.current_customer
tickets = CRM.list_customer_tickets(customer) (1)
render(conn, "index.html", tickets: tickets)
end
def show(conn, %{"id" => id}) do
customer = conn.assigns.current_customer
ticket = CRM.get_customer_ticket!(customer, id) (2)
render(conn, "show.html", ticket: ticket)
end| 1 | We want to list tickets created by the customer. |
| 2 | We want to show the ticket if it’s created by the given customer. |
Now replace the following functions defined in crm.ex
def list_tickets() do
Ticket
|> Repo.all
end
def get_ticket!(id), do: Repo.get!(Ticket, id)with
def list_customer_tickets(customer) do
customer
|> Ecto.assoc(:tickets)
|> Repo.all
end
def get_customer_ticket!(customer, id) do
customer
|> Ecto.assoc(:tickets)
|> Repo.get!(id)
endWith all that butchering of generated code done, we now have our ticketing feature complete.
How many lines of code did we change from what was generated?
Here are the stats of the code changed when we generated the CRUD interface with mix phx.gen.html

Here are the stats of the code changes after we made changes on the generated code:

We have deleted more than half of the generated code and added 27 lines. Our new code doesn’t have any tests. If we have added tests, the number would be much higher.
Is it worth using full scaffold generators? In this case, No. There are a few cases where it might be useful i.e., when we want a simple CRUD interface with little or no modification to the generated code. We run into such a cases when we work on our admin dashboard in the next chapter. For all the user stories that we have covered so far, full scaffold generators are not worth the trouble as it would have resulted in similarly large scale modifications of the generated code.
Internationalization and Localization
Phoenix projects are by default configured to easily translate into multiple languages. Here we are concerned only about the interface language translation such as the text that is hard-coded in the templates, rather than translating the content stored in database. Phoenix uses Gettext Elixir library for translation. The Gettext Elixir library is modeled on GNU Gettext, a translation standard used by many open source projects.
On the homepage of Mango we have the title "Seasonal Products". In this section, we will see how to translate this text into multiple languages. But before we go into that, we will briefly look into how Gettext is configured for our project.
All translated contents are stored in the priv/gettext folder. Currently it looks like this:
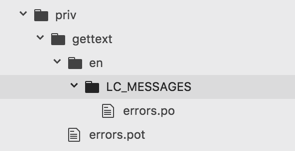
There is an errors.pot file and it contains text such as
## From Ecto.Changeset.cast/4
msgid "can't be blank"
msgstr ""
(...)and then there is en/LC_MESSAGES/errors.po and it again contains similar content such as
## From Ecto.Changeset.cast/4
msgid "can't be blank"
msgstr ""While it look similar, these two files serve different purpose. The errors.pot file serves as a template containing all translatable content in our project for the domain of errors strings. en/LC_MESSAGES/errors.po contains the translations for these strings in the English language.
Since our app is already in English, it’s not immediately clear how this is useful. Run the Mix command mix gettext.merge priv/gettext --locale fr.
→ mix gettext.merge priv/gettext --locale fr
Created directory priv/gettext/fr/LC_MESSAGES
Wrote priv/gettext/fr/LC_MESSAGES/errors.poThe above command creates a new folder fr inside priv/gettext which contains the translation files for the French language. The file priv/gettext/fr/LC_MESSAGES/errors.po will hold the translations for the French language. Open up the file and you will see it contains the same text as in en/LC_MESSAGES/errors.po
msgid "can't be blank"
msgstr ""
(...)The file is populated with the contents available in the template file priv/gettext/errors.pot. A .po file essentially contains two types of information: msgid and msgstr.
msgid is the string found in our source code.
msgstr is the translated string for the msgid for the given language.
Currently fr/LC_MESSAGES/errors.po contains all the error messages from Ecto library that can be translated in to the French language. Let’s learn how to add more strings that can be translated for our application.
Open templates/page/index.html.eex and change the following line
<h1 class="page-title">Seasonal Products</h1>to
<h1 class="page-title"><%= gettext "Seasonal Products" %></h1>Basically, instead of printing the text in HTML, we pass it through an Elixir function gettext inside EEx tag.
Back in the browser, open up http://localhost:4000/ and there is no difference.
Now run the Mix task mix gettext.extract --merge from the project folder.
→ mix gettext.extract --merge
Extracted priv/gettext/default.pot
Extracted priv/gettext/errors.pot
Wrote priv/gettext/en/LC_MESSAGES/default.po
Wrote priv/gettext/en/LC_MESSAGES/errors.po
Wrote priv/gettext/fr/LC_MESSAGES/default.po
Wrote priv/gettext/fr/LC_MESSAGES/errors.poThe above command generated 3 new files:
-
POT file
priv/gettext/default.pot -
PO file
priv/gettext/en/LC_MESSAGES/default.pofor English translation. -
PO file
priv/gettext/fr/LC_MESSAGES/default.pofor French translation.
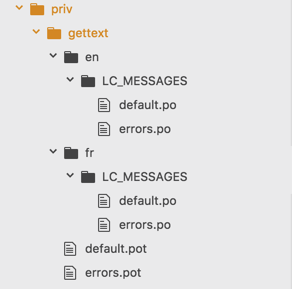
Open up the French translation file and change it as follows
#: lib/mango_web/templates/page/index.html.eex:1
msgid "Seasonal Products"
msgstr "Spécialités saisonnières" (1)| 1 | Add this translation. Disclaimer: This is a text from Google translation ;-) |
We have added a French translation but how do we see it on the webpage in action? Going to http://localhost:4000 still displays the text in English. For Gettext to display the translated text in the French language, we need to switch locale. One way to do that is to change it in config.exs file.
Add the following code to config/config.exs
config :mango, MangoWeb.Gettext,
default_locale: "fr"The above code sets the default language as French. Restart any running server and visit http://localhost:4000 to see the French version of "Seasonal Products" displayed on the homepage:
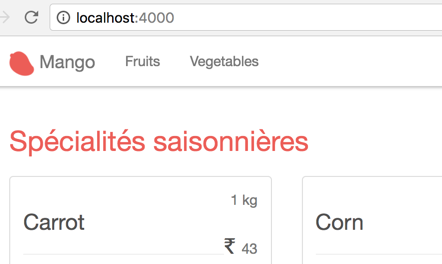
To change locale value on the fly, we need a plug module that can get and set the locale information from the conn struct. Create a new plug module as shown below:
defmodule MangoWeb.Plugs.Locale do
import Plug.Conn
def init(opts), do: nil
def call(conn, _opts) do
case conn.params["locale"] || get_session(conn, :locale) do
nil -> conn
locale ->
Gettext.put_locale(MangoWeb.Gettext, locale)
conn |> put_session(:locale, locale)
end
end
endand add this new plug module in router.ex as shown below:
defmodule MangoWeb.Router do
(...)
pipeline :frontend do
plug MangoWeb.Plugs.LoadCustomer
plug MangoWeb.Plugs.FetchCart
plug MangoWeb.Plugs.Locale (1)
end
(...)
end| 1 | Add the new Locale plug in frontend pipeline. |
Now visit http://localhost:4000?locale=en to see the homepage title in English and visit http://localhost:4000?locale=fr to see the homepage title in French.
To add new languages to translate, we need to just run the Mix task mix gettext.merge priv/gettext --locale LANGUAGE_CODE_TO_ADD
mix gettext.merge priv/gettext --locale de
Created directory priv/gettext/de/LC_MESSAGES
Wrote priv/gettext/de/LC_MESSAGES/default.po
Wrote priv/gettext/de/LC_MESSAGES/errors.po
The above command adds a translation for the German language. It uses the existing POT files to generate the list of translatable strings.
If we add new strings in our project using gettext("new string to translate"), then we need to update our POT file using the mix command
mix gettext.extractand then update all the individual translation files using the command:
mix gettext.merge priv/gettextSince it is a very common operation to run both these tasks, there is an alternate command to run both the tasks in a single command:
mix gettext.extract --mergeDefault Translation
We just generated the German locale de. We haven’t added any German specific translation yet. If we visit http://localhost:4000?locale=de, we see the homepage title in English. Gettext automatically uses the msgid text if there is no translation found.
This brings in an interesting feature. We can go ahead and add gettext for all strings in our app without worrying about adding translations as we build our app. When the translations are ready, our app will automatically use them. Until then, it will display the msgid string which is already meaningful.
Translation Domain
The translation that we added to our project got added in default.pot file, while the Ecto translations were in errors.pot file. Gettext organizes the translatable strings into different domains which helps in maintainability in projects with large numbers of translatable strings. The translation that we added ended up in the domain default (the file name without .pot extension denotes the domain name). If we want it to be added to a different domain name, we need to specify the domain name using the dgettext function instead of the gettext as shown below:
Instead of the following code in the template file:
gettext("Seasonal Products")Write:
dgettext("menu","Seasonal Products")If we now run the Mix task mix gettext.extract, it will extract the text in "menu" domain by generating a file menu.pot inside priv/gettext as shown below:

Plural form of translations
When we use gettext for translating strings such as
gettext("Seasonal Products")we get the following contents in our .po file.
#: lib/mango_web/templates/page/index.html.eex:1
msgid "Seasonal Products"
msgstr ""If we need to add translations for strings that have variations for singular and plural form, then we need to use ngettext (for default domain) and dngettext (for specific domain).
For example, let’s assume the case where we want the title of the page to be in singular if total count of seasonal products is one. In this case, we will use ngettext to switch between singular and plural versions of the title dynamically as shown below:
<%= ngettext "Seasonal Product", "Seasonal Products", Enum.count(@seasonal_products) %>If we extract and merge the translation strings, then we get the following code in the .po files.
msgid "Seasonal Product"
msgid_plural "Seasonal Products"
msgstr[0] ""
msgstr[1] ""The above code returns the singular version if the third argument to ngettext is 1. If the third argument is greater than 1, the plural version will be returned. msgstr[0] stores the singular version and msgstr[1] stores the plural version. Since both are empty, Gettext will automatically return msgid for singular and msgid_plural for plural version of translations.
Navigation for Changing Language
We can use the following code in our navigation to allow a change of language by selecting a language from a dropdown menu.
Add the following code to lib/mango_web/templates/layout/app_nav.html.eex to generate a drop down:
<li class="dropdown">
<a href="#" class="dropdown-toggle" data-toggle="dropdown"><i class="fa fa-globe"></i> I18n<span class="caret"></span></a>
<ul class="dropdown-menu">
<li class="<%= get_active_locale_class("en") %>">
<a href="?locale=en">English</a>
</li>
<li class="<%= get_active_locale_class("fr") %>">
<a href="?locale=fr">Français</a>
</li>
<li class="<%= get_active_locale_class("de") %>">
<a href="?locale=de">Deutsche</a>
</li>
</ul>
</li>Add the following helper function to LayoutView to print HTML class active on the currently active locale menu item.
def get_active_locale_class(locale) do
if Gettext.get_locale(MangoWeb.Gettext) == locale, do: "active" (1)
end| 1 | We get the currently active locale using get_locale/1 and check if its value is the same as the one passed to the function. If yes, we return the string "active" which becomes the class name of the li HTML element. |
If we now visit the webpage, we get a nice dropdown menu for switching locale and it also highlights the currently active locale as shown below:
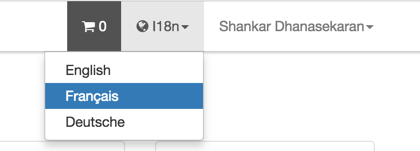
Summary
We started this chapter with an exercise that can be completed with the knowledge that we have gained so far. We then continued to learn how to use the Mix task phx.gen.html to generate a full CRUD resource. We were required to heavily modified the generated resource to suit our requirements and ended up modifying almost all the code that got generated. The lesson learned is basically when NOT to use phx.gen.html and why we haven’t used it so far.
We also learned how to translate interface text into multiple languages by using Gettext library.
Admin - I
Iteration Planning
In this chapter, we will cover the following user stories
-
As an admin, I want to manage users with administrative access.
-
As an admin, I want to see a distinct layout on the admin dashboard
-
As an admin, I want to login to the admin dashboard with a magic link
As mentioned in the last chapter, we will explore a case for CRUD generator in this chapter to appreciate its benefits. The user story for managing the admin users is a perfect case for CRUD generators, as the generated code needs no modification and perfectly suits our needs.
We will learn how Phoenix handles layout configurations and how we can modify them. This will enable us to provide a distinct admin layout which is different from the layout seen by the customers on the frontend.
To implement a magic login link, we will learn how built-in Phoenix Token works. Issuing secure tokens and validating them is made very simple in Phoenix. Later when we work on Phoenix channels, we will use the same token method for authenticating users on Phoenix channels.
Finally, we will also cover user stories for viewing orders and customers. Since these user stories can be implemented with the existing knowledge we have gained so far, these are given as exercises for you to complete. If you get struck or would like to validate your solution, you can always refer to the Mango source code on GitHub which has implementations for these user stories.
Manage Admin users
This story is a perfect example of using phx.gen.html because our only additional requirement to the generated code is that
the entire CRUD operation should be done by authenticated admin user. Since this requirement can be implemented on top of the generated code, rather than modifying the generated code, we will reap the full benefit of the generator.
Run the command
> mix phx.gen.html Administration User users name email:string:unique phone --web AdminThis is similar to what we used in the previous chapter to generate support tickets, except this one has a new option --web Admin.
When the --web option is passed, the generated web-related modules are namespaced with the given module name. Here we passed in Admin and the web-related modules are nested under the Admin namespace with the files nested under the admin folder.
Let’s see this in action.
> mix phx.gen.html Administration User users name email:string:unique phone --web Admin * creating lib/mango/web/controllers/admin/user_controller.ex * creating lib/mango/web/templates/admin/user/edit.html.eex * creating lib/mango/web/templates/admin/user/form.html.eex * creating lib/mango/web/templates/admin/user/index.html.eex * creating lib/mango/web/templates/admin/user/new.html.eex * creating lib/mango/web/templates/admin/user/show.html.eex * creating lib/mango/web/views/admin/user_view.ex * creating test/mango/web/controllers/admin/user_controller_test.exs * creating lib/mango/administration/user.ex * creating priv/repo/migrations/20170614162020_create_users.exs * creating lib/mango/administration/administration.ex * injecting lib/mango/administration/administration.ex * creating test/mango/administration/administration_test.exs * injecting test/mango/administration/administration_test.exs
As you can see above, all the files that get generated into the web directory are nested within the respective admin sub directory.
-
Controller file got generated within an
adminsub directory under thecontrollersdirectory. -
Template files got generated within an
adminsub directory under thetemplatesdirectory. -
View file got generated within an
adminsub directory under theviewsdirectory
This nesting doesn’t happen outside the web directory i.e., other files such as context modules and schema files are generated as usual.
After generating the files, you will notice the following message.
Add the resource to your Admin :browser scope in lib/mango_web/router.ex:
scope "/admin", MangoWeb.Admin, as: :admin do
pipe_through :browser
...
resources "/users", UserController
end
Remember to update your repository by running migrations:
$ mix ecto.migrate
The instruction says Add the resource to your Admin :browser scope.
However, we don’t have a router scope with /admin. We already have two scopes, one for paths that require authentication and an other for paths that don’t require authentication. Both these scopes cater to paths required for the frontend. We don’t have a scope for grouping the paths for the admin section. Let’s create it.
Let’s open up the router.ex file and add the code as below:
defmodule MangoWeb.Router do
(...)
# Add from here -->
scope "/admin", MangoWeb.Admin, as: :admin do
pipe_through :browser
resources "/users", UserController
end
# Up to here <--
endOpen up the generated migration file and change the email field type to citext as we did in the customers table.
defmodule Mango.Repo.Migrations.CreateUsers do
use Ecto.Migration
def change do
create table(:users) do
add :name, :string
add :email, :citext (1)
add :phone, :string
timestamps()
end
create unique_index(:users, [:email])
end
end| 1 | Change the :string type to :citext to make the email field case insensitive. |
Now run, mix ecto.migrate to run the migration.
Now if we go to http://localhost:4000/admin/users we see this error.
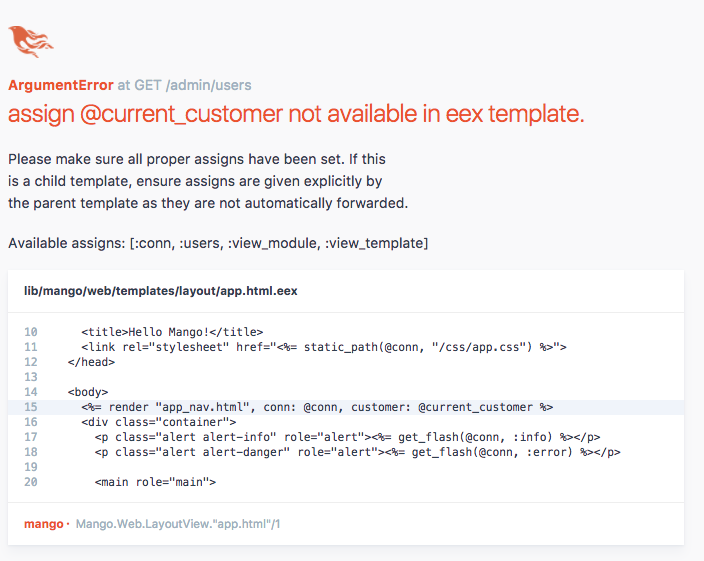
The line that triggered the error is also highlighted in the code widow. It’s the line from the file lib/mango_web/templates/layout/app.html.eex
<%= render "app_nav.html", conn: @conn, customer: @current_customer %>The error says @current_customer is not available in the list of variables available to the template.
Why does it appear now and only in this path? Try visiting other pages, you don’t get this error. Didn’t we set this variable in the LoadCustomer plug? Yes, we did but where did we invoke the plug? We added it to our :frontend pipeline which we used in our router scope for "/" path. There in lies the problem.
pipeline :frontend do
plug MangoWeb.Plugs.FetchCart
plug MangoWeb.Plugs.LoadCustomer
endThe /users path is added in the /admin scope in the router and this scope doesn’t use the :frontend pipeline. Remember, a plug module is executed only when it’s in a pipeline.
Our :frontend pipeline is specific for the customer facing site. We don’t want to load FetchCart and LoadCustomer plugs in our /admin paths. We will temporarily add the :frontend pipeline to our /admin scope to avoid the error and we will remove it in the next section as we work on the admin template.
Go back to the router and modify the pipelines used in the /admin scope as below:
scope "/admin", MangoWeb.Admin, as: :admin do
pipe_through [:browser, :frontend] (1)
resources "/users", UserController
end| 1 | Add frontend pipeline to admin scope. |
Now visit http://localhost:4000/admin/users to see a fully working admin user management system.
Shouldn’t we add tests to it? Nope. Code generated through phx.gen.html already comes with controller tests and units tests for functions in context module. So there is nothing to test.
If we do make any functional changes in the generated code, then we need to modify the test before it.
We don’t need any modification to the generated CRUD code. We do still need to add authentication so that only an admin is allowed to access these paths. We will do that in the subsequent user stories.
Admin layout
By default as we know, Phoenix uses the layout file app.html present in the mango_web/templates/layout/app.html.eex.
Let’s duplicate it under the name admin_app.html.eex. We will do some minor modifications to the new file so that we can identify when the new template is rendered.
<!DOCTYPE html>
<html lang="en">
<head>
<meta charset="utf-8">
<meta http-equiv="X-UA-Compatible" content="IE=edge">
<meta name="viewport" content="width=device-width, initial-scale=1">
<meta name="description" content="">
<meta name="author" content="">
<title>Hello Mango!</title>
<link rel="stylesheet" href="<%= static_path(@conn, "/css/app.css") %>">
</head>
<body>
<%= render "admin_app_nav.html", conn: @conn %> (1)
<div class="container">
<p class="alert alert-info" role="alert"><%= get_flash(@conn, :info) %></p>
<p class="alert alert-danger" role="alert"><%= get_flash(@conn, :error) %></p>
<main role="main">
<%= render @view_module, @view_template, assigns %>
</main>
</div>
<script src="<%= static_path(@conn, "/js/app.js") %>"></script>
</body>
</html>| 1 | Remove the reference to the variable @customer and change the navigation partial name to admin_app_nav.html. The file doesn’t exist yet so let’s create it under the layouts folder with the following content. |
<nav class="navbar navbar-default navbar-fixed-top">
<div class="container">
<div class="navbar-header">
<button type="button" class="navbar-toggle collapsed" data-toggle="collapse" data-target="#admin-nav">
<span class="sr-only">Toggle navigation</span>
<span class="icon-bar"></span>
<span class="icon-bar"></span>
<span class="icon-bar"></span>
</button>
<a class="navbar-brand" href="#"><img src="<%= static_path(@conn, "/images/logo.png") %>"/> Mango Admin</a> (1)
</div>
<div class="collapse navbar-collapse" id="admin-nav">
<ul class="nav navbar-nav">
</ul>
</div>
</div>
</nav>| 1 | Modify the site name to include the text "Admin", so we can easily identify when the new layout is rendered. |
Now that our admin template files are ready we need to configure our app to use it when we visit /admin/users.
Open the controller file mango_web/controllers/admin/user_controller.ex and modify it as shown below:
def index(conn, _params) do
users = Administration.list_users()
conn
|> put_layout("admin_app.html")
|> render("index.html", users: users)
endNow go back to the /admin/users page to see the new layout in action.
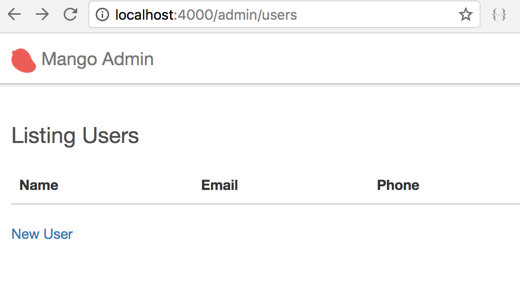
You can identify it by the navbar text that says "Mango Admin", instead of just "Mango" which is used in the older layout.
We have successfully changed the layout for a single path. Try visiting admin/users/new and you will see the old layout.
We shouldn’t be doing this for every single path using the admin layout. That would be difficult and error prone. Luckily there is a better way to set this layout. But before we do that let’s understand the small piece of code shown above.
conn
|> put_layout("admin_app.html")
|> render("index.html", users: users)put_layout/2 is a function defined in the Phoenix.Controller module.
It is automatically imported in all controller modules through the code use MangoWeb, :controller.
This automatic import means we can just call the function name without the module name prefix.
The function takes in a conn struct and a layout file name and it return a new conn struct with the layout name changed.
This highlights another interesting fact about the conn struct — information such as which layout to render is also stored within the conn struct.
We then pass this new conn struct returned by the put_layout function to the render function call. In the View layer, Phoenix now uses the new layout instead of the default one by getting the layout name from the conn struct.
With the above information, we now know that it’s just enough to set the layout value in conn struct to change the layout of the site. We already know how to write a Plug module to change the values in the conn struct. We have seen it in action when we previously loaded the current cart information and the current customer information in the conn struct.
Let’s create a plug module in the file lib/mango_web/plugs/admin_layout.ex
defmodule MangoWeb.Plugs.AdminLayout do
import Phoenix.Controller, only: [put_layout: 2]
def init(_opts), do: nil
def call(conn, _) do
conn
|> put_layout({MangoWeb.LayoutView, "admin_app.html"})
end
endIn the router file, we will create a new pipeline because our need to switch the layout doesn’t fit into the role of any of the existing pipelines. Let’s create a new pipeline called :admin and add our plug to it.
pipeline :admin do
plug MangoWeb.Plugs.AdminLayout
endFor now, the AdminLayout is the only plug in this pipeline. However, as we move forward more plugs that are admin specific will be added here.
Lastly, we will instruct our /admin scope in the router file to use this new pipleline. Modify the admin scope the in router as below:
scope "/admin", MangoWeb.Admin, as: :admin do
pipe_through [:browser, :admin] (1)
resources "/users", UserController
end| 1 | Remove :frontend and add :admin. This also removes our temporary dependency on the :frontend pipeline from the admin scope. |
Now visit any page under /admin and it will display using the new layout.
Finally add a link to admin/users on the admin navigation template.
<ul class="nav navbar-nav">
<li><%= link "Admin Users", to: admin_user_path(@conn, :index) %></li>
</ul>Magic link login
Currently, our admin dashboard is open to public access. Since we want the admin dashboard to be secure and not prone to password attacks, we will implement a new login method popularly known as magic links or passwordless login.
It works as below:
-
The admin user goes to
/admin/loginwhich asks for the email address of the user. -
The user enters his email address registered with the system.
-
The system checks if the email id is associated with an admin user. If yes, it generates a special link which is valid for a short time and sends it by email to the email address of the user.
-
The user clicks on the link sent in the email and is automatically logged in.
The workhorse behind the whole magic link feature is the module Phoenix.Token which comes with the Phoenix framework. Specifically the Phoenix.Token.sign and Phoenix.Token.verify functions. Let’s open up iex -S mix and try these two functions. We will start with sign/3.
iex> token = Phoenix.Token.sign("some_really_long_string_which_is_20_chars_or_above", "salt_value", "mysecret")
"SFMyNTY.g3QAAAACZAAEZGF0YW0AAAAIbXlzZWNyZXRkAAZzaWduZWRuBgBePDv_XAE.GeggWKqJBQjkqWkwd2TgP7g5S67dH1fZ1IiLxurxpEE"Phoenix.Token.sign/3 takes in a long string which is 20 chars or above, a salt value and a secret message that needs to be encrypted. It then return a new encoded string that contains the secret message.
To decrypt the token, we need the same long string and the same salt value to get back the original secret message.
Without going into the cryptographic details, Phoenix.Token uses the long string passed in as the first argument as the base secret key and uses the salt value given as the second parameter to create a variation of this secret key. It then uses the secret key to lock (encrypt) the given data and gives back an unintelligible token. We can get back the original data from this token if and only if we enter in the same base secret and salt value.
iex> Phoenix.Token.verify("some_really_long_string_which_is_20_chars_or_above", "salt_value", token)
{:ok, "mysecret"}Above in verify, we passed in the same base secret and salt for the given token and we got back the original value from the token.
What happens if either the base secret or salt value is different from the original one? Let’s try it.
iex> Phoenix.Token.verify("a_different_base_secret", "salt_value", token)
{:error, :invalid}iex> Phoenix.Token.verify("some_really_long_string_which_is_20_chars_or_above", "some_other_salt_value", token)
{:error, :invalid}In both cases, we got an error tuple, instead of the original data.
We already have a base secret configured for app in config/config.exs under the Endpoint configuration. We could make use of it instead of manually adding a long secret each time.
iex> token = Phoenix.Token.sign(MangoWeb.Endpoint, "the secret cave", "open sesame - the magical word")
"SFMyNTY.g3QAAAACZAAEZGF0YW0AAAAeb3BlbiBzZXNhbWUgLSB0aGUgbWFnaWNhbCB3b3JkZAAGc2lnbmVkbgYAJjZJ_1wB.69P4Bm1J7eXM7M90r9fBE1J2e0Ih8qD6dPywG_-Pf60"In the above code, we used the MangoWeb.Endpoint module instead of giving the base secret. When Phoenix finds a module name such as this, it automatically tries to fetch the secret key base defined in our config file as shown below:
config :mango, MangoWeb.Endpoint,
url: [host: "localhost"],
secret_key_base: "CSZBrY/gqxDYBRECCl2zJz4Ubw8+5c+taa+gIu+IjG0RCbcZ0i2o3pYaRHip1aKy",In addition to verifying the token using the base secret and salt, we can also verify the token’s validity based on the time elapsed since generating it. This is useful to shorten the life span of the generated token which otherwise would be valid for eternity.
iex> Phoenix.Token.verify(MangoWeb.Endpoint, "the secret cave", token)
{:ok, "open sesame - the magical word"}
# Now add a time bound verification in seconds.
iex> Phoenix.Token.verify(MangoWeb.Endpoint, "the secret cave", token, max_age: 10)
{:error, :expired}In the first case, we verified the token without checking for its age and we got back the original message. In the second case, we required that the token should be no more than 10 seconds old. We got back an error because we tried this code after more than 10 secs had elapsed since the token was generated. (If you were too fast in executing the code, you will have to wait 10 secs before trying this code to get the error).
With all of this background knowledge, we can now apply it to create our magic login link. We need three routes for completing the login system.
-
get admin/loginto display a login form with email address field. -
post admin/sendlinkto process the login form submission. This is where we will generate the token as above and email it to the admin user on valid submission. In our case, instead of emailing the link, we will display it on screen to keep our solution simpler. In a real-world scenario, displaying it on screen defeats the purpose and you might need to securely transmit the login link through email or some messaging system. -
get admin/magiclink?token=tokento validate and create a session through valid token.
Open mango_web/router.ex and add the following routes under the admin scope.
scope "/admin", MangoWeb.Admin, as: :admin do
pipe_through [:browser, :admin]
resources "/users", UserController
get "/login", SessionController, :new
post "/sendlink", SessionController, :send_link
get "/magiclink", SessionController, :create
endCreate a new file mango_web/controllers/admin/session_controller.ex to add our session controller. Additionally, we will set a new layout for the session path so that we only display the login form without any other layout elements such as navbar. Since this layout is going to be used only for the session controller paths, we will create a function plug and directly plug it into the session controller.
A function plug is similar to a module plug but much simpler. We just need a function that accepts two arguments. The first input needs to be a %Plug.Conn{} struct and the second contains options to our plug. The options can be ignored if not needed. The function should return a conn struct, either modified or unmodified.
defmodule MangoWeb.Admin.SessionController do
use MangoWeb, :controller
plug :set_layout
def new(conn, _params) do
conn
|> render("new.html")
end
defp set_layout(conn, _) do (1)
conn
|> put_layout("admin_login.html")
end
end| 1 | Function Plug that changes the layout setting in conn struct. |
The above controller defines an action new which we will use for displaying the login form. The controller plug also changes the layout to admin_login.html.eex which needs to be created.
Create a view as shown below:
defmodule MangoWeb.Admin.SessionView do
use MangoWeb, :view
endCreate the layout template admin_login.html.eex as shown below:
<!DOCTYPE html>
<html lang="en">
<head>
<meta charset="utf-8">
<meta http-equiv="X-UA-Compatible" content="IE=edge">
<meta name="viewport" content="width=device-width, initial-scale=1">
<meta name="description" content="">
<meta name="author" content="">
<title>Hello Mango!</title>
<link rel="stylesheet" href="<%= static_path(@conn, "/css/app.css") %>">
</head>
<body>
<div class="container">
<p class="alert alert-info" role="alert"><%= get_flash(@conn, :info) %></p>
<p class="alert alert-danger" role="alert"><%= get_flash(@conn, :error) %></p>
<main role="main">
<div class="row">
<%= render @view_module, @view_template, assigns %>
</div>
</main>
</div> <!-- /container -->
<script src="<%= static_path(@conn, "/js/app.js") %>"></script>
</body>
</html>Create the login form with just the email field and submit button.
<div class="admin-login col-md-4 col-md-offset-4">
<%= form_for @conn, admin_session_path(@conn, :send_link), [as: :session], fn f -> %>
<div class="form-group">
<%= text_input f, :email, placeholder: "Email", class: "form-control" %>
</div>
<%= submit "Send login link", class: "btn btn-primary pull-right" %>
<% end %>
</div>With these changes, if we go to http://localhost:4000/admin/login, we see the login form. We now need to add a new action in our session controller to process the login form submission. We are going to do the following:
-
Check if there exists a valid admin user for the given email id. We need a function to query the admin user table and give us the user struct.
-
If a user is found, we will create a secret token for the ID of the user returned and generate a login link with this token. Finally we will display this link to the user. As mentioned earlier, in a real-world scenario, this link would be emailed, rather than displayed on screen.
-
If a user is not found for the given email id, we send back an "Authentication error" message.
We need a function in our Administration context to fetch a user by email. Open the file lib/mango/administration/administration.ex and add the following function to fetch a user by email id.
def get_admin_by_email(email) do
User |> Repo.get_by(email: email)
endNow let’s use this new function in the session controller to complete the magic link generation process.
defmodule MangoWeb.Admin.SessionController do
(...)
alias Mango.Administration (1)
def send_link(conn, %{"session" => %{"email" => email}}) do
user = Administration.get_admin_by_email(email) (2)
conn = case user do
nil -> (3)
conn
|> put_flash(:error, "Authentication error")
user -> (4)
link = generate_login_link(conn, user)
conn
|> put_flash(:info, "Your magic login link is #{link}") (5)
end
conn |> render("new.html")
end
defp generate_login_link(conn, user) do (6)
token = Phoenix.Token.sign(MangoWeb.Endpoint, "user", user.id)
admin_session_url(conn, :create, %{token: token})
end
end| 1 | Add alias for Mango.Administration. |
| 2 | Fetch user by given email id. |
| 3 | Display error message if the user is not found. |
| 4 | Generate a link and display it on screen if the user is found. |
| 5 | {} inside a string "" is Elixir’s syntax for interpolating a variable inside a string. Elixir automatically converts the variable inside {} to a string data type and interpolates it into the string in the given location. |
| 6 | Private function that handles the link generation process. It contains the token generation code that we saw earlier in this section. |
With all of these processes complete, if we enter a valid email id, then we get back a message with a magic login link. We still need to implement the actual login process through this link that validates the token present in the URL and creates a session and finally we need to implement the logout process as well.
The login link generated is of the format http://localhost:4000/magiclink?token=encrypted_token. Let’s add a new create action on the SessionController to validate the token. If the token is valid, we create a new session, otherwise we return an "Authentication error" message. Additionally, we will set the token validity to be 10mins (600 seconds). So if a users tries to login with an otherwise valid link that is older than 10mins they will still get an authentication error.
The session generation code is the same as what we saw when implementing the customer login feature.
defmodule MangoWeb.Admin.SessionController do
(...)
def create(conn, %{"token" => token}) do
case verify_token(token) do
{:ok, user_id} ->
user = Administration.get_user!(user_id)
conn (2)
|> assign(:current_admin, user)
|> put_session(:admin_id, user.id)
|> configure_session(renew: true)
|> put_flash(:info, "Successfully logged in!")
|> redirect(to: admin_dashboard_path(conn, :index))
{:error, _} ->
conn
|> put_flash(:error, "Authentication error")
|> render(:new)
end
end
@max_age 600 # 10 mins
defp verify_token(token) do
Phoenix.Token.verify(MangoWeb.Endpoint, "user", token, max_age: @max_age) (1)
end
end| 1 | We verify the token’s age is not more than 10mins. |
| 2 | We generate the session by setting admin_id to the ID of the logged in user. |
Exercises
We have already seen how to get customer data from the session data and load it in the conn struct. We did this with the LoadCustomer plug module. We also saw how to enforce user validation before cart checkout. Again, we did this with a module plug AuthenticateCustomer which redirects user to the homepage if not signed in. We also implemented a logout feature which simply meant clearing the session data.
We have exactly the same requirements again but this time for the admin dashboard. So go ahead and complete the following exercises. You can model your solution on the customer plugs that we have already created. There are also other exercises for displaying the list of customers and orders. These features again can be implemented using the knowledge we have gained in developing the frontend.
-
Create and use a
LoadAdminmodule plug so that admin user details are loaded in theconnstruct. -
Create and use an
AuthenticateAdminto ensure that all paths under/adminare only accessible by admin users. -
Implement a logout feature for Admin dashboard.
-
Implement an
admin/orderspath which lists all orders from the store and implement anadmin/orders/:idwhich displays a single order. -
Implement an
admin/customerspath which lists all customers from the store and implement anadmin/customers/:idwhich displays a single customer information.
Solutions for all these exercises are included in Mango source code in GitHub.
Summary
In this chapter, we reviewed a use case where using the mix task phx.gen.html proves to be useful. We learned how to use Phoenix.Token. Specifically how to
-
create a secure token
-
validate a secure token
-
validate a secure token with a time limit
Using our knowledge of Phoenix.Token we created a magic link login system for the admin dashboard. We then learned how to change layout templates for a group of paths and for a single path using the Phoenix.Controller.put_layout/2 function. During this process we also learned how to create and use our first function Plug which works similarly to a module Plug by modifying the conn struct.
Admin - II
Iteration Planning
In this chapter, we will look into warehouse user stories. We will use CRUD generators to setup Warehouse Item and Supplier resources. Since we have already seen CRUD generators in the previous chapters, the purpose of this chapter is not to learn CRUD but to introduce the idea of multiple sources of fragmented truth and give another example of using context.
Along with this we will also explore an undocumented feature of the Phoenix framework that allows us to customize the CRUD resource generators.
If you haven’t completed the exercises in the last chapter, you might want to checkout the branch chapter9 from Mango Repo on GitHub and continue this chapter. Stop any running instance of Mango server or IEx session and follow the steps outlined below:
git clone https://github.com/shankardevy/mango.git
cd mango
git checkout chapter9
mix deps.get
cd assets && npm install && cd ..
mix ecto.reset
mix phx.serverSince the exercises in the previous chapter also require a valid admin user to access the admin dashboard, we need to create one in the IEx shell. Run the following command in iex -S mix shell to create a user.
%Mango.Administration.User{email: "user@example.com"} |> Mango.Repo.insertVisit http://localhost:4000/admin/login and use the email id user@example.com to login to the site.
Now you are all set to continue your journey in this chapter.
Customizing CRUD Generator
In this chapter, we will use the Mix task phx.gen.html to generate Warehouse Items and Suppliers (User story 20 & 21). We will explore an undocumented feature of Phoenix to customize the autogenerated CRUD interface as per our needs. For example, if we generate a CRUD interface for Warehouse Items using Mix task phx.gen.html, it will look like this:
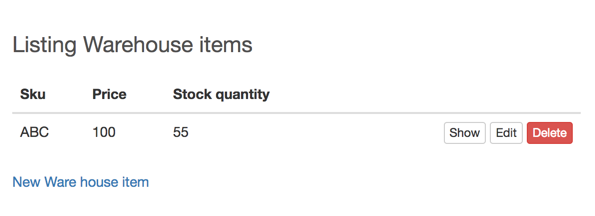
The page title is "Listing Warehouse Items", but we might just need "Warehouse Items" as the title. The table lists each item with a link to "Show", "Edit" and "Delete". Let’s assume that we don’t need a "Delete" link on the index page but instead want it inside the "Edit" page.
We can go ahead and make these changes on the generated template files by phx.gen.html and modify the index page as shown below:

The "Edit" page by default looks as shown below:

We could modify the HTML template to add the "Delete" button at the bottom of the "Edit" page.
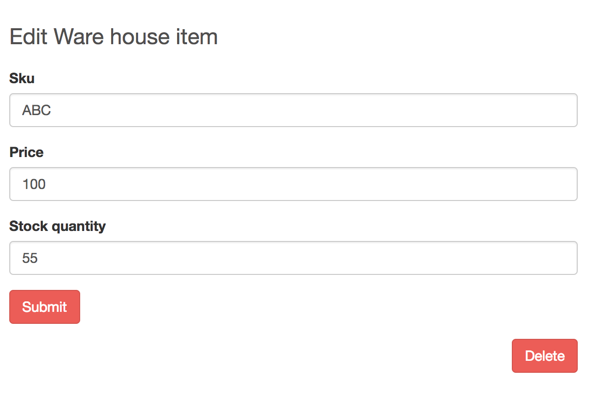
If we wanted a similar behavior for all the CRUD sections, then it’s pretty boring to modify all the generated templates by hand, each time making the same kind of changes for different resources. Instead we can modify the templates used by the Mix task phx.gen.html so that the generated files for our resources are already in the required format.
The mix task phx.gen.html by default looks for files in priv/templates in our current project to generate the templates for a resource. If they are not found, it then uses the files in the Phoenix framework.
We can copy the contents of the folder priv/templates/phx.gen.html from Phoenix framework source code and paste it inside our project’s priv/templates/phx.gen.html folder.
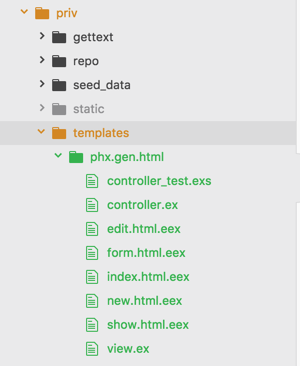
We will end up with a directory structure as shown above for the priv folder inside our project.
Now modify the index.html.eex inside the priv/templates/phx.gen.html folder as shown below:
<h2><%= schema.human_plural %></h2>
<span class="pull-right">
<%%= link "Add new", to: <%= schema.route_helper %>_path(@conn, :new), class: "btn btn-primary" %> (1)
</span>
<table class="table">
<thead>
<tr>
<%= for {k, _} <- schema.attrs do %> <th><%= Phoenix.Naming.humanize(Atom.to_string(k)) %></th>
<% end %>
<th></th>
</tr>
</thead>
<tbody>
<%%= for <%= schema.singular %> <- @<%= schema.plural %> do %>
<tr>
<%= for {k, _} <- schema.attrs do %> <td><%%= <%= schema.singular %>.<%= k %> %></td>
<% end %>
<td class="text-right">
<span><%%= link "Show", to: <%= schema.route_helper %>_path(@conn, :show, <%= schema.singular %>), class: "btn btn-default btn-xs" %></span>
<span><%%= link "Edit", to: <%= schema.route_helper %>_path(@conn, :edit, <%= schema.singular %>), class: "btn btn-default btn-xs" %></span>
</td> (2)
</tr>
<%% end %>
</tbody>
</table>| 1 | Move the "New" link to the top and modify the link text. |
| 2 | Remove the "Delete" link from the row. |
In the above template, we see a new type of EEx tag i.e., <%%= %> (with double %) apart from the normal <%= %> (with single %). The double % is an escape operator instructing the EEx engine not to parse the code inside it. So the Elixir code within <%= %> tag gets executed by the Mix task, while the code inside <%%= %> gets carried over to the generated template file inside <%= %> tags. We will explore this with an example.
Consider the following line present in the above template.
<%%= for <%= schema.singular %> <- @<%= schema.plural %> do %>To generated a template for a resource such as warehouse_item, the line will be transformed as shown below:
<%= for warehouse_item <- @warehouse_items do %>We can also modify the edit.html.eex template in priv/templates/phx.gen.html
<h2>Edit <%= schema.human_singular %></h2>
<%%= render "form.html", changeset: @changeset,
action: <%= schema.route_helper %>_path(@conn, :update, @<%= schema.singular %>) %>
<span class="pull-right"> (1)
<%%= link "Delete",
to: <%= schema.route_helper %>_path(@conn, :delete, @<%= schema.singular %>),
method: :delete,
data: [confirm: "Are you sure?"],
class: "btn btn-danger" %>
</span>| 1 | Add "Delete" link instead of "Back" link. |
Now, let’s generate the resources for WarehouseItem and Supplier and see if the Mix task is now using our new templates within our project instead of the ones found in the Phoenix framework.
WarehouseItem
→ mix phx.gen.html Warehouse WarehouseItem warehouse_items sku price:decimal stock_quantity:integer --web AdminSupplier
→ mix phx.gen.html Warehouse Supplier suppliers name contact_person phone email --web AdminAdd the resources to the router.ex file and run mix ecto.migrate as instructed by the above commands.
Now create a new supplier at http://localhost:4000/admin/suppliers/new and visit http://localhost:4000/admin/suppliers to see the new template in action:
Warehouse Items also use our new template.
We have done very minor modifications to the template files in phx.gen.html. However, we are not limited to just modifying the HTML templates, we can also modify the generated controller files and even the tests.
Modify admin_app_nav.html.eex and add the following navigation links:
<li class="dropdown">
<a href="#" class="dropdown-toggle" data-toggle="dropdown">Warehouse<span class="caret"></span></a>
<ul class="dropdown-menu">
<li><%= link "Warehouse Items", to: admin_ware_house_item_path(@conn, :index) %></li>
<li><%= link "Suppliers", to: admin_supplier_path(@conn, :index) %></li>
</ul>
</li>Multiple Sources of Fragmented Truth
A side-effect (in the positive sense) of using Phoenix Context is, our mental model of having a single source of truth is broken and we start to accept multiple sources of fragmented truth as normal.
We have generated two resources in the context Warehouse: Warehouse Item and Supplier.
The schema for Warehouse Item stores the data in the database table warehouse_items. Without using Phoenix Context, all the information for Warehouse Item would have ended up on the products table. Our Warehouse Item contains the following information
-
price
-
sku
-
stock_quantity
The price field on the Warehouse Item refers to the cost of the product or the price at which the Warehouse of the company purchases the Item. Product and Warehouse Items are the same thing seen from two different perspectives. Product is a Warehouse Item seen from the vantage point of a customer. Warehouse Item is a Product seen from the perspective of a Warehouse staff member. However, these two things are not one and the same. They might share a few common fields but each of them has its own distinctive feature that is not present in the other. For example, Product might have an SEO field with text optimized for search engines but a warehouse staff member has no use for that feature. In the same way, the Warehouse Item might store the information of the supplier which is not needed for a customer purchasing it.
This property of relatedness and distinctive information storage between two things which might also have a few common fields introduces multiple sources of fragmented truth. For many of us, who have been used to working with a single source of truth by keeping all information about an entity in one database table, this idea of fragmenting the data across multiple tables might need some mental recalibration. However, this is a good thing for the following reasons:
-
Increasingly large monolith applications are broken down into smaller micro services for various technical and non-technical reasons. The trend is going to increase as technology advances and more complex applications are being built. Microservices and monolithic database tables don’t go very well together.
-
Breaking down monolithic database table into multiple smaller tables helps to avoid God Schema and helps in code maintainability.
Summary
In this chapter, we explored an undocumented feature of the Phoenix framework that allows us to customize the files generated by the Mix task phx.gen.html. We did very minimal customizations on the index and edit pages of our generated resources. However, this gives us enough knowledge to make further customizations should we need to change any of the files generated by phx.gen.html.
We then looked into the concept of multiple sources of fragmented truth which becomes a norm when using Phoenix Context.
Mango Robot
Iteration Planning
In this chapter, we will work on developing a chat robot which does three things
-
Notifies admin for every new order on the online store through a message on the chat window.
-
Updates order status by commands received through chat.
-
Works as a Point of Sale app by creating orders for customers visiting the store.
We will use Phoenix Channels to work on the above features. Our interface is going to be a typical chat window. However, instead of chatting with a real person, we are going to chat with a virtual robot that can understand and perform certain pre-defined tasks.
Here are some screenshots of what we will work on in this chapter. We will have a chat interface as shown in the images below by the end of this chapter.
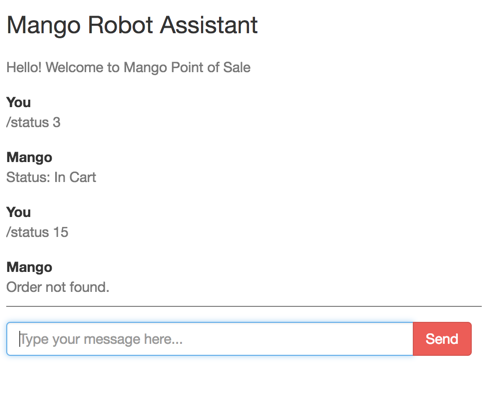
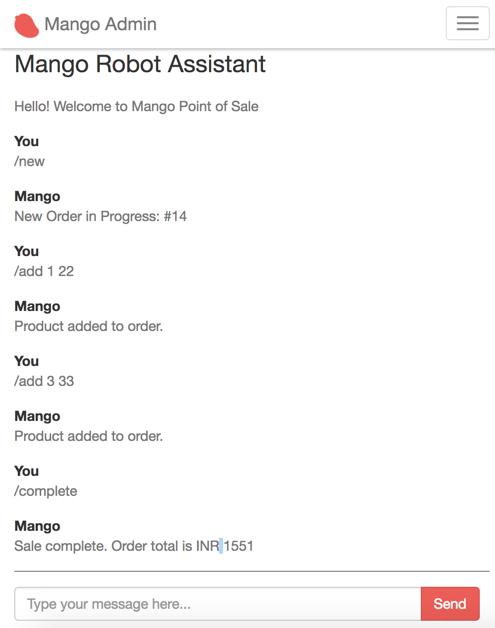
Setup chat interface and channel
The first step is getting the interface for our chat engine and establishing a connection with the server.
Our chat engine will be available at the /admin path. Let’s create a simple page at /admin and display a chat window. The communication in this chat window will happen through Phoenix Channel.
A Phoenix channel is a stateful keep-alive connection between a JS client and the web server. In a stateless connection like HTTP, the server needs to load information from the cookie file to restore the session data for the client. This happens for every single request. Since Phoenix channels are stateful keep-alive connections, once the client and server perform a handshake with authentication, subsequent messages between the same client and server don’t have to authenticate. The server knows the messages are coming from an authenticated channel because the connection between them is not closed.
Phoenix channels make use of Websocket connections natively supported in all modern browsers to keep a two-way communication channel between the client and the server. Since it’s a two-way communication channel, the server can also push information to the clients connected to it without the clients asking for the information. This is known as broadcasting.
Create a new route under the /admin scope and map it to the show action of the DashboardController.
scope "/admin", MangoWeb.Admin, as: :admin do
(...)
get "/", DashboardController, :show
endAdd a controller:
defmodule MangoWeb.Admin.DashboardController do
use MangoWeb, :controller
def show(conn, _params) do
render conn, "show.html"
end
endAdd a view:
defmodule MangoWeb.Admin.DashboardView do
use MangoWeb, :view
endFinally, let’s create a template with the following HTML for displaying the chat window. Since the CSS styles are already present, the following HTML will display a nicely themed chat window.
<div class="chat-box">
<h3>Mango Robot Assistant</h3>
<ul id="pos-chat-room" class="chat">
<li>
<div class="chat-body">
<p id="intro-text">Waiting for connection...</p>
</div>
</li>
</ul>
<div class="chat-input input-group">
<input id="btn-input" type="text" class="form-control" placeholder="Type your message here...">
<span class="input-group-btn">
<button class="btn btn-primary" id="btn-chat">
Send</button>
</span>
</div>
</div>Now visit, http://localhost:4000/admin. You should see a chat window as shown below:
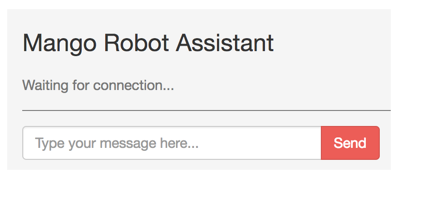
The next step in our setup is to establish a connection with the server through proper authentication so that the chat window is accessible only for users with a valid token.
Creating a Channel
The main components behind the chat system are
-
Phoenix Socket JS client
-
Socket
-
Channel
The Phoenix Socket JS client is responsible for making a request for socket connections from the browser. If we can compare these components to the router and controllers that we have seen so far, a socket file works like a router file listing all entry points for our chat system and a channel file works like a controller listing all possible actions in that channel. We will see each of these components in detail as we setup our chat system.
The JS client for Phoenix Socket is already available in our project but is not enabled yet. Open assets/js/app.js and uncomment the following line:
(...)
// import socket from "./socket" (1)| 1 | Remove the preceding // to uncomment this line. |
The above line imports socket from the socket.js file present in the same directory. We will work with this file for establishing connection with the server. The contents of socket.js is shown below (with comments removed):
import {Socket} from "phoenix"
let socket = new Socket("/socket", {params: {token: window.userToken}})
socket.connect()
let channel = socket.channel("topic:subtopic", {})
channel.join()
.receive("ok", resp => { console.log("Joined successfully", resp) })
.receive("error", resp => { console.log("Unable to join", resp) })
export default socketLet’s understand the first three lines of code in this file.
import {Socket} from "phoenix"Here we are importing Socket (with capital S), a javascript object constructor available in the phoenix.js file. This file is already included as a dependency in package.json inside the assets folder.
{
(...)
"dependencies": {
"phoenix": "file:../deps/phoenix", (1)
"phoenix_html": "file:../deps/phoenix_html"
}
(...)
}| 1 | phoenix.js included as a dependency. |
Using the Socket object constructor we will create a new socket object (with small s) and establish a connection with the server.
let socket = new Socket("/socket", {params: {token: window.userToken}})We are creating a new socket object that connects to the /socket path and sends a JSON object as request. A socket connection is created using the Javascript new object constructor with the following syntax:
new Socket(socket_path, json_object)If we open up the browser console on Chrome and check for window.userToken it will return undefined.
So in the above code, we are making a request to the /socket path with the JSON value shown below:
{
token: undefined
}This socket request lands up on the UserSocket module because our endpoint.ex module declares that all requests to /socket will be handled by the UserSocket module.
defmodule MangoWeb.Endpoint do
use Phoenix.Endpoint, otp_app: :mango
socket "/socket", MangoWeb.UserSocket
(...)
endOur project already has the UserSocket module defined in lib/mango_web/channels/user_socket.ex as shown below (with comments removed).
defmodule MangoWeb.UserSocket do
use Phoenix.Socket
transport :websocket, Phoenix.Transports.WebSocket
def connect(_params, socket) do
{:ok, socket}
end
def id(_socket), do: nil
endThe connect function defined in this module is the first one to receive the socket request.
def connect(_params, socket) do
{:ok, socket}
endIt accepts two arguments: params and socket. params is the value sent by the JS client and socket is a struct containing the socket connection information.
socket on the server side can be compared to the conn struct that we have seen so far in controller modules. Just like how we store variables in the conn struct in the controller and retrieve them in the templates, the socket struct is a storage place where we can assign various values and then retrieve them when needed.
In the function above, we have ignored the params value by prepending it with an ignore operator _.
The connect function is responsible for deciding if the socket connection can be accepted or not. If it accepts the connection, it should return a tuple {:ok, socket} and if it rejects the connection, it should return an atom :error.
Currently, the function is accepting all connections without requiring any validation as it just returns a tuple with :ok.
We will leave it as it is now and proceed to configuring the Channels. We will come back to this function again to restrict access only for admin users.
If we now visit http://localhost:4000/admin with the browser console opened, we will see the following message:
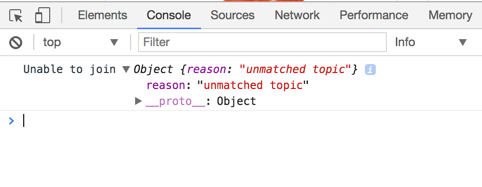
The message on console says "Unable to join" and the reason being "unmatched topic". This is equivalent to getting a 404 error in an HTTP requests due to an unmatched path in the router.
Let’s go back to our JS client and look at the code for creating a connection: .assets/js/socket.js
import {Socket} from "phoenix"
let socket = new Socket("/socket", {params: {token: window.userToken}})
socket.connect()
let channel = socket.channel("topic:subtopic", {})
channel.join()
.receive("ok", resp => { console.log("Joined successfully", resp) })
.receive("error", resp => { console.log("Unable to join", resp) })We have already seen the first three lines of code. The UserSocket module got the request from our socket and it accepted the connection. The error message that we see in the console is "unmatched topic". This is because our JS client is trying to connect to a topic by name "topic:subtopic" which doesn’t exist.
let channel = socket.channel("topic:subtopic", {})Topics are managed by creating Channels. We will create a new topic pos by creating a new channel and configuring it. The channel name can be any string. Phoenix comes with a Mix task to create a channel. Run the following command to create a channel.
→ mix phx.gen.channel BotThe above command creates a channel file and test file and produces the following information:
* creating lib/mango_web/channels/bot_channel.ex
* creating test/mango_web/channels/bot_channel_test.exs
Add the channel to your `lib/mango_web/channels/user_socket.ex` handler, for example:
channel "bot:lobby", MangoWeb.BotChannelThe file mango_bot_channel.ex is the channel file and contains the following code:
defmodule MangoWeb.BotChannel do
use MangoWeb, :channel
def join("bot:lobby", payload, socket) do
if authorized?(payload) do
{:ok, socket}
else
{:error, %{reason: "unauthorized"}}
end
end
(...)
endThe join function takes in three arguments, with the first one being the topic name. Since we want the topic name to be called pos, we will modify the above function as shown below:
def join("pos", payload, socket) do
if authorized?(payload) do
{:ok, socket}
else
{:error, %{reason: "unauthorized"}}
end
endWe also need to add an entry in the UserSocket module for the new channel that we just created. Open user_socket.ex and add the following line:
channel "pos", MangoWeb.BotChannelBack to the JS client, we will modify it to connect to the pos topic, instead of the existing topic:subtopic.
import {Socket} from "phoenix"
let socket = new Socket("/socket", {params: {token: window.userToken}})
socket.connect()
let channel = socket.channel("pos", {}) (1)
channel.join()
.receive("ok", resp => {
console.log("Joined successfully", resp)
})
.receive("error", resp => { console.log("Unable to join", resp) })| 1 | Change the topic name to pos |
Now open http://localhost:4000/admin and we can see the successful connection message on the console.
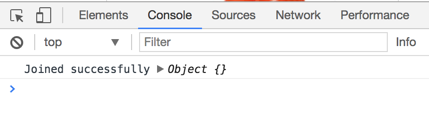
We have successfully configured a new channel pos and connected to it. In the next section, we will work on this established connection to build our chat engine.
Authenticating in Chat Room
Right now, we are using the browser console to identify if a socket connection is successful or not. We will change this behavior to display a successful connection message in the chat window and add authentication to ensure that only admin users can send and receive messages in this channel.
Open bot_channel.ex and modify the join function as shown below and remove all the other functions.
def join("pos", payload, socket) do
welcome_text = "Hello! Welcome to Mango Point of Sale"
{:ok, %{message: welcome_text}, socket}
endInstead of returning a two element tuple, we are now returning a three element tuple. The second element of this tuple will be sent back to the browser as response.
Back to the JS client code
(...)
let channel = socket.channel("pos", {})
channel.join()
.receive("ok", resp => {
console.log("Joined successfully", resp)
$("#intro-text").text(resp.message) (1)
})
.receive("error", resp => { console.log("Unable to join", resp) })| 1 | Add this line. |
In the above code, the local variable resp contains the value returned by the join function as a JSON object. We replace the text inside the HTML element inside the chat window with the response message using standard jQuery.
With this change, going to http://localhost:4000/admin we get the successful connection message in the chat window as shown below:
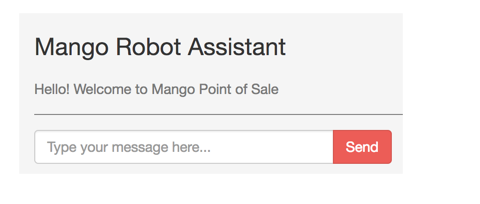
Our chat window is present in the /admin path and it’s already protected by session based login.
However, this only protects the interface to send and view the messages in the channels. All channel communications that happen in the path /socket are unprotected, which means any user can open up a browser console and use it as a client to communicate with /socket.
To clarify this point, let’s visit http://localhost:4000 with the browser console open.
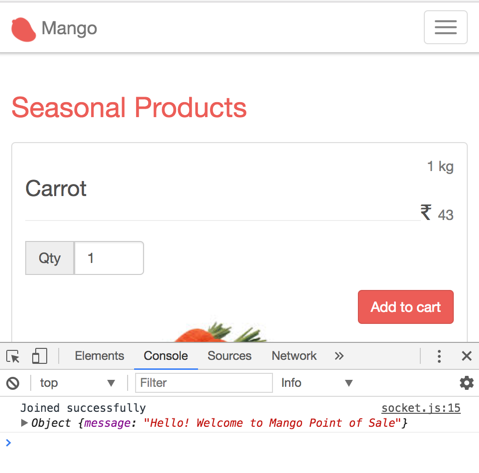
In the console, we are already seeing the welcome message that is intended only for admin members to see.
Let’s fix this with socket authentication. We will use the same technique we used for magic link login and use a Phoenix Token to authenticate the socket connection.
Open DashboardController and modify it as shown below:
defmodule MangoWeb.Admin.DashboardController do
use MangoWeb, :controller
def show(conn, _params) do
admin = conn.assigns.current_admin
token = Phoenix.Token.sign(conn, "socket_login", admin.id)
render conn, "show.html", token: token
end
endOpen the template file dashboard/show.html.eex and modify it as shown below:
<script>window.userToken = "<%= @token %>";</script>
<div class="chat-box">
(...)
</div>This will make the token value available in our JS client as userToken variable.
Back in the browser navigate to http://localhost:4000/admin. Open the console and check the value of userToken.
It should display the token value as shown below:

With this value, the JS client code will now be able to pass this token to the server when making a socket connection.
import {Socket} from "phoenix"
let socket = new Socket("/socket", {params: {token: window.userToken}}) (1)
socket.connect()
(...)| 1 | Since we have now set the value of userToken, our request to the socket will contain this token value in the params data. |
Open the UserSocket module and let’s modify the connect function so that it checks the token value before connecting to the socket.
def connect(%{"token" => token}, socket) do
case Phoenix.Token.verify(socket, "socket_login", token) do
{:ok, user_id} ->
socket = assign(socket, :user_id, user_id)
{:ok, socket}
{:error, _} ->
:error
end
endWith this change, our socket connection is now secured and allows only connections with a valid token. We can verify this by navigating to http://localhost:4000. The browser console will now display this error instead of displaying the welcome message as seen previously.

Getting notified on new orders
The first task we are going to accomplish using Phoenix channels is to get notified whenever there is a new order on the website.
Modify the JS client as shown below:
(...)
channel.on('message:new', payload => {
alert(payload.message)
})
export default socketLet’s see it in action, before I explain the code above. Stop any running server and restart using IEx shell iex -S mix phx.server. Open http://localhost:4000/admin in a browser and in the IEx console, give the following command:
iex> MangoWeb.Endpoint.broadcast! "pos", "message:new", %{message: "Message from Channel"}The moment the above command is given, we get a new alert in the browser window we have opened with the message we sent in the IEx console.
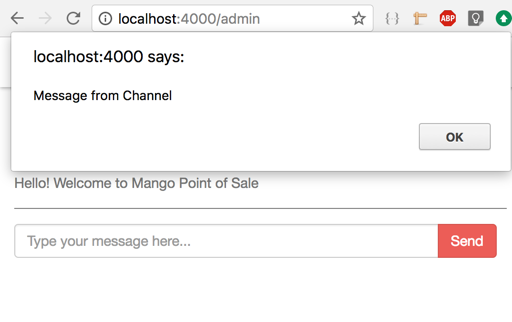
We used the broadcast!/3 function defined in our Endpoint module to send a message to all clients connected to our server. The function takes in the channel room name as the first argument, the event name as the second argument and a map containing the information we want passed on to the client as the third argument.
In the example above, "pos" is the room name, "message:new" is the event name and the map %{message: "Message from Channel"} is the message we want to send across to all clients connected via sockets.
On the JS client end, we have this code:
channel.on('message:new', payload => {
alert(payload.message)
})The above code gets triggered when the event name matches the first argument given to channel.on. So when we broadcasted the message from the IEx shell, the message got received in the JS client. The JS function inside the matching channel.on gets triggered giving us the alert popup on the browser.
With these basics in place, we will modify the channel.on function to update the chat window with the incoming message, instead of using the JS alert popup.
(...)
channel.on('message:new', payload => {
renderMessage(payload, "MangoRobot")
})
let chatMessages = $("#pos-chat-room")
let renderMessage = (payload, user) => {
let template = document.createElement("li")
template.innerHTML = `<div class="chat-body">
<div class="header">
<strong class="primary-font">${user}</strong>
</div>
<p>${payload.message}</p>
</div>`
chatMessages.append(template);
}
export default socketWith this above change, let’s broadcast a message again from the IEx console.
iex> MangoWeb.Endpoint.broadcast! "pos", "message:new", %{message: "Message from Channel"}And this time, we get a nicely formatted message on the chat window.
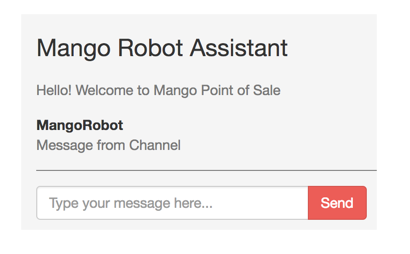
The broadcast can be done from anywhere in our application code. We used IEx as an example. To notify the admin on a chat window for every new order, we just need to add a broadcast message on the checkout controller.
def update(conn, %{"order" => order_params}) do
order = conn.assigns.cart
order_params = associate_user_from_session(conn, order_params)
case Sales.confirm_order(order, order_params) do
{:ok, order} -> (1)
message = "New Order ##{order.id} from #{order.customer_name}"
MangoWeb.Endpoint.broadcast! "pos", "message:new", %{message: message} (2)
conn
|> put_flash(:info, "Your order has been confirmed.")
|> redirect(to: "/")
(...)
end| 1 | Modify {:ok, _} to {:ok, order} so that we can use the order information in the broadcast message. |
| 2 | Add broadcast on successful checkout. |
Open two browser windows with the first one loading http://localhost:4000/admin and in the second one complete a checkout process on http://localhost:4000. You will now see a message on the chat window immediately after the order is placed.
Chat using Slash Commands
In the last section, we saw how to broadcast new order messages to all clients. So if there are three admin users with their browsers open to the chat window, all of them will get notified of the new order.
In this section, we will implement a 1-on-1 communication between the chat client and the server so that the server responds with a message only to the specific client that made the request. We will learn this by implementing a slash command as explained below:
-
If the user enters
/status IDas the chat message, the server should respond with the status of the order for the given ID.
Open assets/js/socket.js and add the following code:
(...)
let input = $('.chat-input > input') (1)
input.on('keypress', event => { (2)
if(event.keyCode == 13) { (3)
let message = input.val();
let command_regex = /^\/(\w+)\s*([\w\s]*)/g (4)
let parts = command_regex.exec(message)
renderMessage({message: message}, "You")
input.val("")
channel.push(parts[1], { message: parts[2] }).receive(
"ok", (reply) => renderMessage(reply, "Mango")
).receive(
"error", (reply) => renderMessage(reply, "Mango")
)
}
});| 1 | input stores the HTML input field as a jQuery object. |
| 2 | Trigger a new function on keypress event on input. |
| 3 | Check if Enter key is pressed. |
| 4 | Regex for checking user input and capturing it as event and message. Read below to understand what is meant by event and message. |
In the above code, we use jQuery to watch the keypress event for the chat window’s input box. If the input key value is 13 i.e., the "Enter" key is pressed, then we use a regex to match the given slash command and capture the event name and message value.
For example, if the slash command given is /status 123, then we have parts[1] containing the slash command status (event name in socket parlance) and parts[2] containing the argument 123 (message value in socket parlance).
We then send a message to the channel room in the format as shown below:
channel.push(event_name, message)
.receive("ok", function(reply) {})
.receive("error", function(reply) {})We chain two receive functions to the channel.push: the first one will match a reply of "ok" from the server and process the given success handler, and the second one will match an "error" from the server and process the error handler.
Open BotChannel and add the following functions to handle the request.
defmodule MangoWeb.BotChannel do
use MangoWeb, :channel
(...)
def handle_in("status", payload, socket) do
reply = %{ message: "You asked for status" }
{:reply, {:ok, reply}, socket}
end
def handle_in(_, _payload, socket) do
reply = %{ message: "I don't understand your question." }
{:reply, {:error, reply}, socket}
end
endThe handle_in/3 function takes the event name as the first argument, the message sent by the client as second argument and the current socket struct as the third arguement. We use two function heads to match on the event name.
The first function matches the event "status", while the second one matches any other event.
The return value from handle_in/3 is a tuple whose second element contains the message for the client. If the second element is a tuple containing {:ok, message}, then the success handler is called in the client JS. If the second element is a tuple containing {:error, message}, then the error handler is called in the client JS.
With this setup, open http://localhost:4000/admin and enter /status 123 and /unknown 123. You should now see the replies from the server as shown below:
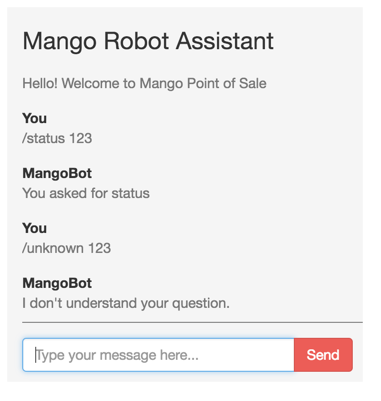
We get two different messages for the two commands given.
From here on, it’s just a task of finding the order with the given ID and returning the status of the same to complete our /status ID command feature.
alias Mango.Sales
def handle_in("status", payload, socket) do
reply = case Sales.get_order(payload["message"]) do
nil -> %{ message: "Order not found." }
order -> %{ message: "Status: #{order.status}"}
end
{:reply, {:ok, reply}, socket}
endAdd a function to get the order in the Sales context module if you don’t have it already.
def get_order(id), do: Repo.get(Order, id)Reply for a valid order ID:

Reply for an invalid order ID:

In the previous section, we saw how broadcast message works. In this section, we learned how to use 1-on-1 chat instead of broadcast. We still haven’t used the socket struct to store and retrieve values across multiple chat messages. The next section focuses on explaining this usage.
Implementing Conversational POS
In this section, we are going to implement a conversational Point of Sale feature. It’s unlikely that we will have something like this in the real world. But for the purpose of our learning, especially to understand the persistent nature of the socket struct, this is a good exercise.
The feature we are going to work on behaves like this:
-
Admin user types in
/newto create a new order.System should respond with a message "New Order in Progress: #OrderID".
-
Admin user types in
/add productID quantity.System should find the product by the given id and add the given quantity to the order created previously.
If there is no order created previously, then it should give the error message "Please create a new order before proceeding." We are not handling the case of adding invalid product id or missing quantity information to keep our implementation simple. You can try adding these validations as an exercise.
-
Admin user types in
/complete.System should update the order status to "Complete" and respond with a message "Order completed" and it should clear the order details from the socket struct.
Since we already have the necessary JS code to send the commands to the server, we just need to add more functions to handle the new commands described above.
Creating Order
defmodule MangoWeb.BotChannel do
use MangoWeb, :channel
alias Mango.Sales
(...)
def handle_in("new", _, socket) do
order = Sales.create_cart()
new_socket = socket |> assign(:order, order)
reply = %{ message: "New Order in Progress: ##{order.id}" }
{:reply, {:ok, reply}, new_socket}
end
def handle_in(_, _payload, socket) do
(...)
endEnsure that above handle_in/3 is added before the catch all handle_in/3 which matches any topic name. When a request comes to this new handler, it creates a new order and stores this order information in the socket struct. When we reply, we return this new_socket in the tuple. The returned new_socket struct becomes the value of the socket struct for any subsequent call to this socket.
Let’s try this command in the chat window. Type /new in the chat window and we get the new order information from the server.
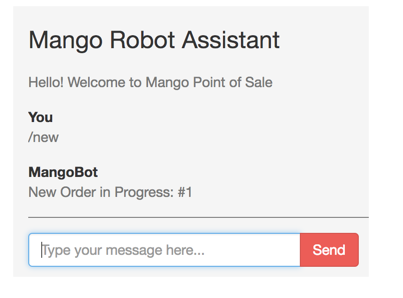
Adding Product
def handle_in("add", payload, socket) do
item = String.split(payload["message"], " ")
reply = case [socket.assigns.order, item] do
[nil, _] ->
%{ message: "Please create a new order before proceeding." }
[order, [product_id, quantity]] ->
{:ok, order} = Sales.add_to_cart(order, %{product_id: product_id, quantity: quantity})
new_socket = socket |> assign(:order, order)
%{ message: "Product added to order." }
_ ->
%{ message: "Error" }
end
{:reply, {:ok, reply}, new_socket}
endIn the above code, socket should already contain the order information if we have invoked /new command prior to invoking the /add command. Any value added to socket using the assign/2 function is persisted for the entire life span of the socket connection i.e., until we refresh the browser or navigate to other pages.
With the order information loaded from the socket struct, we then proceed with splitting the payload string using a single space to get the product id and quantity information. We pattern match on [socket.assigns.order, item] and return appropriate messages for each scenario. We make use of the existing add_to_cart function in the Sales context module to add products to the order stored in the socket struct.
With this above code in place, we can now use the command /add id quantity, where id is a valid product id and quantity is an integer representing the quantity we wish to add to the order. Here we are using the primary key value of the product to add it to the cart. In a real world scenario this is probably better replaced with the SKU value of the product. Since we have 40 products added through seed data, you can use any integer 1 - 40 as a product id for testing this command now.
As mentioned earlier, we are not validating the product id in this code. If you enter an invalid product id, the channel process will crash and restart again. This will also reset the socket struct. Any order information stored in the socket struct gets lost. If this happens you need to create a new order before trying to add a product again.
|
Completing the Order
The last command is relatively simpler. We just need to change the order status to "POS Sale" and remove the order from socket. We need a new changeset to update the order to "POS Sale" status.
Add the following function to lib/mango/sales/sales.ex to update the order.
def pos_sale_complete(%Order{} = order) do
order
|> Order.changeset(%{"status" => "POS Sale"})
|> Repo.update()
endNow add the handle_in/3 function for completing the order.
def handle_in("complete", _, socket) do
reply = case socket.assigns.order do
nil ->
%{ message: "Please create a new order before proceeding." }
order ->
Sales.pos_sale_complete(order)
socket = socket |> assign(:order, nil)
%{ message: "Sale complete. Order total is INR #{order.total}" }
end
{:reply, {:ok, reply}, socket}
endWe update the order using the new function defined in the Sales context and remove the order details from the socket. We pass-in the updated socket in our return value so that subsequent calls use the new socket value.
This completes our conversational POS feature. The key point here is that a socket struct maintains the state per connection in the server.
Our POS is fully functional. A complete order can be created using the conversational-style POS as shown in the above screenshot.
Summary
We learned several new concepts in this chapter related to Phoenix Channels. Specifically we learned the various key components of a successful channel communication such as
-
Socket JS client
-
Socket module in Phoenix
-
Channel module in Phoenix
We learned the flow of control between client and server by implementing a chat server. We implemented two types of channel communications i.e.,
-
Broadcast message to all clients from the server (We used this feature for sending new order notification on the chat window)
-
One-to-one communication with the server (We used this feature for implementing a slash command feature)
We also compared channel communication with controller actions and learned how the socket struct compares to the conn struct and how to persist data in the socket struct.
Deployment
In this chapter we are going to deploy the shop application that we have developed so far.
When it comes to deploying our Phoenix applications, there are several approaches available. We will cover the following approaches:
-
Use Mix
-
Use Distillery Release
-
Use Distillery Release with Docker
The following guide assumes that
-
you have an Ubuntu Server (16.04) with root access or a user with unrestricted
sudoaccess with permissions to install software on the server. -
DNS entry for mango.yourdomain.com is already mapped to the IP address of the server.
-
You are able to ssh to the server using
ssh user@mango.yourserver.comfrom your terminal.
Use Mix to Deploy
This is the simplest form of deployment for a Phoenix application. Assuming we are deploying our Phoenix app Mango to an Ubuntu server (16.04) at the url http://mango.yourdomain.com, the following are the steps for deployment:
Step 1 - Phoenix Dependencies
Install the following dependencies on the Ubuntu server
-
Erlang
-
Elixir
-
PostgreSQL
-
Nodejs
-
Hex package manager
All these dependencies can be installed using the same instructions we followed in Chapter 1 to setup Phoenix locally.
Step 2 - Installing Git (optional)
Git is optional but it’s a very convenient way to get our project code onto the server. Without Git we need to copy the source code from our machine to the server through scp or some other file transfer method. Since having the source code on Git is the minimal expected standard these days, we will go ahead and install Git on our server. This enables us to easily pull the source code of Mango from GitHub.
Run the following command on the server to install Git.
sudo apt-get update
sudo apt-get install gitStep 3 - Get a Copy of Mango
Get a copy of the Phoenix app source code on the server by running the following code:
git clone https://github.com/shankardevy/mango.gitStep 4 - Setup Secrets
Inside the newly created directory, create a new configuration file to store the credentials for the database and other secrets.
cd mango
nano config/prod.secret.exsPaste in the following configuration in the new file:
config :mango, MangoWeb.Endpoint,
secret_key_base: "qXmARElyUIfgb1dYY2hqlnxKODQ9lKmBibVqDT+w4BXoM6IwWErlour81xv5wqP7"
# Configure your database
config :mango, Mango.Repo,
adapter: Ecto.Adapters.Postgres,
username: "postgres",
password: "postgres",
database: "mango_prod",
pool_size: 15Make sure the database credentials given above are correct. If your server has a different username/password combination, make those changes above.
For the secret_key_base value, use the command mix phx.gen.secret to generate a random secret.
→ mix phx.gen.secret
qXmARElyUIfgb1dYY2hqlnxKODQ9lKmBibVqDT+w4BXoM6IwWErlour81xv5wqP7 (1)| 1 | Use this value in prod.secret.exs file for configuring the secret_key_base value. |
Step 5 - Run the Database Migrations
MIX_ENV=prod mix ecto.create
MIX_ENV=prod mix ecto.migrate
MIX_ENV=prod mix run priv/repo/seeds.exsWe could also run mix ecto.reset instead of the above individual tasks.
Step 6 - Run the Server in Prod Mode
With all those setup, it’s now time to run the server. Run the server using
sudo MIX_ENV=prod mix phx.serverNow visit http://mango.yourdomain.com and you should be able to see the site with all the products listed on the homepage.
Step 7 - Run the Server as Daemon
In the previous step, we already started our server and our website is now accessible. However, the moment we quit the terminal running the server command, our server stops running and our website is no longer accessible. To avoid this, we need to start the server as a daemon which will continue running the server even after we terminate our SSH connection to the server.
sudo MIX_ENV=prod elixir --detached -S mix phx.serverThe above command is slightly different from the previous command we ran to start the Phoenix server. Instead of calling the Mix task directly, we prefix it with elixir --detached which effectively converts the command following it into a daemon process that runs in the background.
Drawbacks of Using Mix
-
We have to install Elixir, Erlang and Nodejs on the server to deploy our application. However, these are not necessary if we use Erlang releases to deploy our application.
-
If two different applications on the server depends on different version of Elixir, then we have to do a few work arounds to manage the different versions of Elixir on the same machine by using package managers such as asdf.
-
Finally, if we want to restart our detached app, there is not a graceful way to stop and restart the application. Also if the host server restarts, our application will not start after the host server comes back online, unless we start it again manually using the command shown above.
We are going to resolve all these drawbacks in the following sections by using Erlang releases for our deployment. Deploying via Erlang releases is going to be slightly more complicated than the process we just saw, mainly because of several new concepts that we will need to learn. However, using Erlang releases for deploying provides several benefits that outweigh the additional efforts needed.
Deploying with Erlang Releases
What is an Erlang Release?
An Erlang release is a setup of self contained files for your app bundled with the ERTS (Erlang Runtime System) so that the app can be run without installing either the Elixir or Erlang language on the target machine. The Distillery library in Elixir takes care of building these release files and packages them into a single tar file that we can conveniently copy onto the remote server where we want to run our application.
What we will be doing?
At a high level, here is what we will be doing to deploy an app using release files.
-
Add and Configure Distillery
-
Minor Code Modifications (since we are running on Phoenix master)
-
Configuring the App Secrets
-
Setting Up Static Files
-
Create Release Files
-
Transfer Release Files to a Production Server
-
Start Our App on a Production Server
Add and Configure Distillery
Open the mix.exs file locally and add distillery as a dependency.
defp deps do
[
(...)
{:distillery, "~> 1.4"}
]
endRun mix deps.get to download the new dependencies. Before we build a release file, we need to create a configuration file for Distillery and setup the app secrets for the prod environment.
Run mix release.init to create a sample release config file that we can modify when needed.
→ mix release.init
An example config file has been placed in rel/config.exs, review it,
make edits as needed/desired, and then run `mix release` to build the releaseWe will not modify the generated rel/config.exs file as the default values are good enough for us to proceed. However, let’s inspect its contents to understand what is going on. Note especially the code block below:
environment :prod do
set include_erts: true
set include_src: false
set cookie: :"KTjUu*G|buS(&)z^fu,zV59oURJ~GN>B`F(=]:qRo}!@CIc_=M(8D%P!tUlQsHPS"
endThis code instructs Distillery to do the following for the prod environment:
-
include ERTS (Erlang Runtime System) together with the compiled BEAM files of our project in the release files.
-
NOT include the source code of our project in the release files.
-
set the cookie value.
The cookie referred to here is the Erlang cookie value that is used as an authentication token when connecting with multiple nodes in a distributed setup. That is, if deploying our app on 3 virtual machines which need to interconnect, we use the same cookie for all three machines. Since we are going to deploy our app only on a single machine, this cookie value is not useful for us now. However, it’s good to know what it does because it is important as our needs expand.
The next configuration that we need to modify is config/prod.exs and config/prod.secret.exs.
Configuring App Secrets
Change the Endpoint configuration in the config/prod.exs file as shown below:
config :mango, MangoWeb.Endpoint,
load_from_system_env: true,
url: [host: "mango.yourdomain.com", port: 80], (1)
cache_static_manifest: "priv/static/cache_manifest.json",
server: true (2)| 1 | Modify the host value to the actual domain name for accessing the app. |
| 2 | Add this line so that the Cowboy server is started in production. |
Finally, let’s look at the contents of config/prod.secret.exs.
use Mix.Config
config :mango, MangoWeb.Endpoint,
secret_key_base: "a long string"
config :mango, Mango.Repo,
adapter: Ecto.Adapters.Postgres,
username: "postgres",
password: "postgres",
database: "mango_prod",
pool_size: 15This file is ignored in .gitignore file and is not under version control to avoid leaking sensitive information publicly. The file currently stores two sensitive pieces of information
-
secret_key_base- which Phoenix uses to encrypt and decrypt session cookies and to generate tokens as we saw in the Magic Login Link in Chapter 8. -
PostgreSQL database credentials.
Instead of supplying these details in the development machine where we are generating the release, we can supply this information as environment variables on the production system. So let’s delete this file from our local machine and modify config/prod.exs to add the following code
config :mango, MangoWeb.Endpoint,
secret_key_base: System.get_env("SECRET_KEY_BASE")
config :mango, Mango.Repo,
adapter: Ecto.Adapters.Postgres,
pool_size: 15Most importantly remove the line import_config "prod.secret.exs" from config/prod.exs because we just deleted this file. With this configuration in place, we are ready to generate our release files.
Setting Up Static Files
We have been using Brunch on our development machine to watch changes to our static files such as CSS and JS files and copy them to the priv/static folder. On the production machine, we will not have Brunch to deliver these files to the priv/static folder. So before we create our release, we need to
-
Generate production version of our asset files and copy them to
priv/static -
Create compressed versions of these generated files suitable for deployment.
From within our project’s assets directory, run the following command
./node_modules/.bin/brunch b -pThis populates priv/static directory with production version of the static files.
Next, run
MIX_ENV=prod mix phx.digestto generate gzipped version of the static files and a cache manifest file.
The cache_manifest.json file generated by phx.digest deserves some explanation as it does interesting work behind the scenes. The content of the file is shown below
cache_manifest.json{
"version":1,
"latest": {
"css/app.css":"css/app-85c76079eef96244b4c31c7fecfb7e22.css",
"js/app.js":"js/app-42825cacf468fbd616044f007471b83b.js",
"product_images/Banana.jpeg":"product_images/Banana-ce6caaf5c9f5b6964c3318736a758d84.jpeg",
(...)
}
"digests": {
"css/app-85c76079eef96244b4c31c7fecfb7e22.css":{
"size":154388,
"mtime":63665941872,
"logical_path":"css/app.css",
"digest":"85c76079eef96244b4c31c7fecfb7e22"
},
(...)
}
}As seen above, cache_manifest.json maps the asset file names such as css/app.css to the file names of the digest version and also contains various details about the digest version such as its size and modification time. Phoenix uses this information to generate links to the static files within our template. Our layout file has the following code
<link rel="stylesheet" href="<%= static_path(@conn, "/css/app.css") %>">Phoenix uses the above digest information present in the cache_manifest.json to generate a link to the digest version of app.css. The end result is that we get the HTML output as below:
<link rel="stylesheet" href="/css/app-85c76079eef96244b4c31c7fecfb7e22.css?vsn=d">Notice the link to app.css is now referring to the digest version of the css file.
Finally let’s modify our Endpoint module at lib/mango_web/endpoint.ex to serve gzipped versions of static files.
plug Plug.Static,
at: "/", from: :mango, gzip: true, (1)
only: ~w(css fonts images product_images js favicon.ico robots.txt)| 1 | Change gzip value to true. |
Create Release Files
With all these preparations done, we are now good to go for generating the release files.
Run
MIX_ENV=prod mix release --env=prodNote the use of prod twice. The first use is refers to the Mix environment while the last one is the release environment.
Distillery documentation explains in detail why we need to use prod twice in the above command.
The Mix environments and release environments represent two distinct concepts, though they appear to be the same.
the Mix environment is used during compilation to determine what dependencies to fetch/build, it can be used to compile modules differently based on environment, and it determines what configuration to use. In some cases this aligns perfectly with your deployment environments, but not always. For example, you may build with MIX_ENV=prod for both production and staging environments, but want different release configurations for each of them.
This command takes awhile to compile all the files. Upon successful completion it generates the following output:
Generated mango app
==> Assembling release..
==> Building release mango:0.0.1 using environment prod
==> Including ERTS 8.2 from /usr/local/Cellar/erlang/19.2/lib/erlang/erts-8.2
==> Packaging release..
==> Release successfully built!
You can run it in one of the following ways:
Interactive: _build/prod/rel/mango/bin/mango console
Foreground: _build/prod/rel/mango/bin/mango foreground
Daemon: _build/prod/rel/mango/bin/mango startTake time to browse through the files generated at _build/prod/rel/mango. These are the files that we need to copy to the remote server for deploying our app. The folder contains all the compiled BEAM files and contains a few shell scripts for running our app.
Distillery also gives a single compressed tar file containing all files needed for our deployment. This is convenient as we can just copy this single file to the remote server and extract it there. The compressed file present at _build/prod/rel/mango/releases/0.0.1/mango.tar.gz, where 0.0.1 represents the current version of our app as defined in mix.exs file
defmodule Mango.Mixfile do
use Mix.Project
def project do
[app: :mango,
version: "0.0.1",
(...)
]
end
(...)
endGenerating Release Files on macOS
The above release works only if the development system where the release is created has the same operating system and architecture as the production system. If our development machine is macOS and the production server is running on Ubuntu, the release file created on macOS will not run on the production server.
In the case where our system OS and architecture don’t match, we can follow the same steps as previously outlined with the exception of generating the release file. When we have a miss match in the OS/architecture of our development machine and server, we will use a Docker container running a linux distro to build the release file. The rest of the steps outlined work exactly the same.
If you haven’t installed docker, download Docker for macOS from https://docs.docker.com/docker-for-mac/install/ and install it.
Create a new file Dockerfile.build on our project folder with the following contents
FROM elixir:1.4.0
# Install hex
RUN /usr/local/bin/mix local.hex --force && \
/usr/local/bin/mix local.rebar --force && \
/usr/local/bin/mix hex.info
WORKDIR /app
COPY . .
RUN mix deps.getThe above file builds a Docker container with Elixir 1.4 installed. We copy the contents of our current folder i.e., our project files into /app inside the Docker container and run mix deps.get.
To actually build a Docker image with the above specification, run the following command:
docker build --tag=build-mango -f Dockerfile.build .We create a new Docker image named build-mango using the specifications mentioned in Dockerfile.build.
Finally, we run the mix release command on the Docker image. Though the release is being built inside the Docker container, we want the output to be available on our host machine macOS. To do this, we attach the volume _build folder of our current directory to the app/_build folder inside the Docker image. This way Docker writes to the volume accessible by the host machine. Because we need the Docker image to write to a folder in the host machine, we need to set our folder permission for the _build directory to be liberal.
# Set folder permission
chmod -R 777 _build
# Create release
docker run --rm -e MIX_ENV=prod -v $PWD/_build:/app/_build build-mango mix release --env=prodThe above command generates the release and puts it inside the _build folder of our project. We can now copy this file to the remote server running on Ubuntu and it will work because the release is created inside the Docker image running on Linux.
Transfer Release Files to Production Server
Copy the release tar file to the production server using any file transfer method. We will use scp as it’s easy and convenient to do from the terminal.
scp _build/prod/rel/mango/releases/0.0.1/mango.tar.gz deployer@server:/home/deployerLogin to the server and extract the files
ssh deployer@server
cd /home/deployer
tar zxvf mango.tar.gzStart Our App on the Production Server
From inside the extracted directory run the following commands to start our app. We need to provide the various required values as environment variables through export.
export PORT=4001 (1)
export DATABASE_URL=ecto://postgres:postgres@localhost/mango_prod (2)
export SECRET_KEY_BASE=NvfW9LM1Xv9F3OqHxAb7Yo6InV4sdmOgSZWYggMnqU3j0EARHhI/zCeB8Ryf5TON (3)
./bin/mango start| 1 | PORT number on which Cowboy server listens for requests. |
| 2 | Provide the database credentials in URL format ecto://username:password@host/database_name. Ensure the database already exists and is accessible with the credentials given. |
| 3 | Use mix phx.gen.secret to generate a random string and use it as SECRET_KEY_BASE. |
Access http://0.0.0.0:4001 (replace 0.0.0.0 with actual IP address) or http://yourhostname:4001` on your browser and we get this error:
Internal server errorThis is because we haven’t run our database migrations. While we have the database accessible, we haven’t yet created the necessary tables in it.
That should be simple. Can we run the migration using mix ecto.migrate?
No. mix is a command line tool that comes with installing the Elixir language. On the production server we only have the file with the ERTS; not an installation of Elixir. Also, mix requires the source code of the mix.exs files to perform many of its jobs and we don’t have that on the production server either. With the mix option ruled out, we need a way to run the migrations manually. Luckily, Ecto gives us an API to for this purpose.
Run the following command to connect to an IEx console connected to the running application:
./bin/mango remote_consoleAnd run the following code.
migrations_path = Path.join([:code.priv_dir(:mango), "repo", "migrations"]) (1)
Ecto.Migrator.run(Mango.Repo, migrations_path, :up, all: true) (2)| 1 | We store the location of the migration files in the migrations_path |
| 2 | We call Ecto.Migrator.run to execute the migrations on our database. |
Access http://0.0.0.0:4001 again and we should now see our app, although there are no products displayed.
To stop the server, we need to run the following command:
./bin/mango stopThat’s a long journey to deploy our app. We still have a few pain points to address, specifically we need:
-
A better way to run the migrations and seed data
-
Access our app without any port number in the url (i.e., access on port 80)
-
To handle the scenario where our host server restarts and we need to have our app running automatically.
We will address these one by one.
Handle Database Migrations and Seed Data
Create a new file at lib/release_tasks.ex with the following content:
defmodule Mango.ReleaseTasks do
# Modify below with app name and Repo name
@app :mango
@repo Mango.Repo
# Do not modify anything from here:
@start_apps [
:postgrex,
:ecto
]
def migrate do
IO.puts "Loading mango.."
# Load the code for mango, but don't start it
:ok = Application.load(@app)
IO.puts "Starting dependencies.."
# Start apps necessary for executing migrations
Enum.each(@start_apps, &Application.ensure_all_started/1)
# Start the Repo for mango
IO.puts "Starting repos.."
Mango.Repo.start_link(pool_size: 1)
# Run migrations
Ecto.Migrator.run(@repo, migrations_path(@app), :up, all: true)
# Signal shutdown
IO.puts "Success!"
:init.stop()
end
defp migrations_path(app) do
Path.join([:code.priv_dir(@app), "repo", "migrations"])
end
endThe above file is a slightly modified version of what is found on the official documentation of Distillery
This is the same functionality as what we did in the IEx shell but wrapped in a nicely named module.
Now we need a way to call the function defined in this module easily on the production server. We have already used a Distillery shell command to start our application using bin/mango start. Ideally, we could have another command such as bin/mango migrate to migrate all the database changes. Conveniently, Distillery allows us to create arbitrary commands like this by simply writing the steps to handle the task. We will do exactly that now.
Create a new shell script at rel/commands/migrate.sh with the following contents
#!/bin/sh
bin/mango command Elixir.Mango.ReleaseTasks migrateEdit the rel/config.exs and modify the existing release code block as shown below:
release :mango do
set version: current_version(:mango)
set applications: [
:runtime_tools
]
set commands: [
"migrate": "rel/commands/migrate.sh"
]
endIf we now make a fresh Distillery release and copy the release files to the server we can run the new commands
./bin/mango migrateAs an exercise, you can write a new command to run the seed.exs file on the production server. Seed data should be imported if we run the following command on the server:
./bin/mango seedServing Our App on Port 80
We could change the PORT number to 80 when starting our application. However, only one site can be accessed at port 80 by this method. The alternative is to use a web server such as Nginx to handle multiple sites on port 80 and have it proxy the request to individual Phoenix apps running on different ports. We will see how to configure Nginx to serve our app.
Installing Nginx
sudo apt-get update
sudo apt-get install nginxCreate a new file at /etc/nginx/sites-enabled/mango.conf with the following content
upstream mango {
server 127.0.0.1:4001 max_fails=5 fail_timeout=60s; (1)
}
server {
server_name mango.yourdomain.com; (2)
listen 80;
location / {
allow all;
# Proxy Headers
proxy_http_version 1.1;
proxy_set_header X-Forwarded-For $proxy_add_x_forwarded_for;
proxy_set_header Host $http_host;
proxy_set_header X-Cluster-Client-Ip $remote_addr;
# The Important Websocket Bits!
proxy_set_header Upgrade $http_upgrade;
proxy_set_header Connection "upgrade";
proxy_pass http://mango;
}
}| 1 | Use the same PORT number on which our app is running. |
| 2 | Change the server_name to desired domain name. |
Restart Nginx using the command:
sudo systemctl nginx restartNow access the site using the domain name configured. In the example above, the site is available at http://mango.yourdomain.com.
Managing Host Restarts
We have done everything needed for running our app. But, if the host system restarts our app will not run automatically. Currently if the host restarts we need to login to the server and start the app manually. Ubuntu 16.04 comes with systemd service which takes care of the services that need to be started automatically when the system boot up. We will configure systemd letting it know how to start and stop our app and then configure it to start the app automatically.
Create a new file at /etc/systemd/system/mango.service with the following content:
[Unit]
Description=Mango Shop
After=network.target
[Service]
Type=simple
User=deployer
Group=deployer
WorkingDirectory=/home/deployer/mango
ExecStart=/home/deployer/mango/bin/mango start
ExecStop=/home/deployer/mango/bin/mango stop
Restart=on-failure
Type=forking
RestartSec=5
Environment=LANG=en_US.UTF-8
Environment=PORT=4001
Environment=DATABASE_URL=ecto://postgres:postgres@localhost/mango_prod
Environment=SECRET_KEY_BASE=NvfW9LM1Xv9F3OqHxAb7Yo6InV4sdmOgSZWYggMnqU3j0EARHhI/zCeB8Ryf5TON
SyslogIdentifier=mango
[Install]
WantedBy=multi-user.targetNotice that we have moved all our environment variables to this file because during a system restart, systemctl needs to know both the environment variables and the command to start the application.
Run systemctl daemon-reload after creating the file to let systemctl recognize the new service.
Finally run systemctl enable mango.service to start the service now and to run it on system restart.
Summary
In this final chapter, we learned everything it takes to deploy a Phoenix app successfully on an Ubuntu server. We looked into three types of deployment:
-
Mix
-
Distillery Release
-
Distillery Release with Docker
Using Mix to deploy a Phoenix app seems to be the simplest but requires us to install Elixir, Erlang and Nodejs on the server as with our development server. This requirement together with the issue of starting and stopping the server constitutes the main drawbacks of this method.
We then learned about performing a Distillery release and how it’s different from the Mix deployment method. We learned how to run database migrations in a Distillery release as Mix tasks are not available in them. We also learned how to use systemctl to automatically start our application if the physical host server restarts.
Lastly, since Distillery release files can only be run on a system with similar architecture as that of the build system, we learned how to use a Docker Ubuntu image to build our release files when using a macOS system for development. This enables us to deploy the release files on an Ubuntu machine without issues.